

Artists, designers, and enthusiasts may find the LoRA models to be compelling since they provide a diverse range of opportunities for creative expression. They are also quite simple to use with ComfyUI, which is the nicest part about them. In this article, we will demonstrate the exciting possibilities that are associated with LoRA models in ComfyUI.
What is a LoRA?
Stable Diffusion models are fine-tuned using Low-Rank Adaptation (LoRA), a unique training technique. It offers a solution that is particularly useful in the field of artificial intelligence art production by mainly addressing the issues of balancing the size of model files and training power. With LoRAs, users can make model customizations without putting a heavy strain on local storage resources.
An innovative approach has been developed to address these difficulties. LoRA approaches the adaptation of large-scale pre-trained language models in a novel way. The mechanism operates by imbuing each layer of the transformer architecture with trainable rank decomposition matrices and freezing the pre-trained model weights. By employing this novel methodology, the quantity of trainable parameters is drastically diminished, resulting in enhanced operational effectiveness during both the training and inference stages. LoRA enables the scalable execution of AI model integrations into practical tasks, presenting potential resolutions to current obstacles in the implementation of generative AI models.
Stable Diffusion & LoRA's guide by Sebastian Kamph
Stable Diffusion LoRA guide
The LoRA Theory
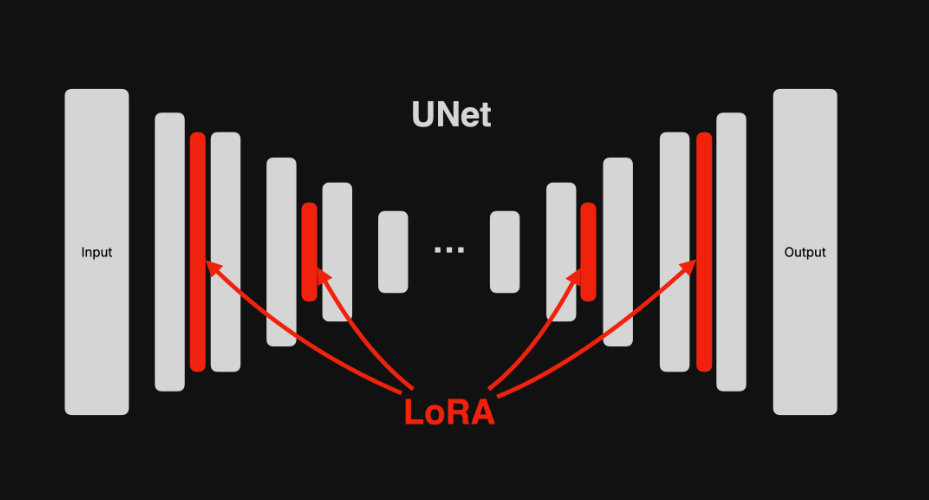
A method known as the UNet algorithm is employed in the series of computations that make up one of LoRA's hypotheses. The data is input into the left side, which is then used to do a series of computations; the data is then shown on the right side. The picture's long bars show the computing steps. The effect of the produced images can be altered by modifying the output results, which are achieved by altering the parameter weights inside the pillars. Without affecting any one function, LoRA permits the injection of parameters into any existing layer. The original model is unharmed, it's plug-and-play, and the model is compact, which is advantageous.
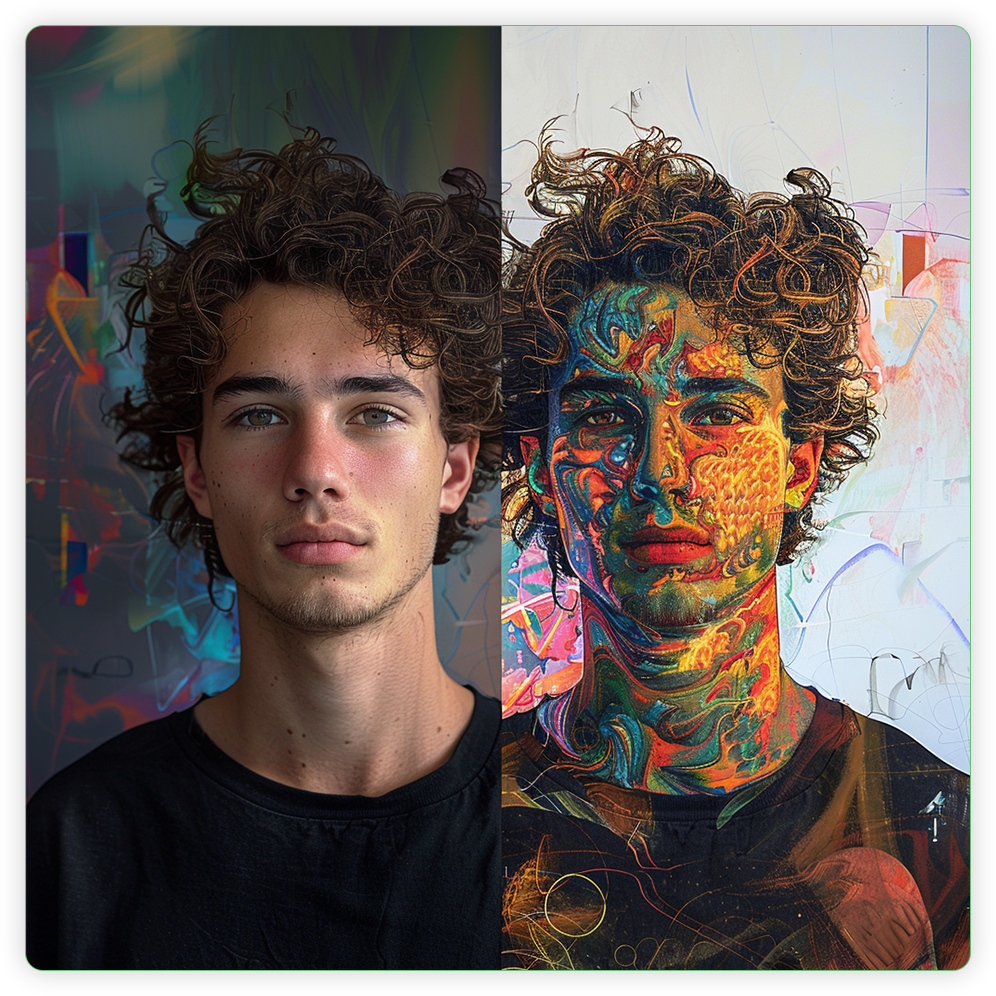
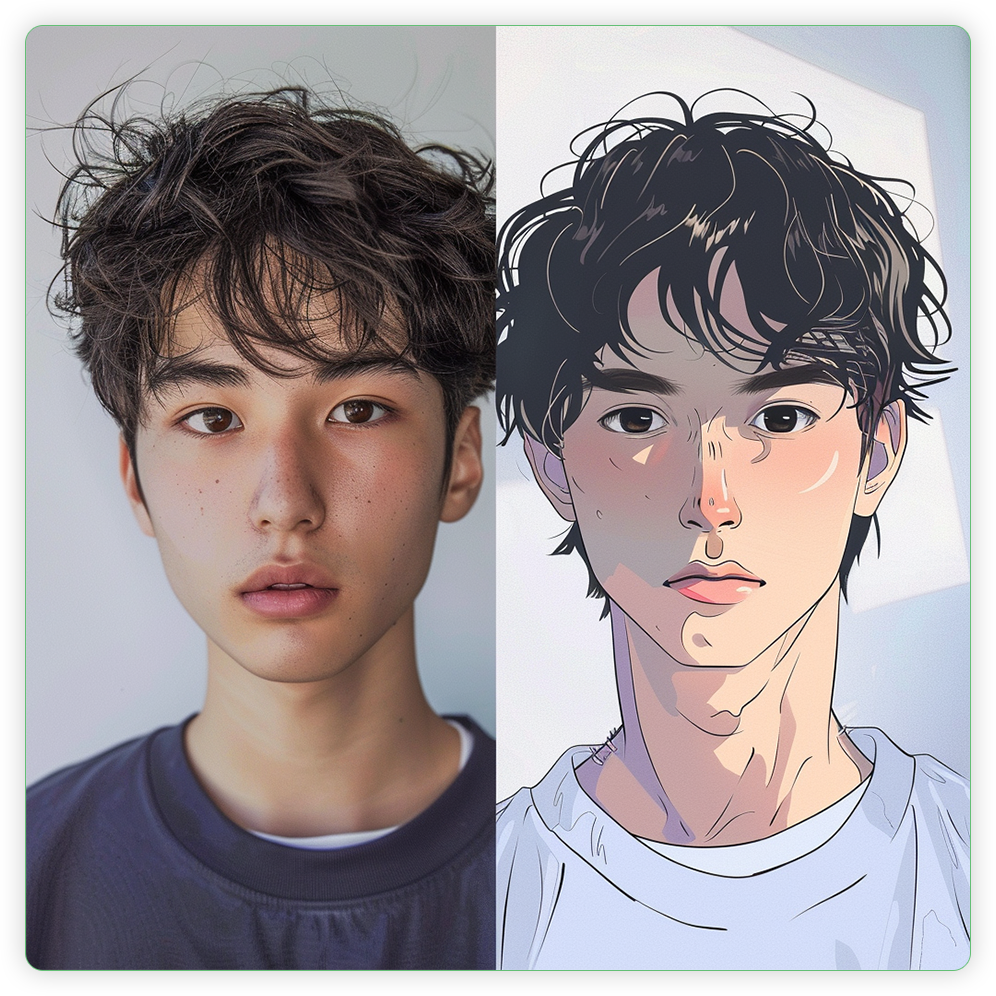
To understand LoRA's, it's helpful to think of it like a "filter" for a camera. You can see that the Prompt and Seed models are identical in the two pictures down below. On one side, we have the original image without any LoRA effects applied, and on the other, we have the image with the LoRA effect applied in a sketch manner.
Where to get LoRA’s?
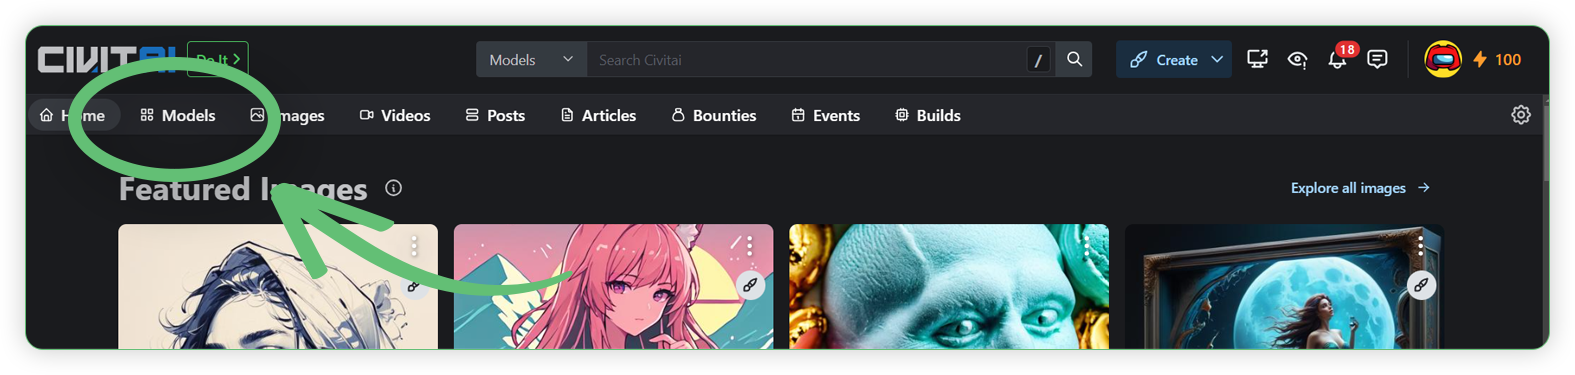
Civitai
Civitai has a thriving community where you can always find fresh and exciting models. To find LoRA models, just simply follow these steps.
- Go to civitai.com and search for models.
- Click the Filters > Check LoRA model and SD 1.5 base model and after setting the filters, you may now choose a LoRA.
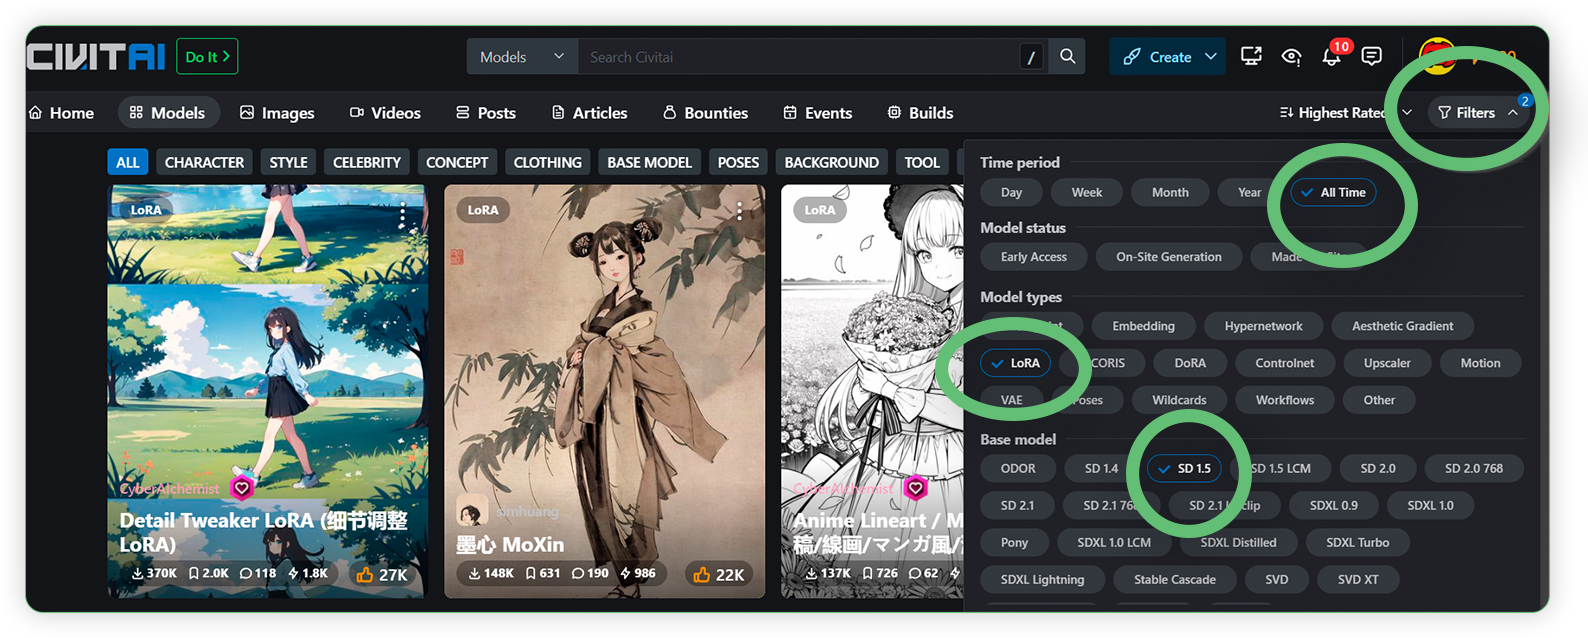
- Click download either on that area for download. Be sure to remember the base model and trigger words of each LoRA.
- Save your LoRA files (SAFETENSORS File format) because you can use these in your instance of ThinkDiffusion.
HuggingFace
- Use this https://huggingface.co/models?other=stable-diffusion&sort=downloads&search=lora when searching for LoRA’s.
- Make sure that the LoRA keyword is used, and the Stable Diffusion left panel filter is selected.
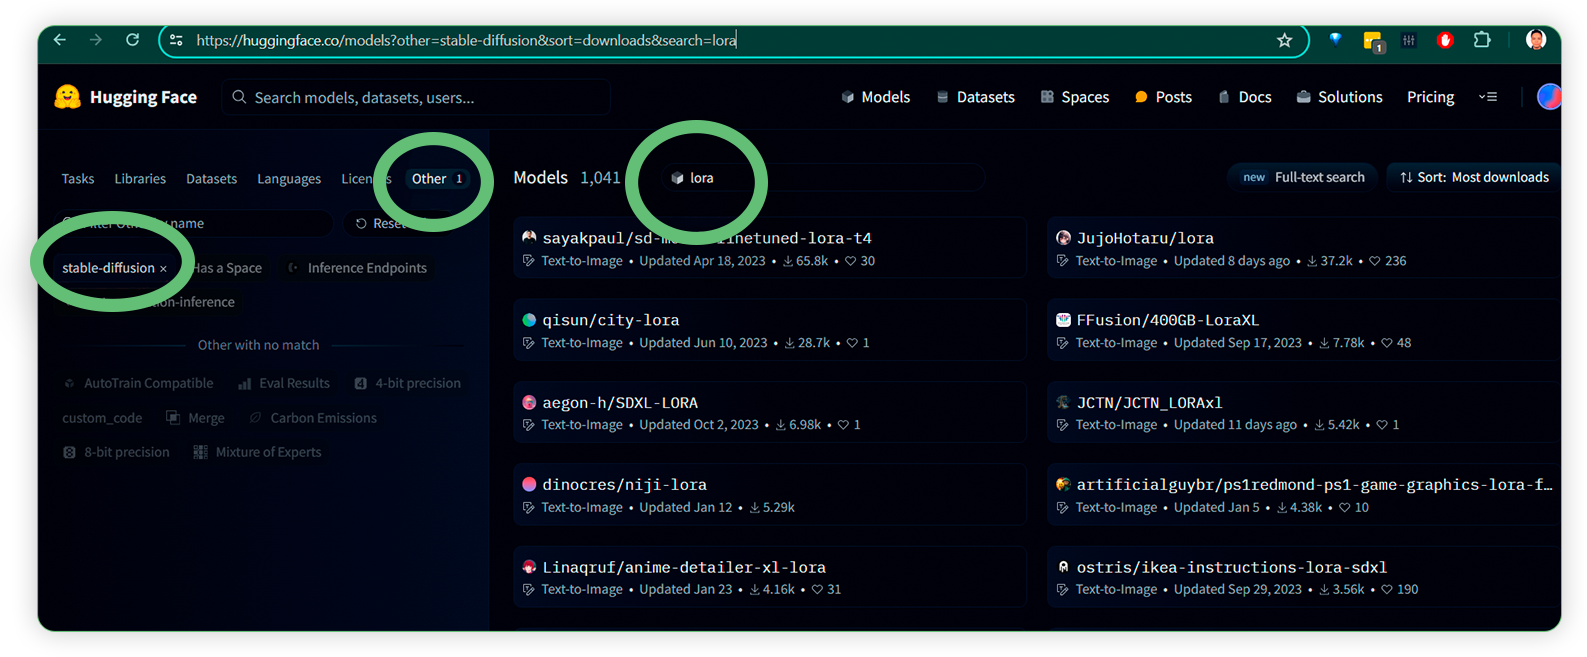
- Choose a LoRA from this list of models available. You can determine what kind of LoRA they are according to the arrowed selection.
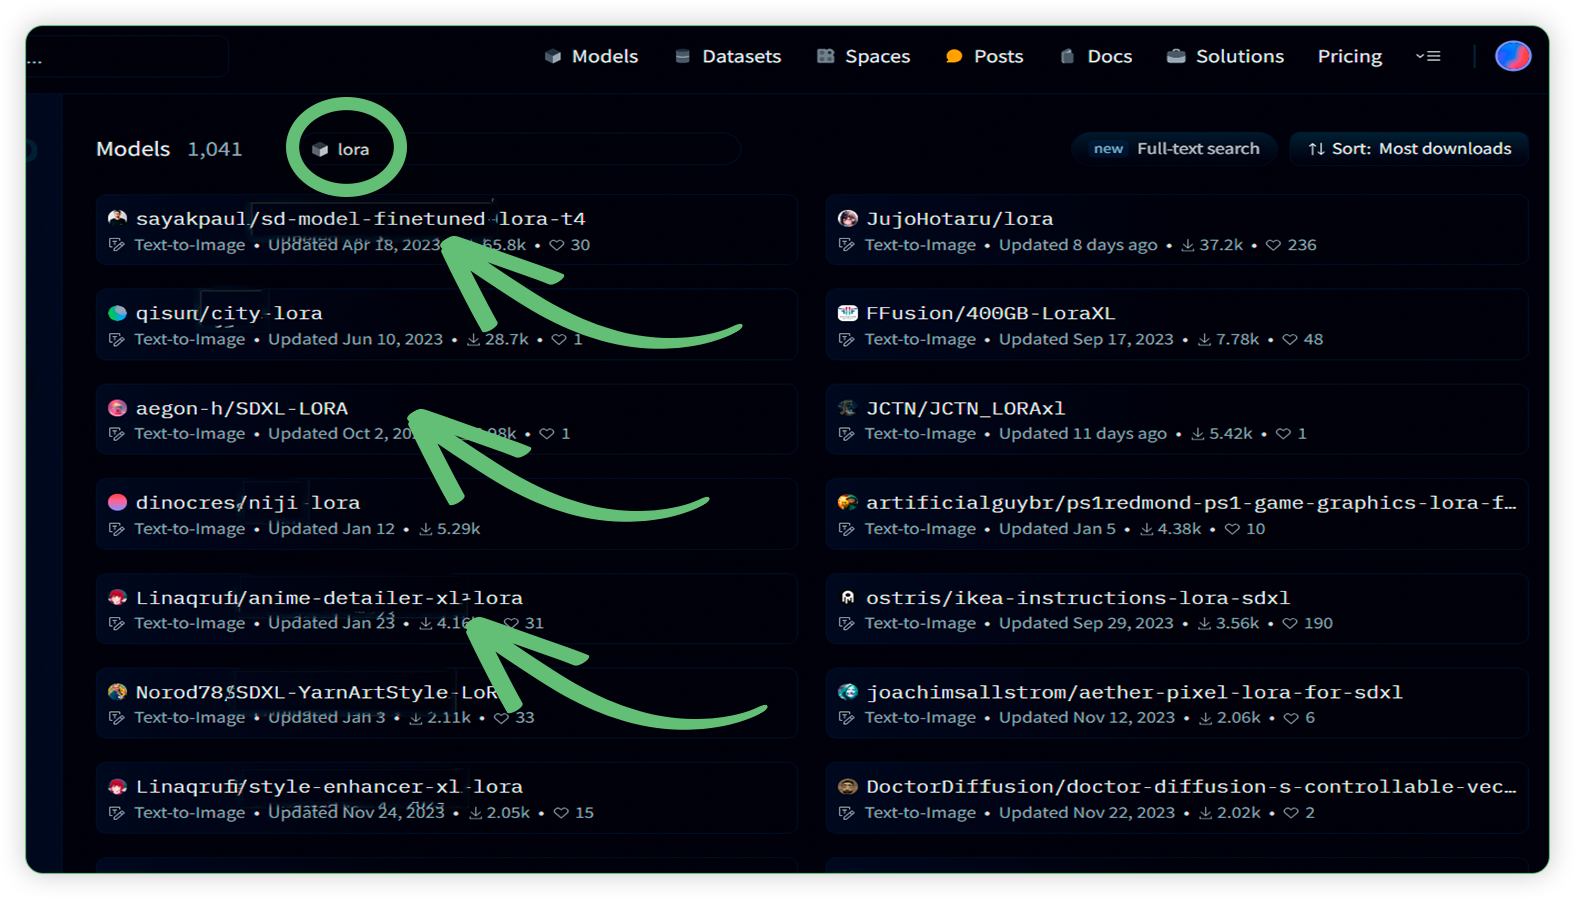
- For example, in the anime-detailer-xl-lora that was selected, it will redirect you to the LoRA page and you will see a Model Card tab which explains the overview, model details and installation process. The right-hand side shows the trigger words that can be used in the text prompt node.
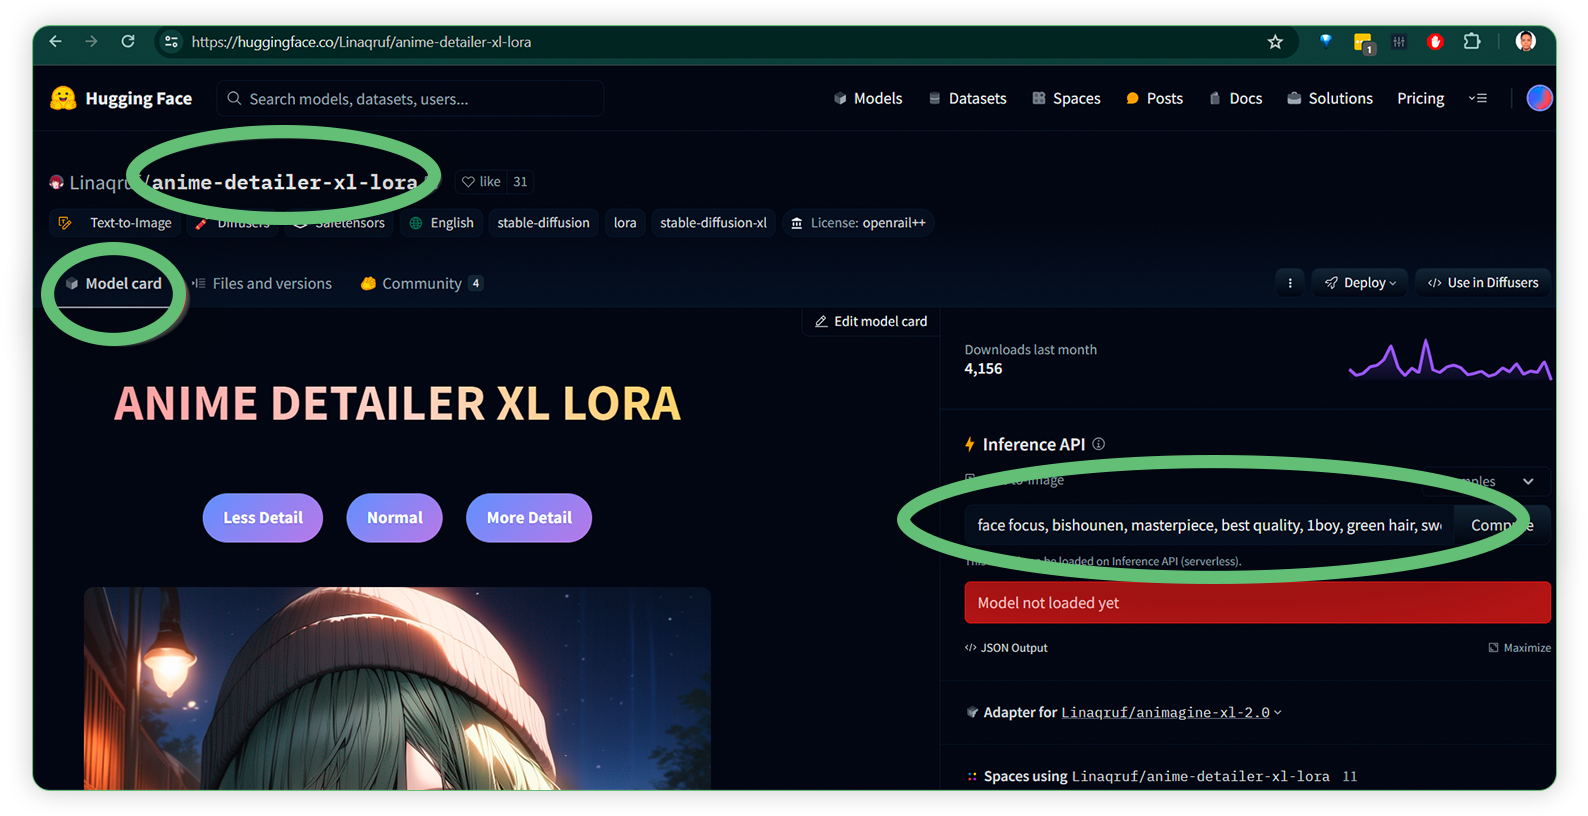
- In the Files and version tab, you can see the list of files and you can download specifically the SAFETENSORS file.

Other sources of LoRA's
Some of the websites like https://prompthero.com/ai-models/lora and https://tensor.art/models may offer a download of LoRA models. Google, Github and Reddit are also helpful in providing LoRA's. But for now, let's hook up to those most visited community websites.
Getting Started with ComfyUI powered by ThinkDiffusion
Load LoRA
Download workflow here: Load LoRA
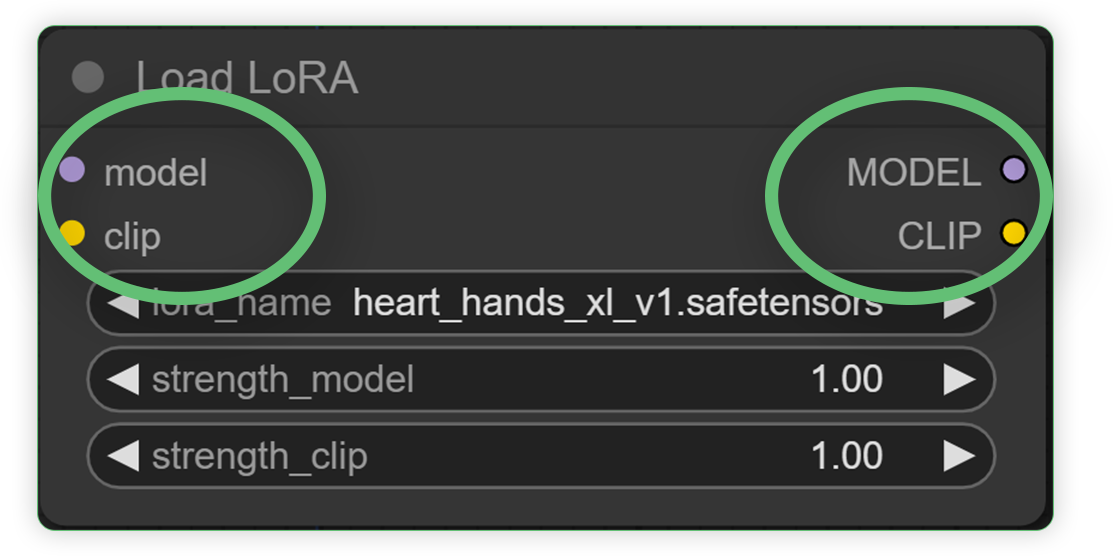
- To use your LoRA with ComfyUI you need this node:
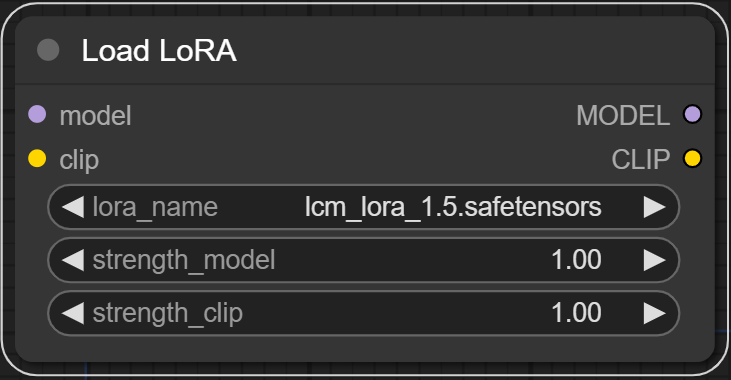
For loading a LoRA, you can utilize the Load LoRA node. By adjusting the LoRA's, one can change the denoising method for latents in the diffusion and CLIP models. Examples of common use-cases include improving the model's generation of specific subjects or actions, or adding the ability to create specific styles. To make even more changes to the model, one can even link several LoRA's together.
You have the option to set the LoRA strength settings to negative numbers. Occasionally, this can lead to fascinating outcomes.
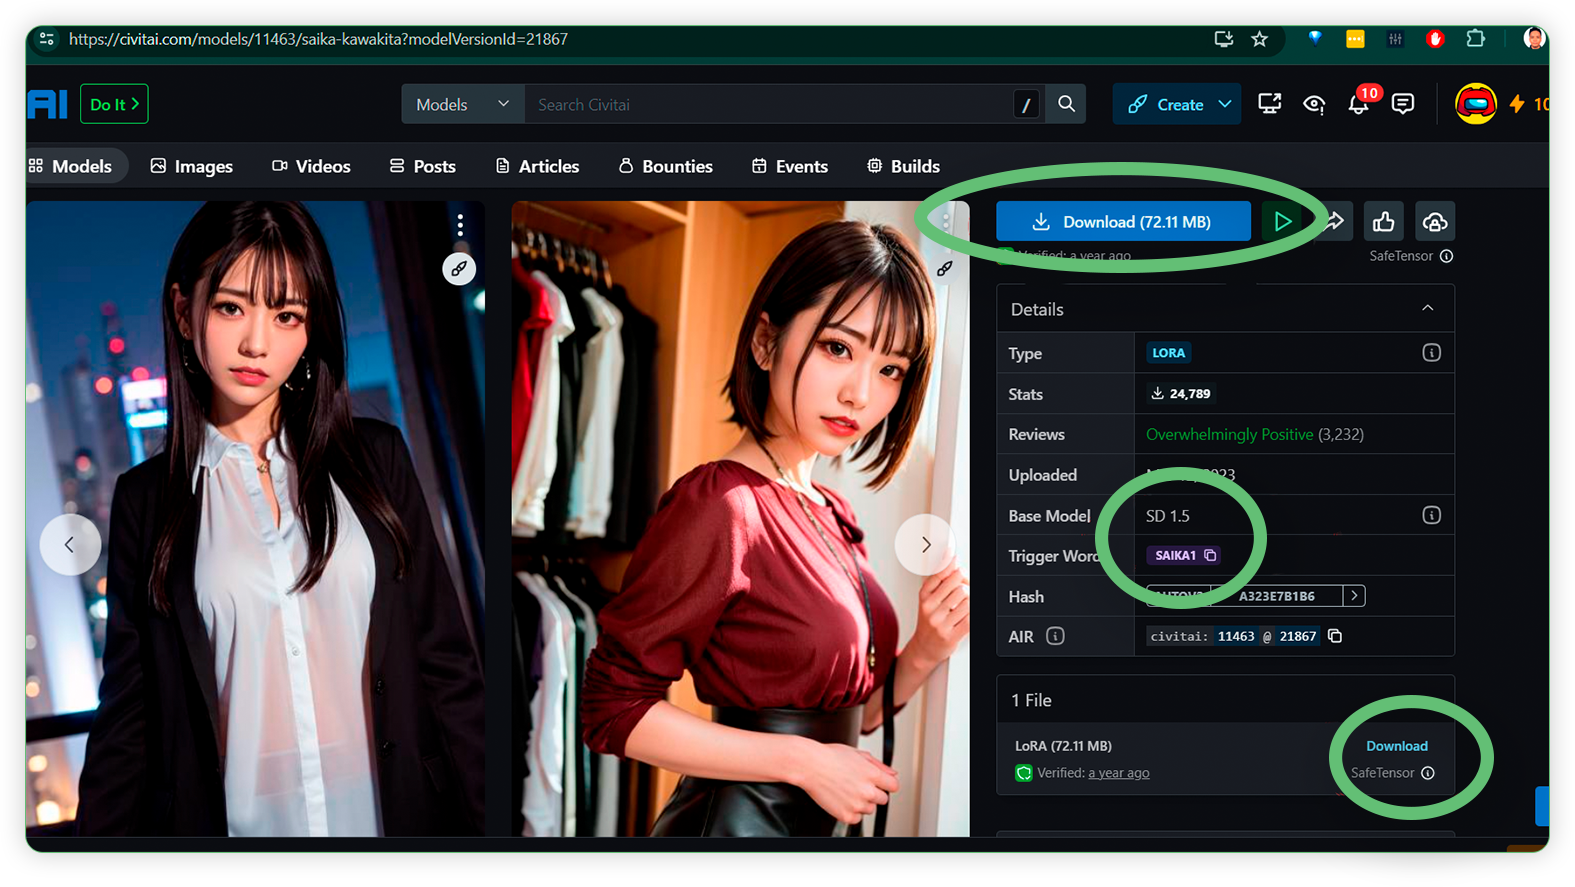
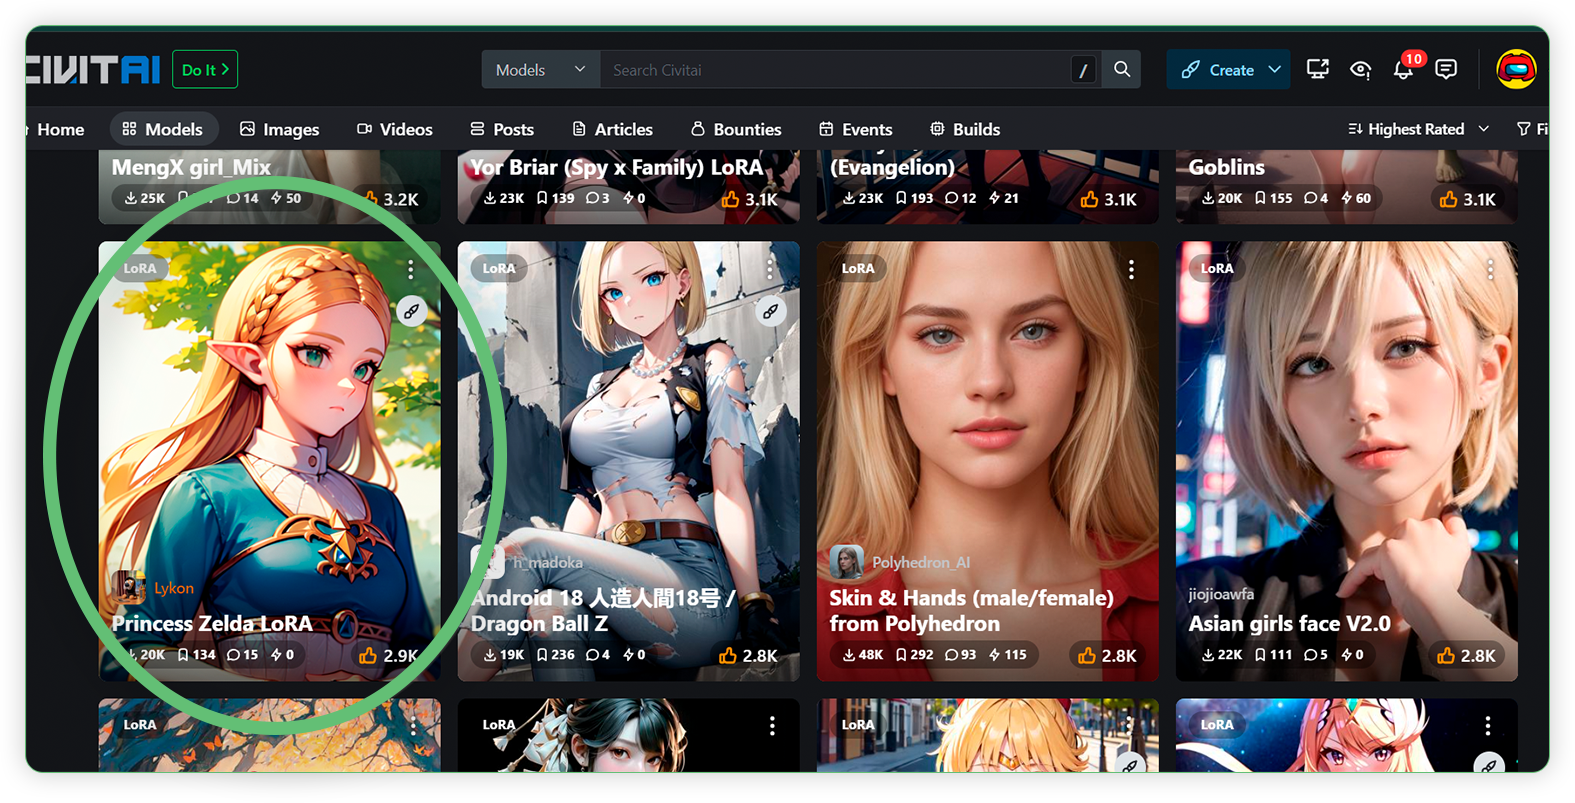
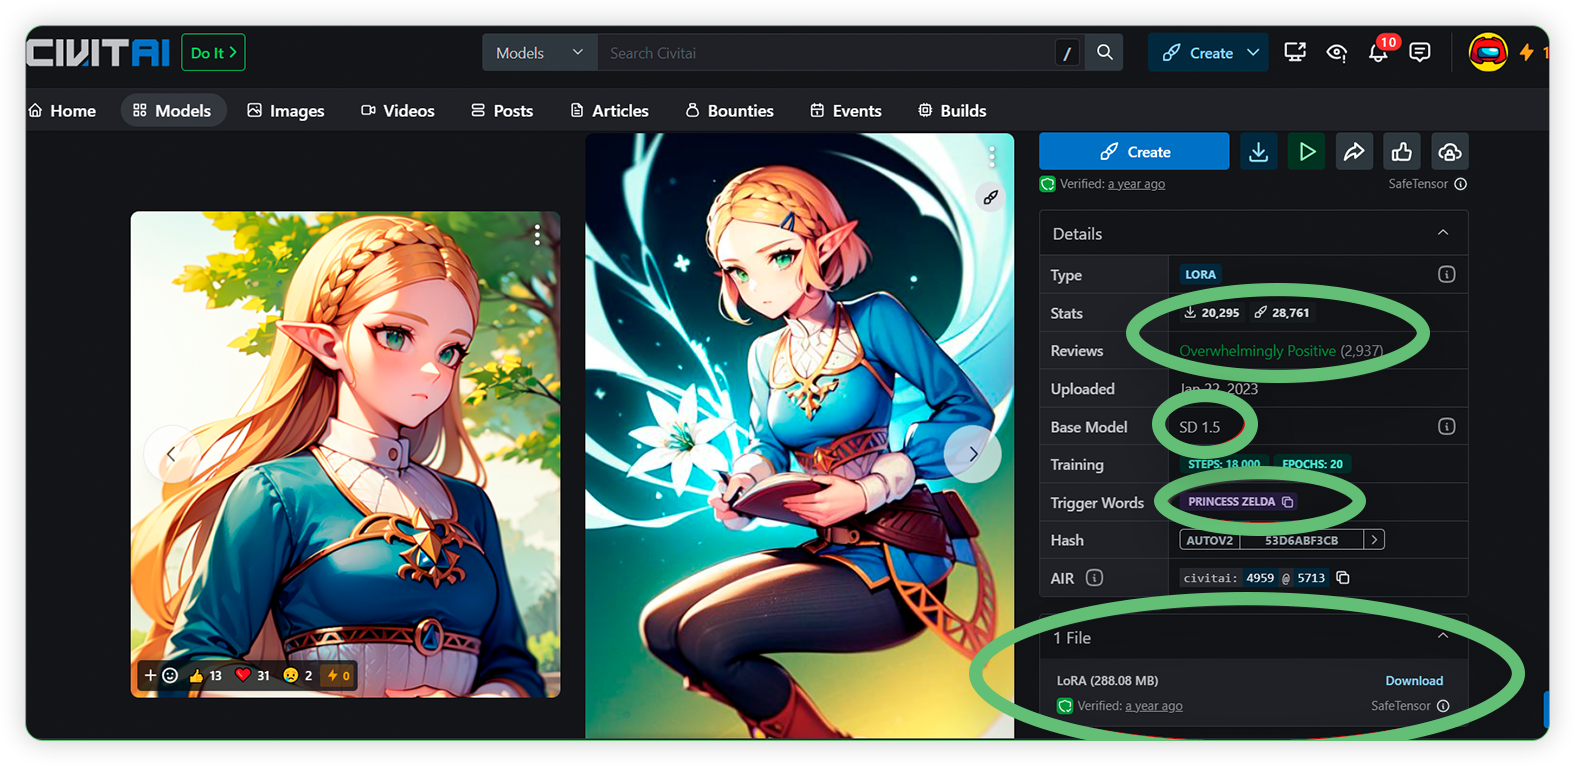
- Look for a LoRA to be used. For tutorial purposes, let's use Princess Zelda LoRA from Civitai.com. https://civitai.com/models/4959?modelVersionId=5713
- Check the right panel of Princess Zelda LoRA page before downloading it. Make sure to check it has good reviews, base model, trigger words and LoRA stats.
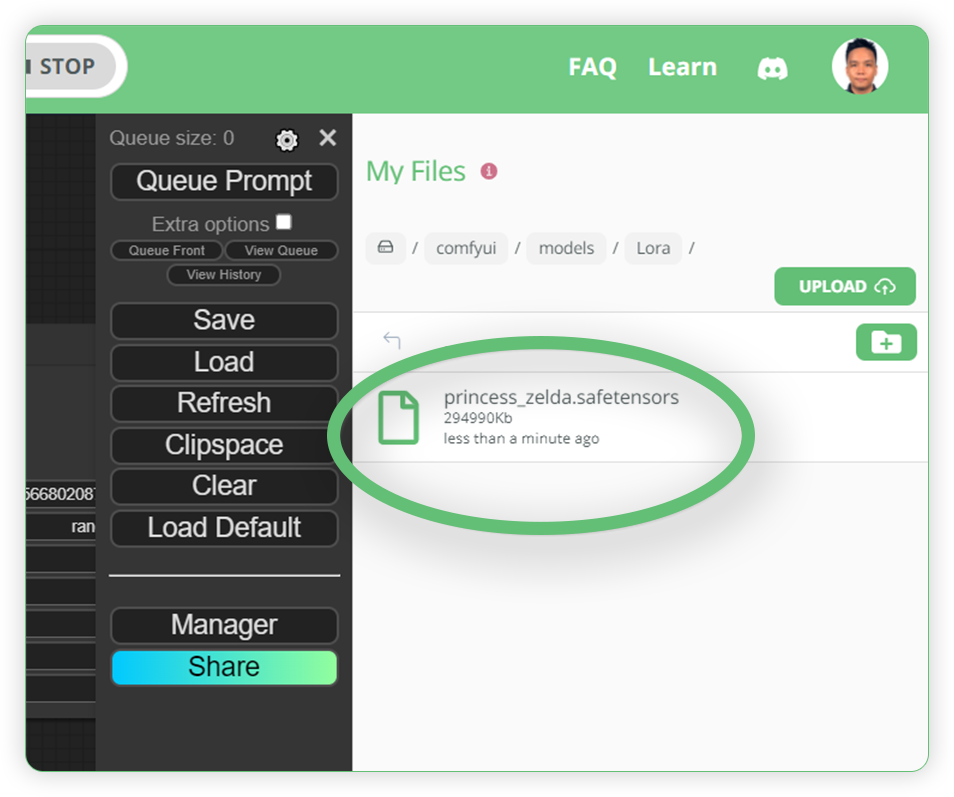
- After downloading the SAFETENSOR file of Princess Zelda. Launch the ComfyUI machine from ThinkDiffusion.

- Upload Princess Zelda LoRA into the ComfyUI machine. The upload feature can be seen on the right side of the ComfyUI machine. If hidden just click the My Files icon at the bottom corner of the browser in order to pop-up the upload panel. Then follow the sequence of folders: comfyui > models > Lora >
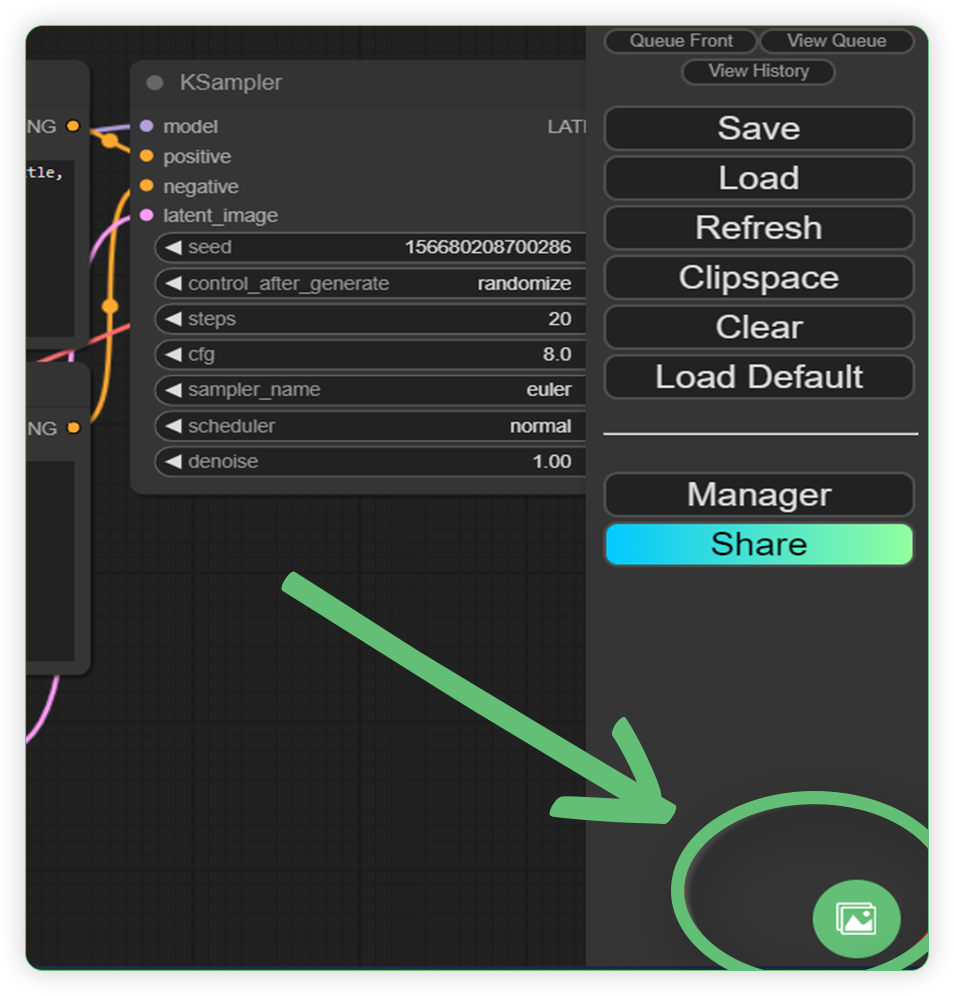
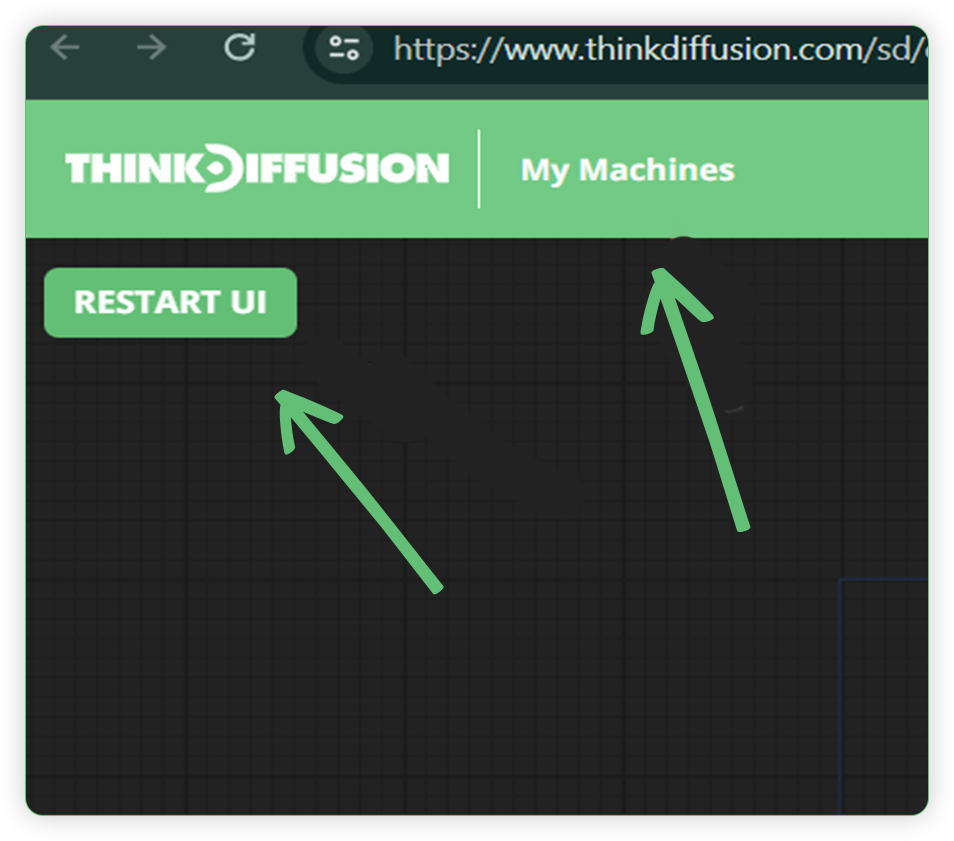
- Restart the ComfyUI machine so that the uploaded file takes effect. You can click the Restart UI, or you can go to My Machines and stop the current machine and relaunch it ( Step 4).
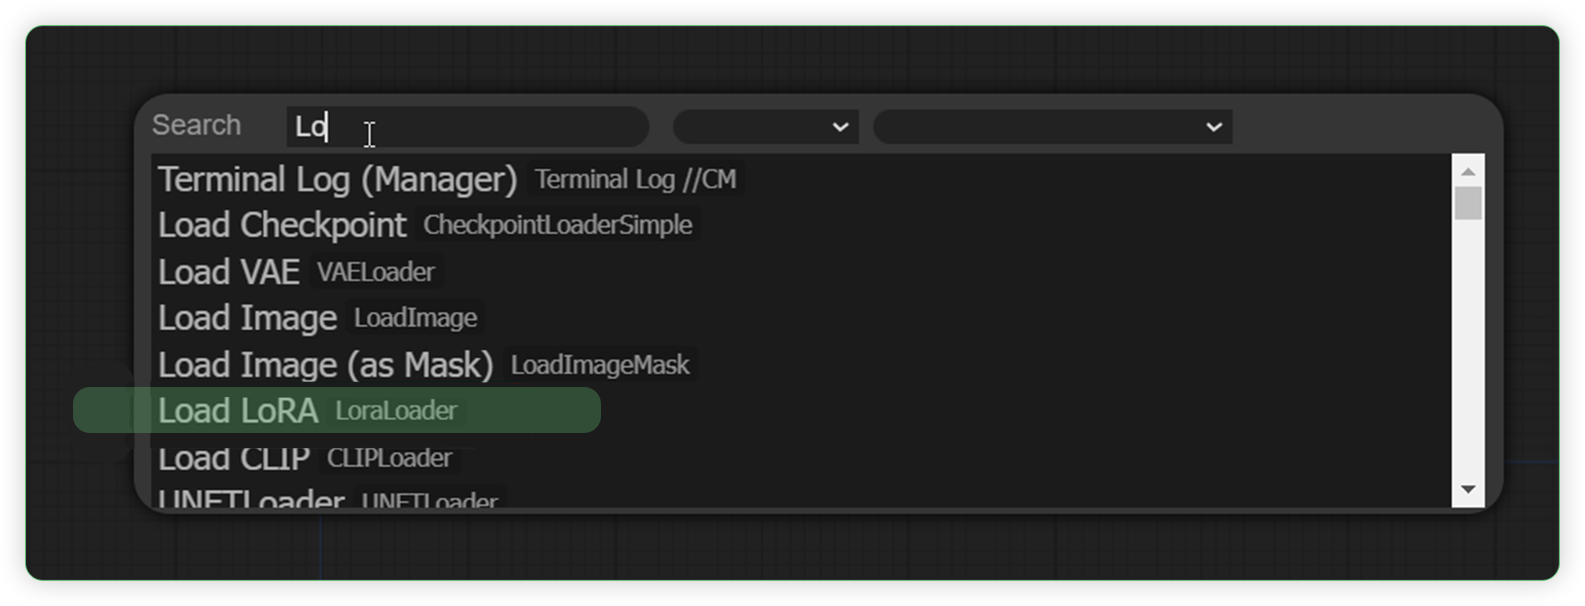
- In the ComfyUI, add the Load LoRA node in the empty workflow or existing workflow by right clicking the canvas > click the Add Node > loaders > Load LoRA. The other way is by double clicking the canvas and search for Load LoRA.

- Once the Load LoRA node appears, connect it to other existing nodes. Connect it by using the same INPUT and OUTPUT to other nodes by simply dragging the point and the connecting wires will appear.
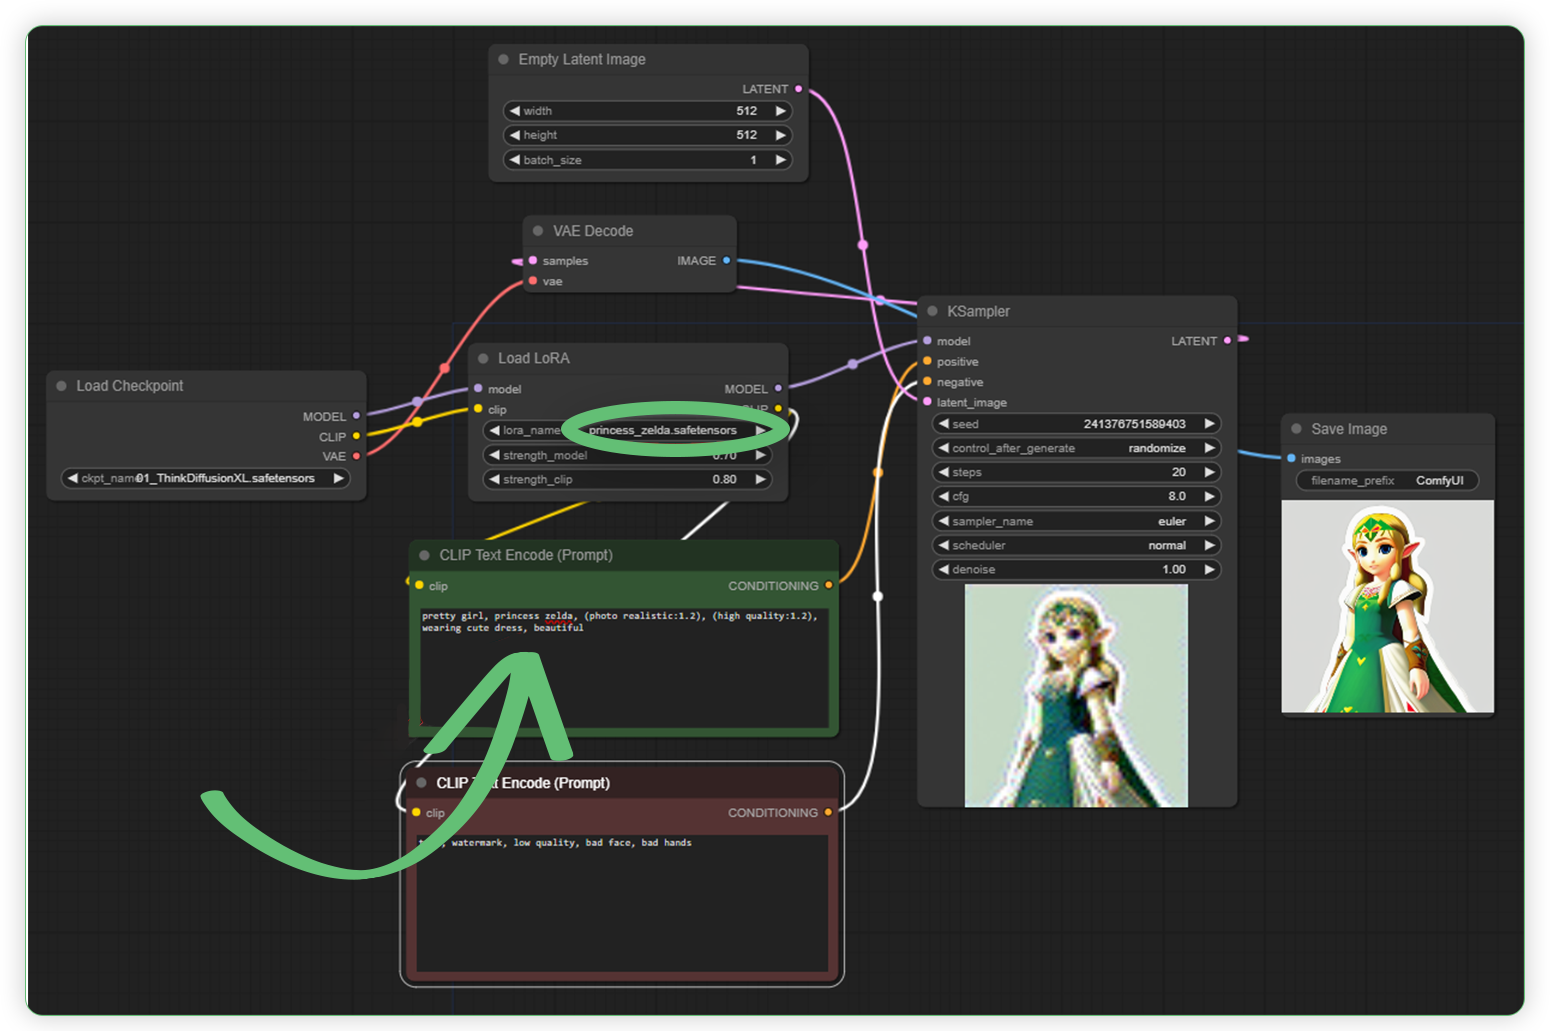
- This is the final setup of the workflow that has a Load LoRA node and is connected to other nodes. Make sure you have selected the correct LoRA_name parameters in Load Lora node and trigger words in the Text Prompt node.
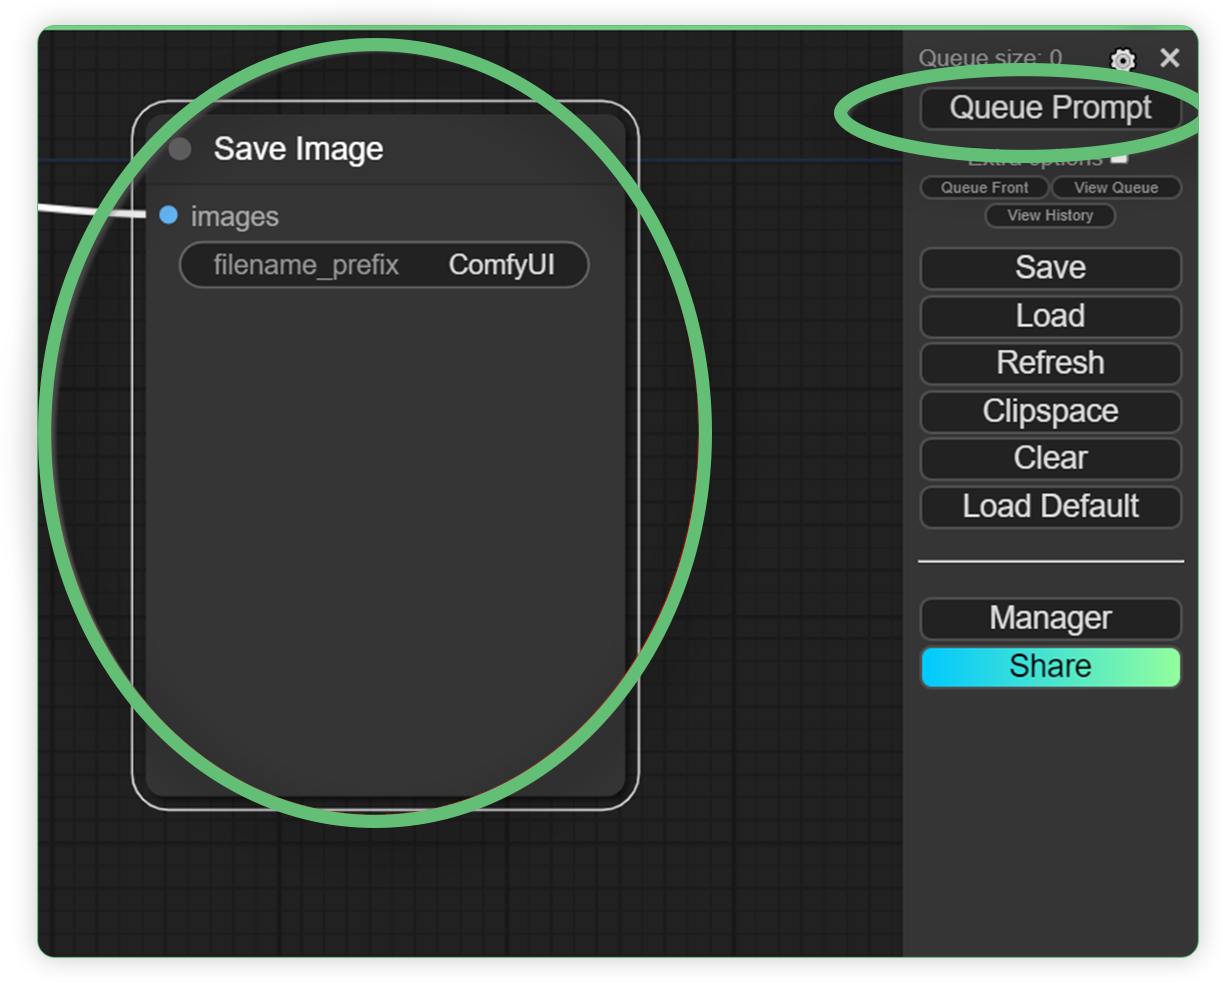
- After the workflow has been setup with the Load LoRA node, click the Queue Prompt and see the output in the Save Image node.
Multiple LoRA’s
Download workflow here: Multiple LoRAs
Yes, you heard it right. You can add multiple LoRA's in a single workflow.
- Look for new LoRAs in websites such as civitai.com and huggingspace.co and download it and upload the SAFETENSOR files to the My Files of ThinkDiffusion. You can follow the steps here:- Where to Get LoRA?. You can add a desired model to your existing workflow such as hand position LoRA, background LoRA, image effects LoRA, etc.
- Go to your workflow and add new LoRA nodes beside the existing LoRA node.
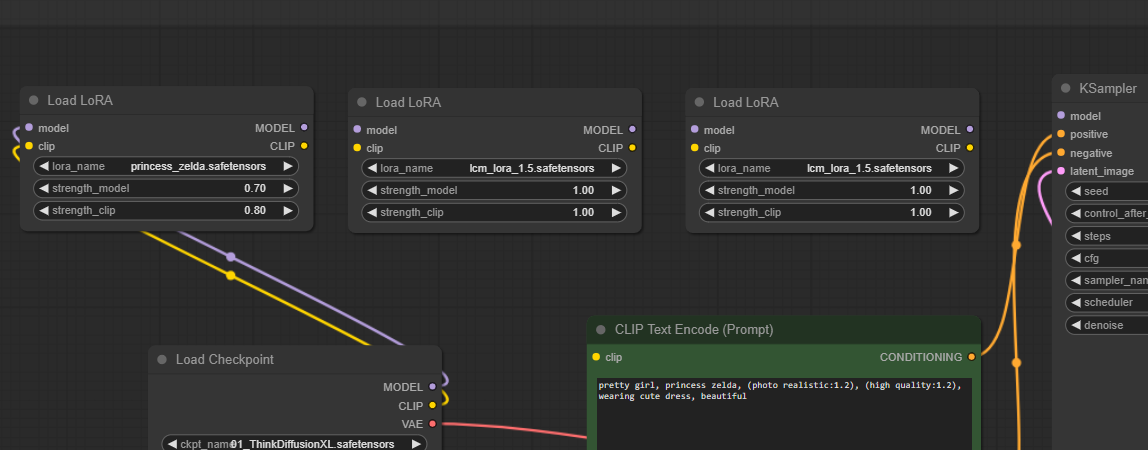
- Connect the multiple LoRA nodes in a series connection. Observe the circled selection as it shows the connected input / output colors.
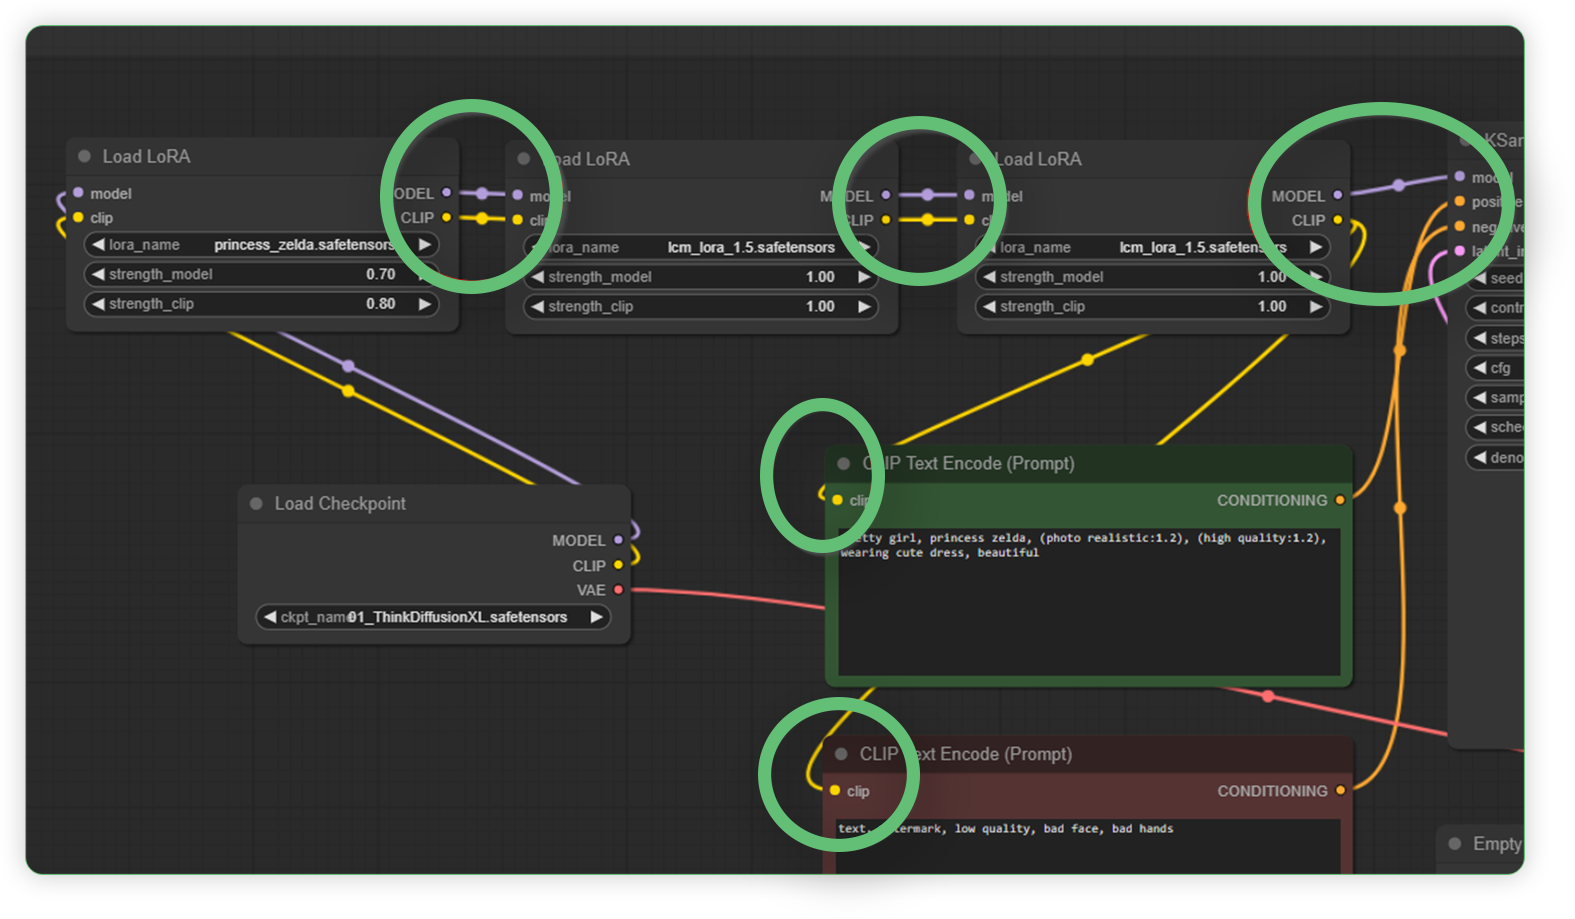
- Set the correct LoRA within each node and include the relevant trigger words in the text prompt before clicking the Queue Prompt. I’m using the princess Zelda LoRA, hand pose LoRA and snow effect LoRA. The example below executed the prompt and displayed an output using those 3 LoRA's.
LoRA Stack
Download workflow here: LoRA Stack
By default, there is no stack node in ComfyUI. All you need to do is to install it using a manager. LoRA Stack is better than the multiple Load LoRA node because it is compact, saves space and reduces complexity. Below are the steps on how to get the LoRA Stack node and how to use it in the workflow.
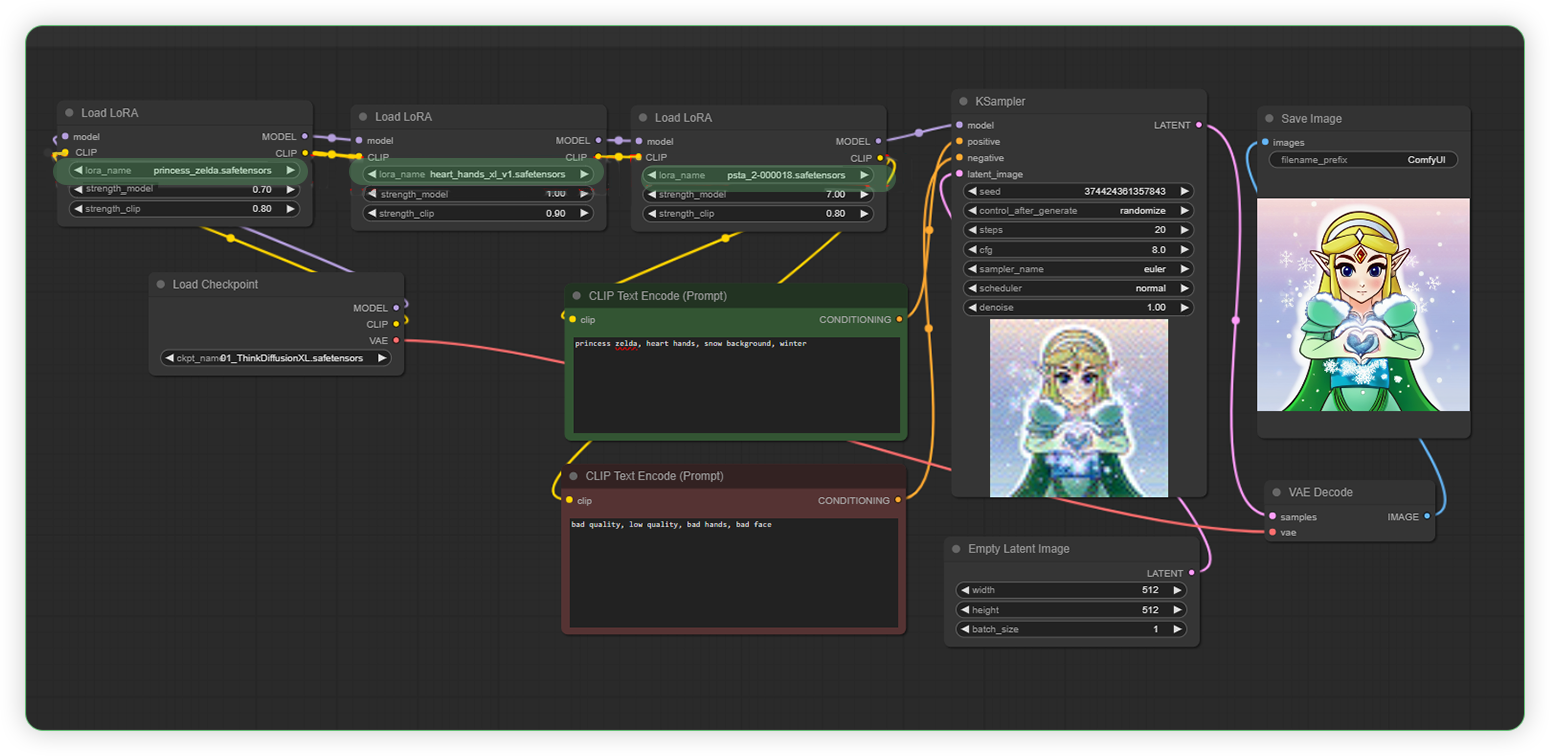
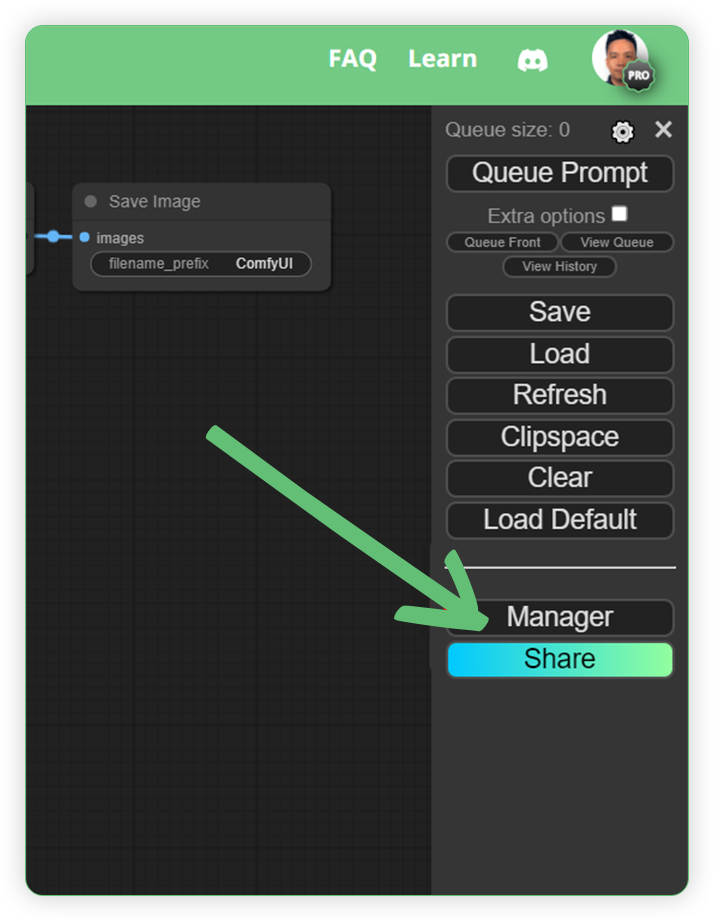
- Go to Manager

- Click Install Custom Nodes
- Search for “comfyroll” in the search box and check the list of available nodes below and click the install.
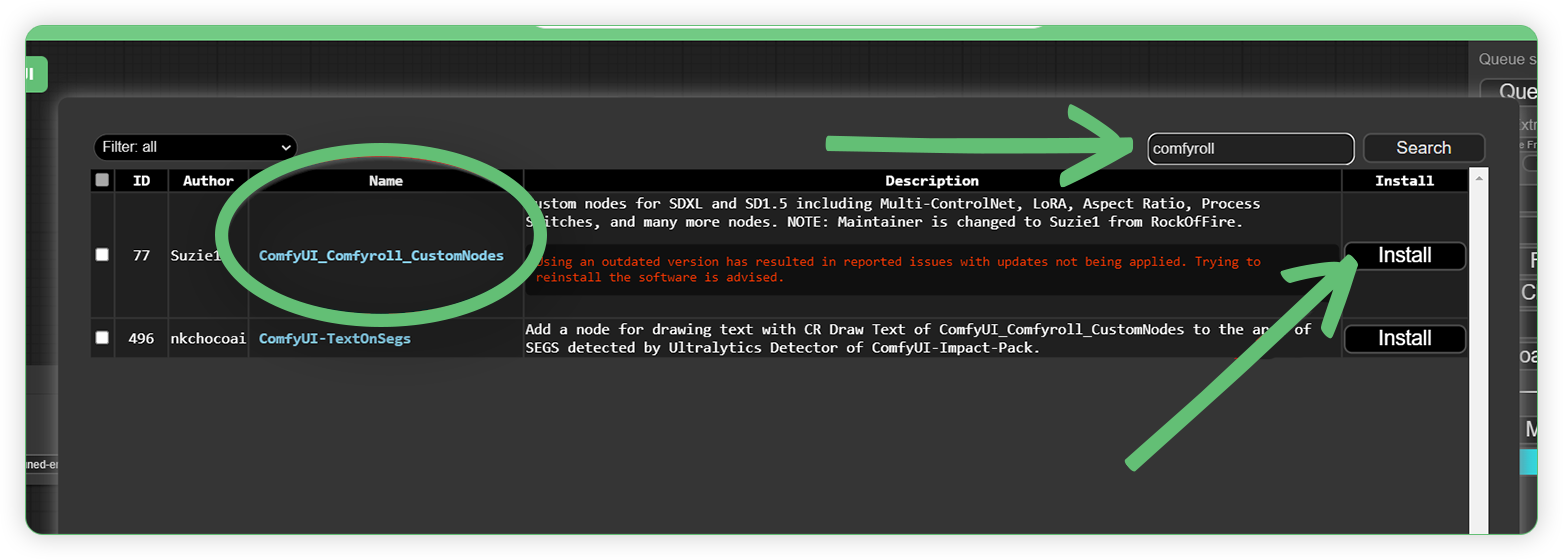
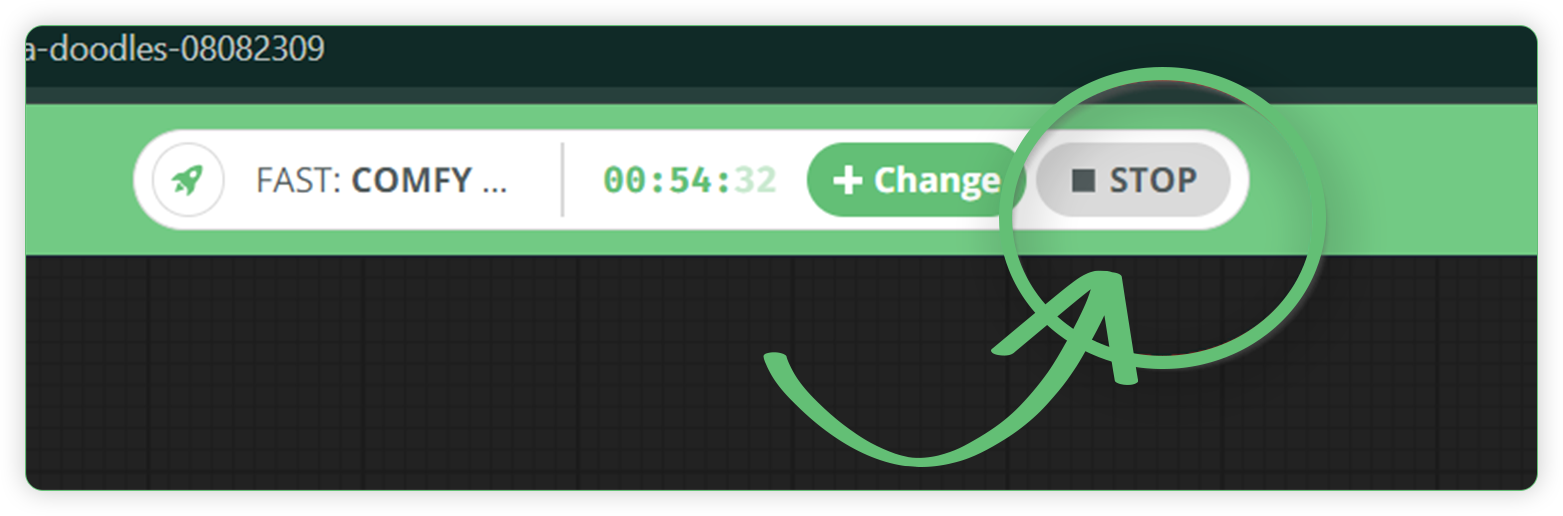
- Don’t forget to restart the ComfyUI machine for the newly installed custom node to take effect. If the node is not yet available in the node list even though the RESTART was already clicked, just click the stop button and relaunch the machine.
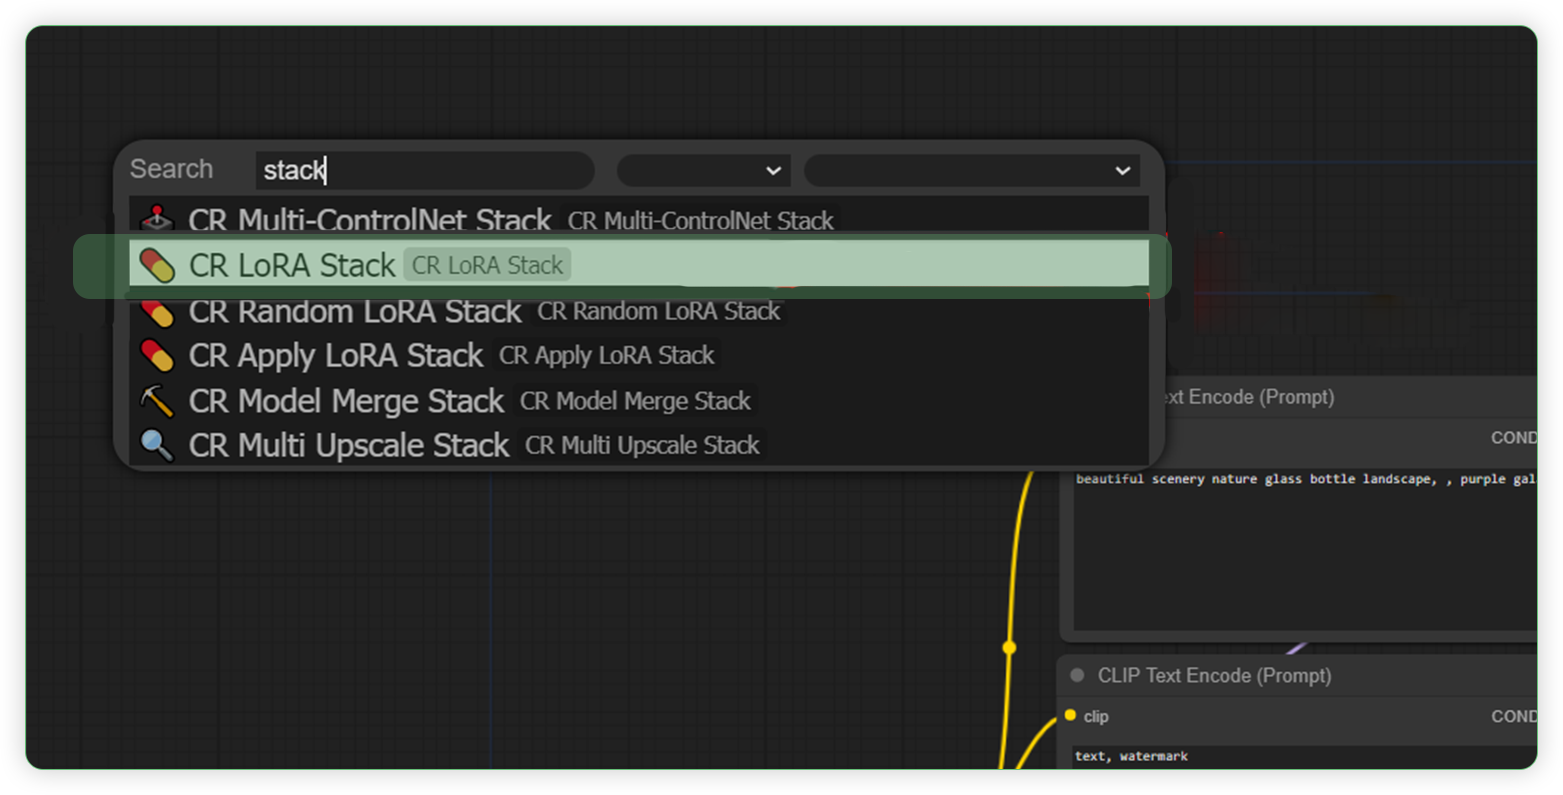
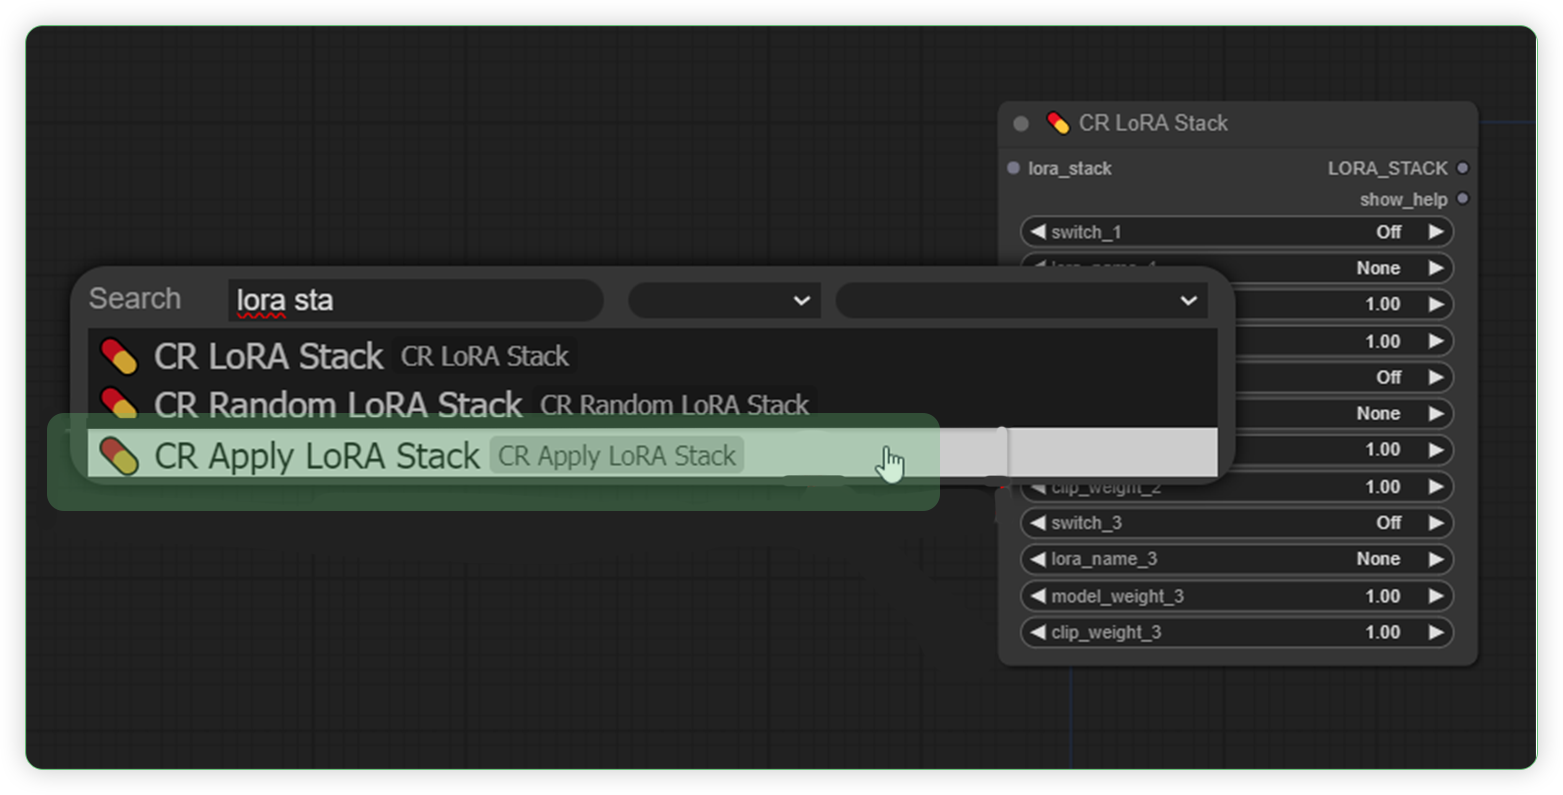
- Search the LoRA Stack and Apply LoRA Stack node in the list and add it to your workflow beside the nearest appropriate node.
- The image below is the workflow with LoRA Stack added and connected to the other nodes.
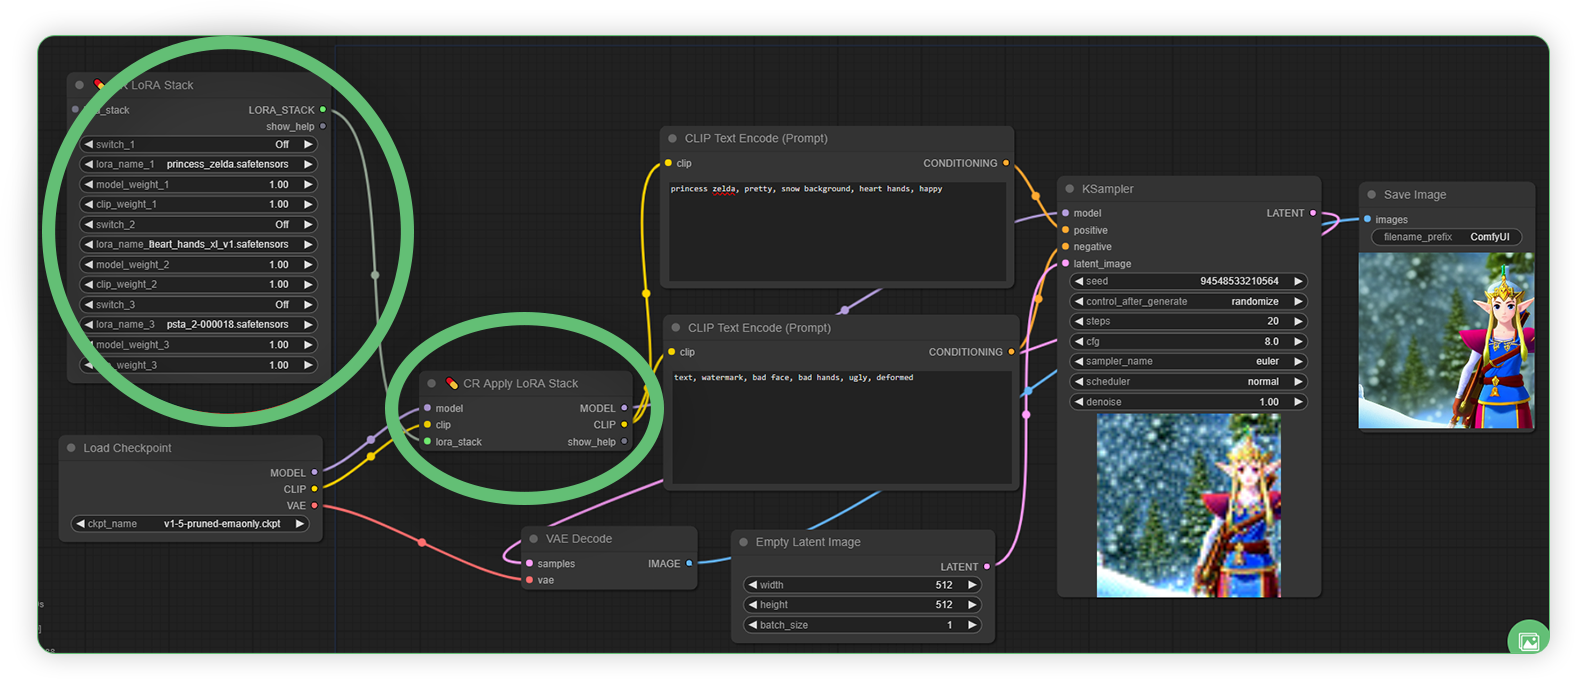
- Before clicking the Queue Prompt, be sure that the LoRA in the LoRA Stack is Switched ON and you have selected your desired LoRA. As an example, I used Princess Zelda LoRA, Heart Hands LoRA and Snow Effect LoRA. You can follow this workflow and save the output as many times as you like.

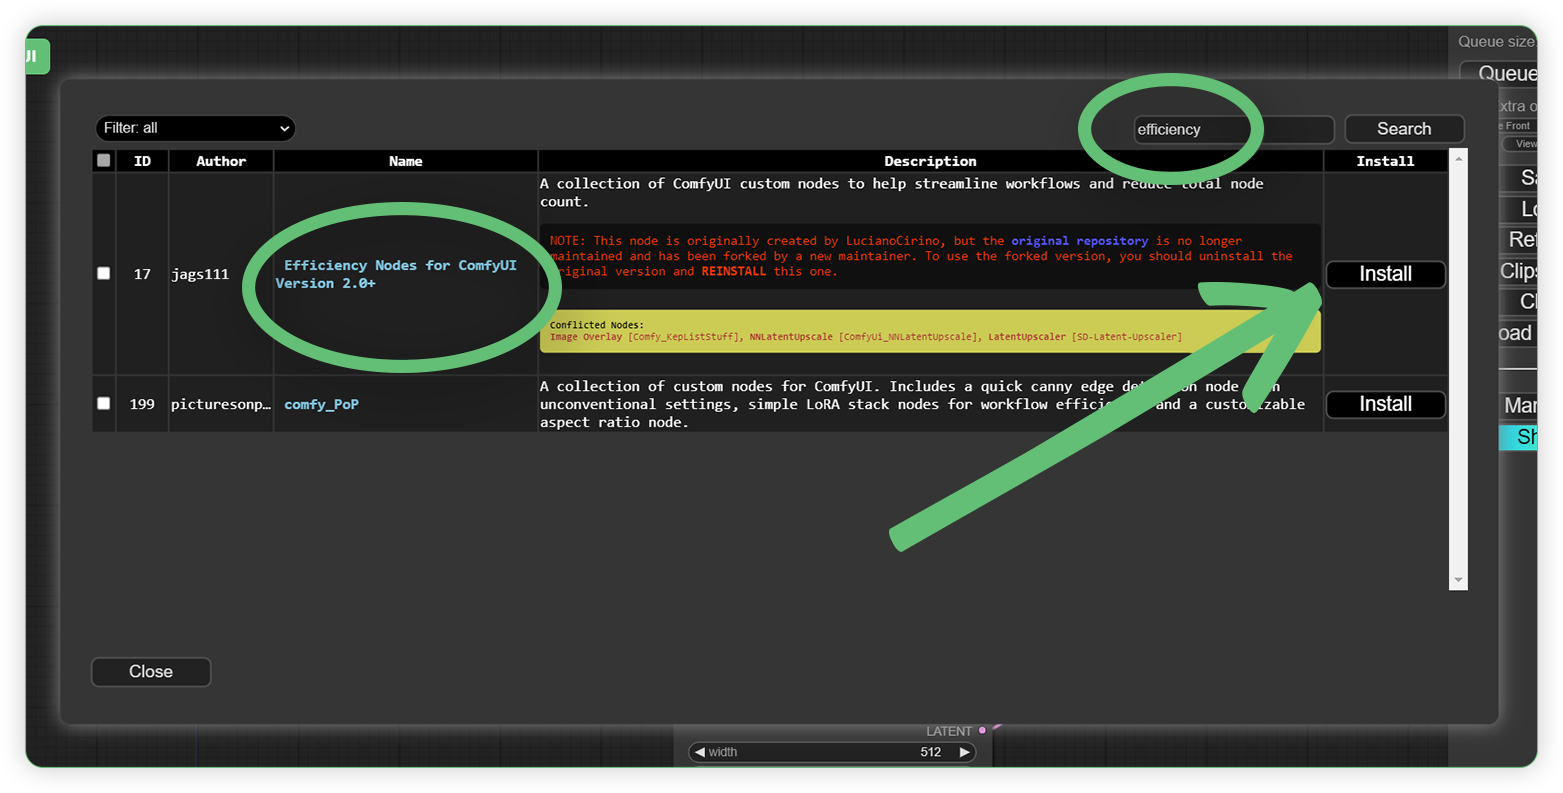
LoRA in Efficient Node
Download workflow here: LoRA in Efficient Node
By default, there is no efficient node in ComfyUI. All you need to do is to install it using a manager. Advanced ComfyUI users use efficient node because it helps streamline workflows and reduce total node count. Below are the steps on how to get the Load LoRA within the Efficient Loader and how to use it in the workflow.
- Go to Manager
- Click Install Custom Nodes

- Search for “efficiency” in the search box and check the list of available nodes below and click the install.
- Don’t forget to restart the ComfyUI machine to take effect on the newly installed custom node. If the node is not yet available in the node list even though the RESTART was already clicked, just click the stop button and relaunch it.

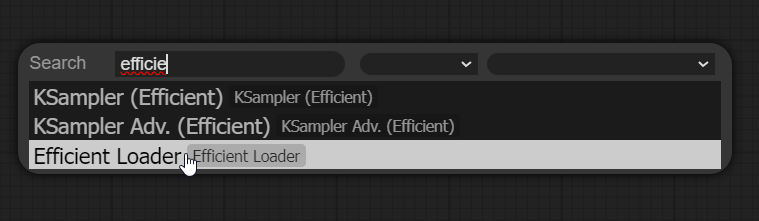
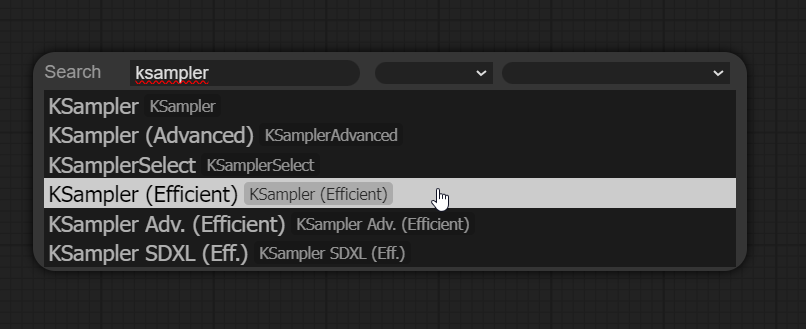
- Search the Efficient Loader and KSampler (Efficient) node in the list and add it to the empty workflow.
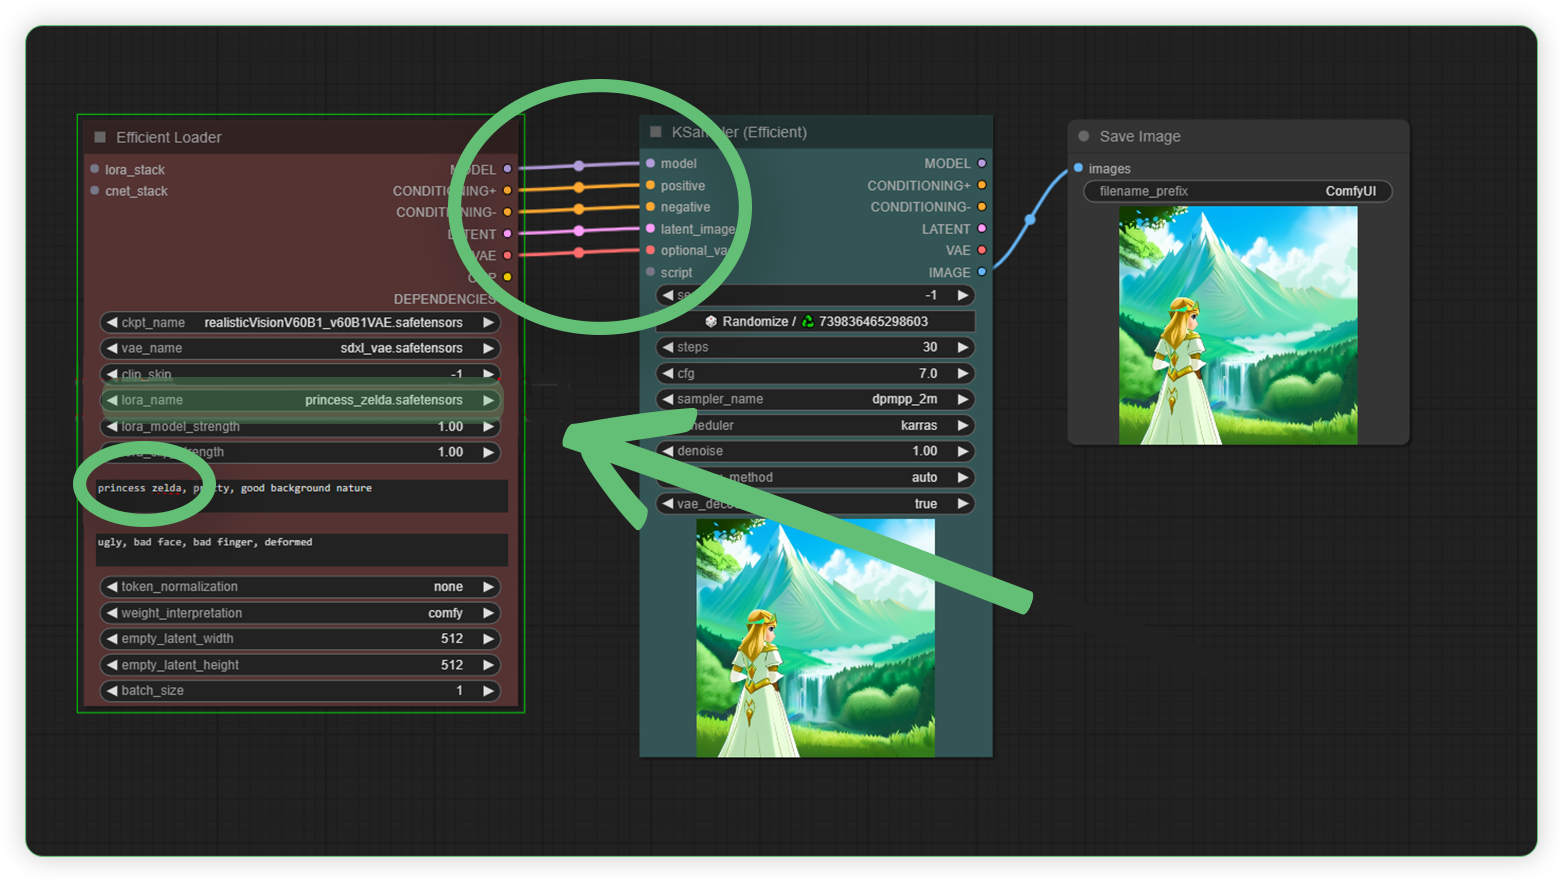
- The image below is the empty workflow with Efficient Loader and KSampler (Efficient) added and connected to each other nodes.
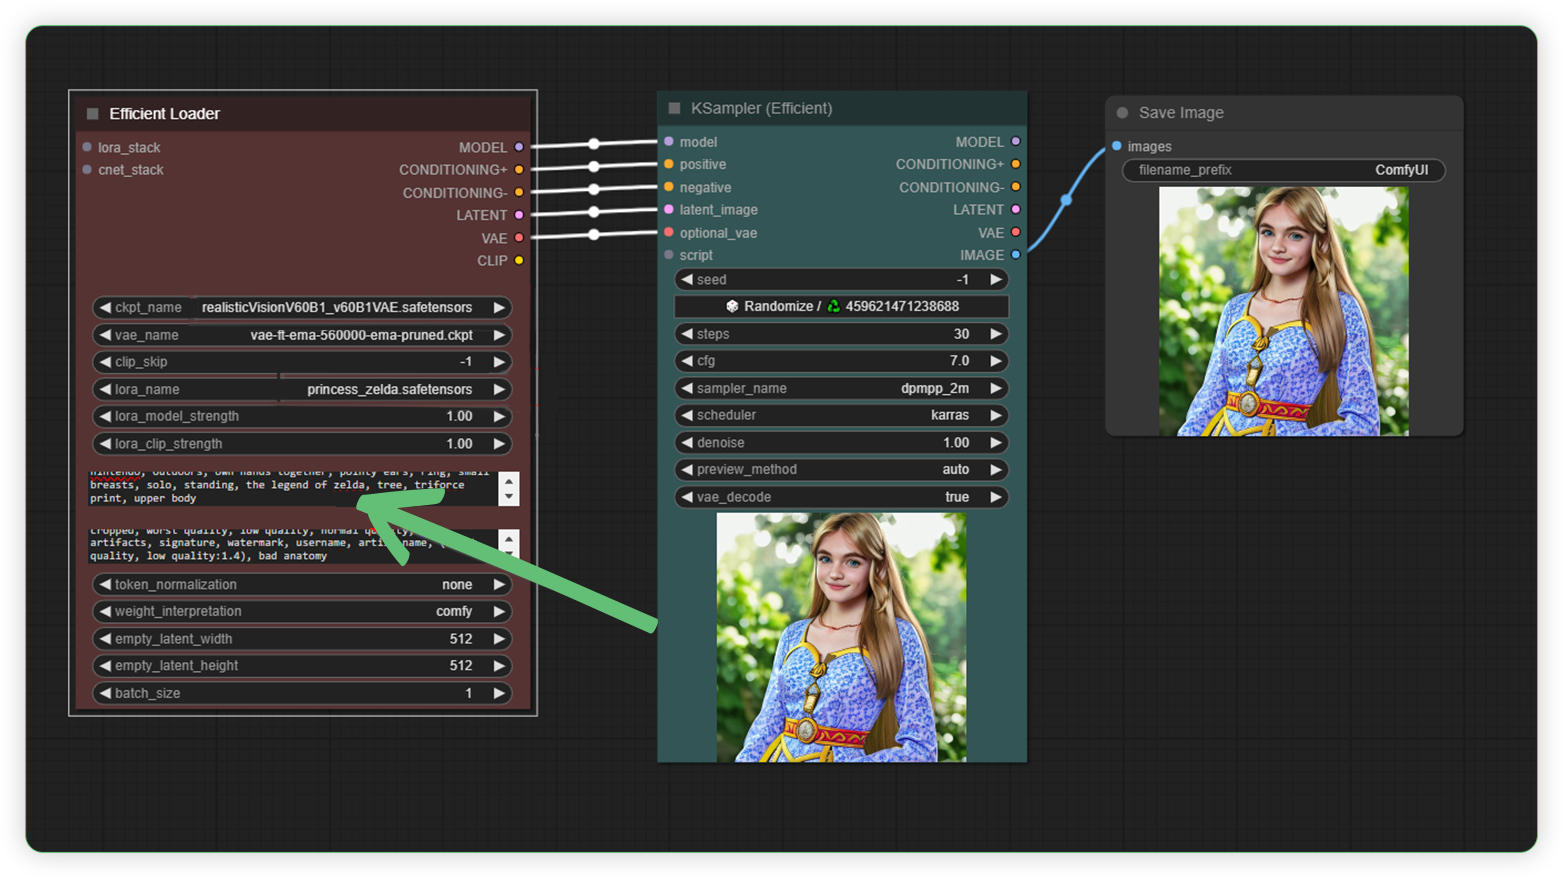
- Another Example and observe its amazing output. Be sure to check the trigger words before running the prompt.
Training a LoRA (Difficult Level)
For those of you who are ambitious, and want to make your own LoRA, there are 2 guides that you can use to train your own LoRA.
Super simple LoRA training guide
This is a super simple guide for anyone who wants to dive straight in and use the .json settings attached in the guide. You can start training a LoRA within 10 to 20 mins and you don’t have to worry about learning all of the settings, trying to understand what it all means.
https://learn.thinkdiffusion.com/a-super-simple-guide-to-lora-training-on-kohya/
Detailed, in depth, LoRA training guide
This guide is more in depth and attempts to explain what each field does within the Kohya_ss user interface. This is a longer tutorial and requires more time to read and understand the content.
https://learn.thinkdiffusion.com/creating-sdxl-lora-models-on-kohya/
If you’re having issues with installation or slow hardware, you can try any of these workflows on a more powerful GPU in your browser with ThinkDiffusion.
If you enjoy ComfyUI and you want to test out different workflows, then feel free to check out these 10 cool ComfyUI workflows here.
Member discussion