
An introduction to LoRA's
LoRA models, known as Small Stable Diffusion models, incorporate adjustments into conventional checkpoint models.
You want to create LoRA's so you can incorporate specific styles or characters that the base SDXL model does not have.
This tutorial is tailored for newbies unfamiliar with LoRA models. It will introduce to the concept of LoRA models
( For more info on how to use LoRAs, check out my post here )
Why LoRAs?
LoRA (Low-Rank Adaptation) represents a training technique tailored for refining Stable Diffusion models.
Yet, amidst existing techniques like Dreambooth and textual inversion, what sets LoRA apart?
The significance of LoRA lies in striking a favorable balance between file size and training effectiveness.
Just how big is a LoRA model?
While Dreambooth yields potency, it yields hefty model files (ranging from 2 to 7 GBs). On the other hand, textual inversions are compact (around 100 KBs), but their scope is limited.
LoRA occupies a middle ground. Its file size remains considerably manageable (ranging from 2 to 200 MBs), while maintaining decent training capability.
LoRA's Enhance Existing Checkpoint Models
Similar to textual inversion, a LoRA model can't function in isolation. It necessitates synergy with a model checkpoint file. LoRA brings about stylistic variations by introducing modifications to the corresponding model file.
In addition to this, with the release of SDXL, StabilityAI have confirmed that they expect LoRA's to be the most popular way of enhancing images on top of the SDXL v1.0 base model.
Let's create our own SDXL LoRA!
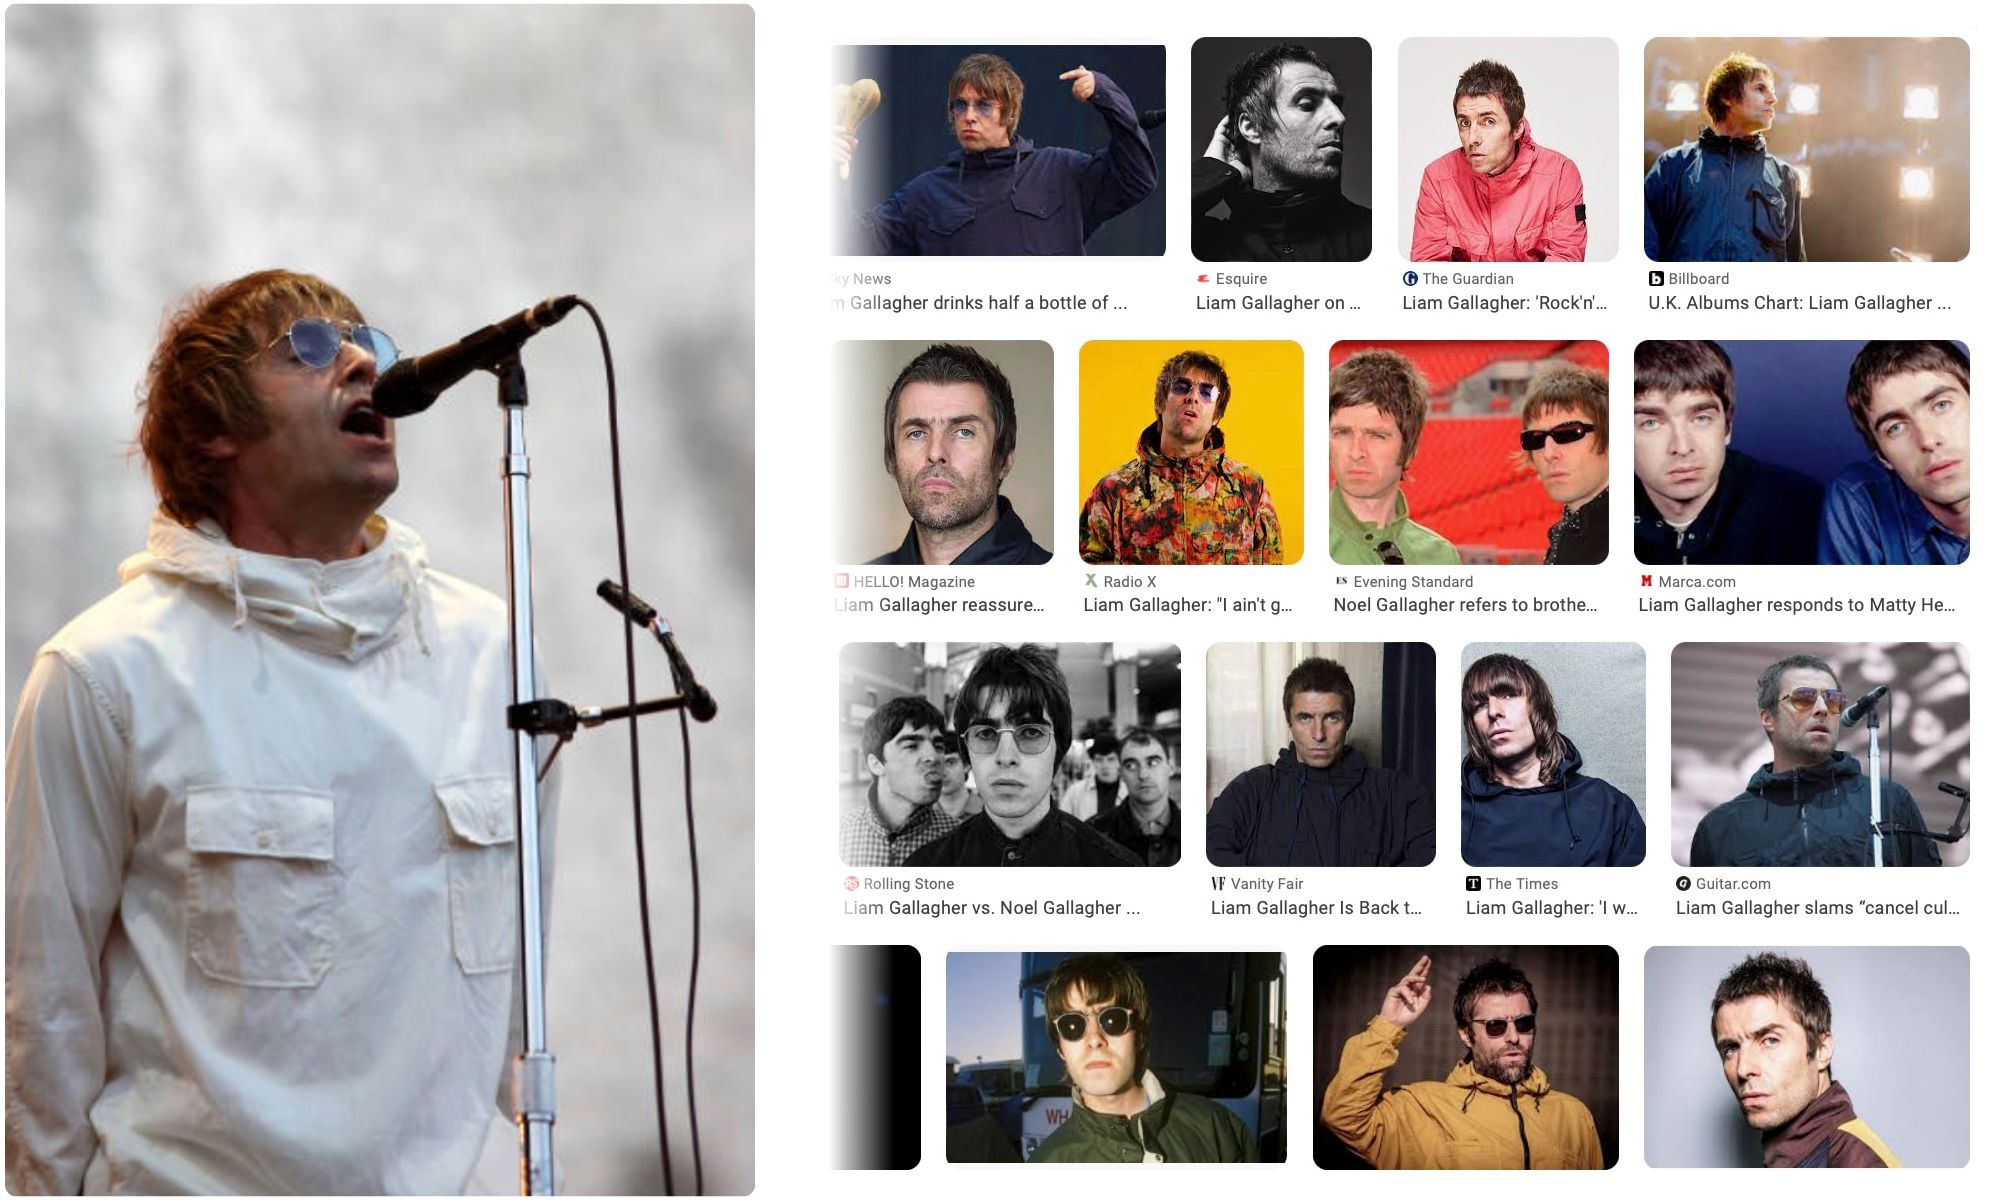
For the purpose of this guide, I am going to create a LoRA on Liam Gallagher from the band Oasis!
This guide was created using ThinkDiffusion's Kohya ULTRA machines running Kohya v24.1.4.
TIP: To train larger models, try ULTRA machines with 48GB VRAM.
Collect training images
You will need around 20 - 30 good quality images of your subject and for SDXL LoRA's these should be at a resolution of 1024 x 1024. I have 30 images at a resolution of 1024 x 1024 that I am going to use. An example of one is shown below:
We then need some Regularisation images. To work out how many regularisation images we need, we can multiply the number of subject images we have by the number of repeats we have, which will be 25 in this scenario. Therefore 25 (repeats) x 30 (subject images) = 750 regularisation images.
There are various datasets available, such as https://huggingface.co/datasets/ProGamerGov/StableDiffusion-v1-5-Regularization-Images/tree/main to grab images.
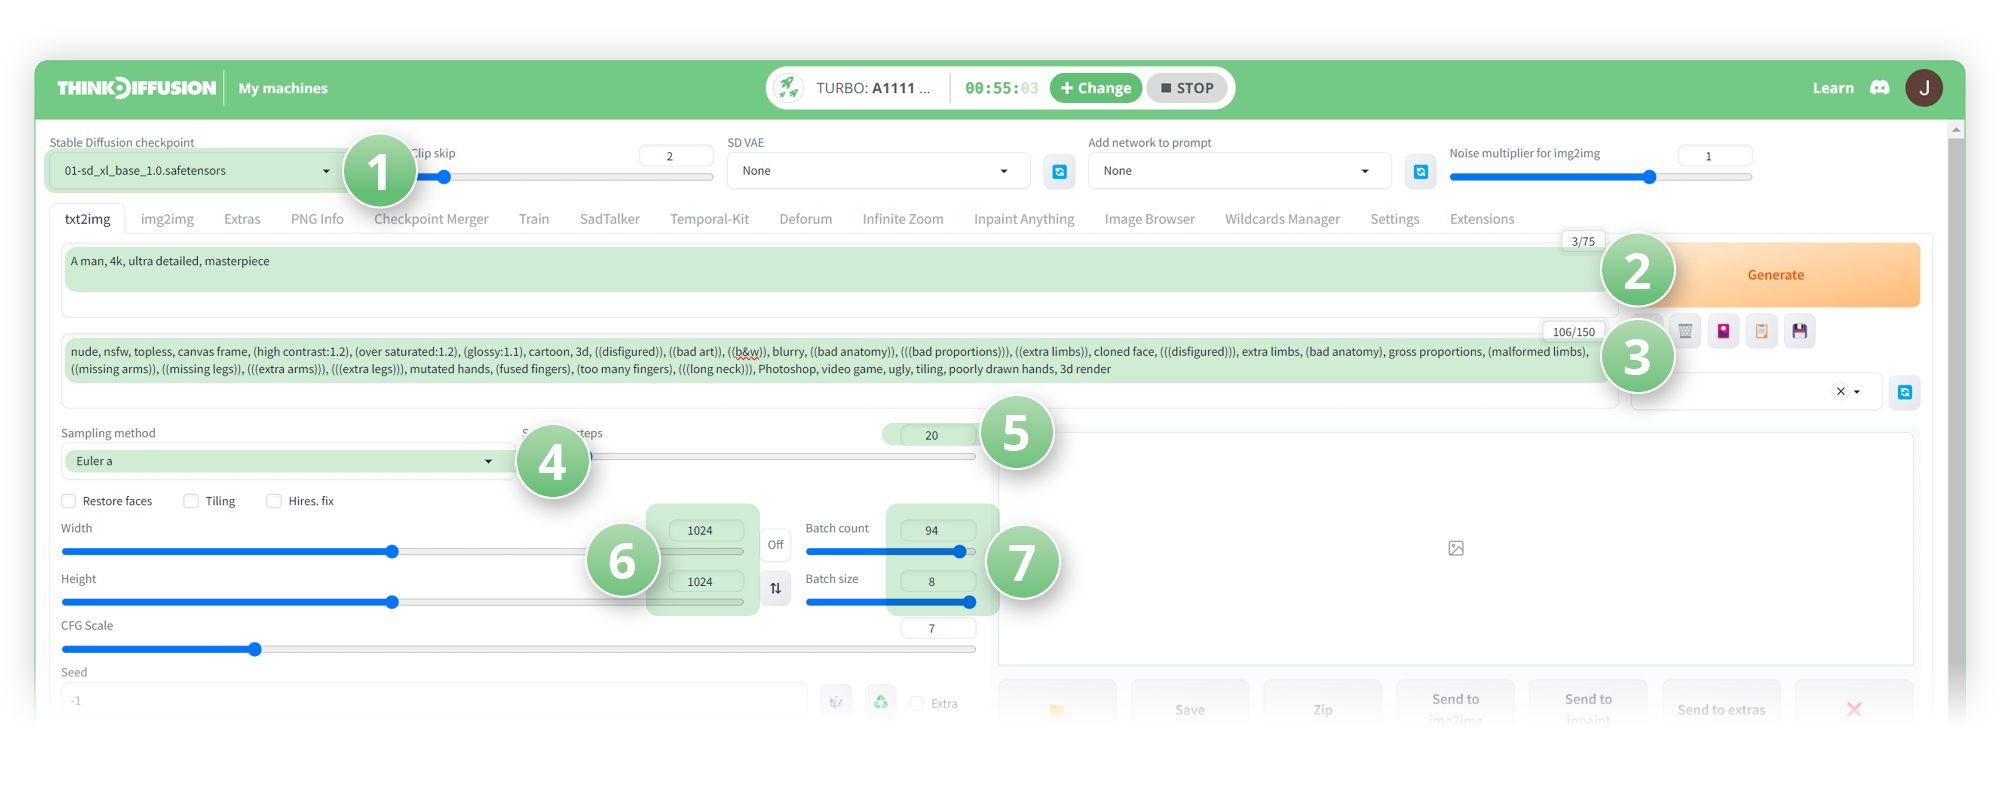
I decided to generate them through Stable Diffusion through the txt2img tab.
Here's how I did it:
- (1) Set the model to sd_xl_base_1.0.safetensors
- (2) Positive Prompt:
'A man, 4k, ultra detailed, masterpiece' - (3) Negative Prompt:
'nude, nsfw, topless, canvas frame, (high contrast:1.2), (over saturated:1.2), (glossy:1.1), cartoon, 3d, ((disfigured)), ((bad art)), ((b&w)), blurry, ((bad anatomy)), (((bad proportions))), ((extra limbs)), cloned face, (((disfigured))), extra limbs, (bad anatomy), gross proportions, (malformed limbs), ((missing arms)), ((missing legs)), (((extra arms))), (((extra legs))), mutated hands, (fused fingers), (too many fingers), (((long neck))), Photoshop, video game, ugly, tiling, poorly drawn hands, 3d render' - (4) Sampling method: Euler a
- (5) Sampling Steps: 20
- (6) Resolution 1024 x 1024
- (7) Batch count 100, Batch size 2. Which gives us 200 images. Do this 3 times to give us 600 images. Then on the 4th batch do a Batch count of 76, Batch size of 2. In total, this gives us 752 images which is what we need).
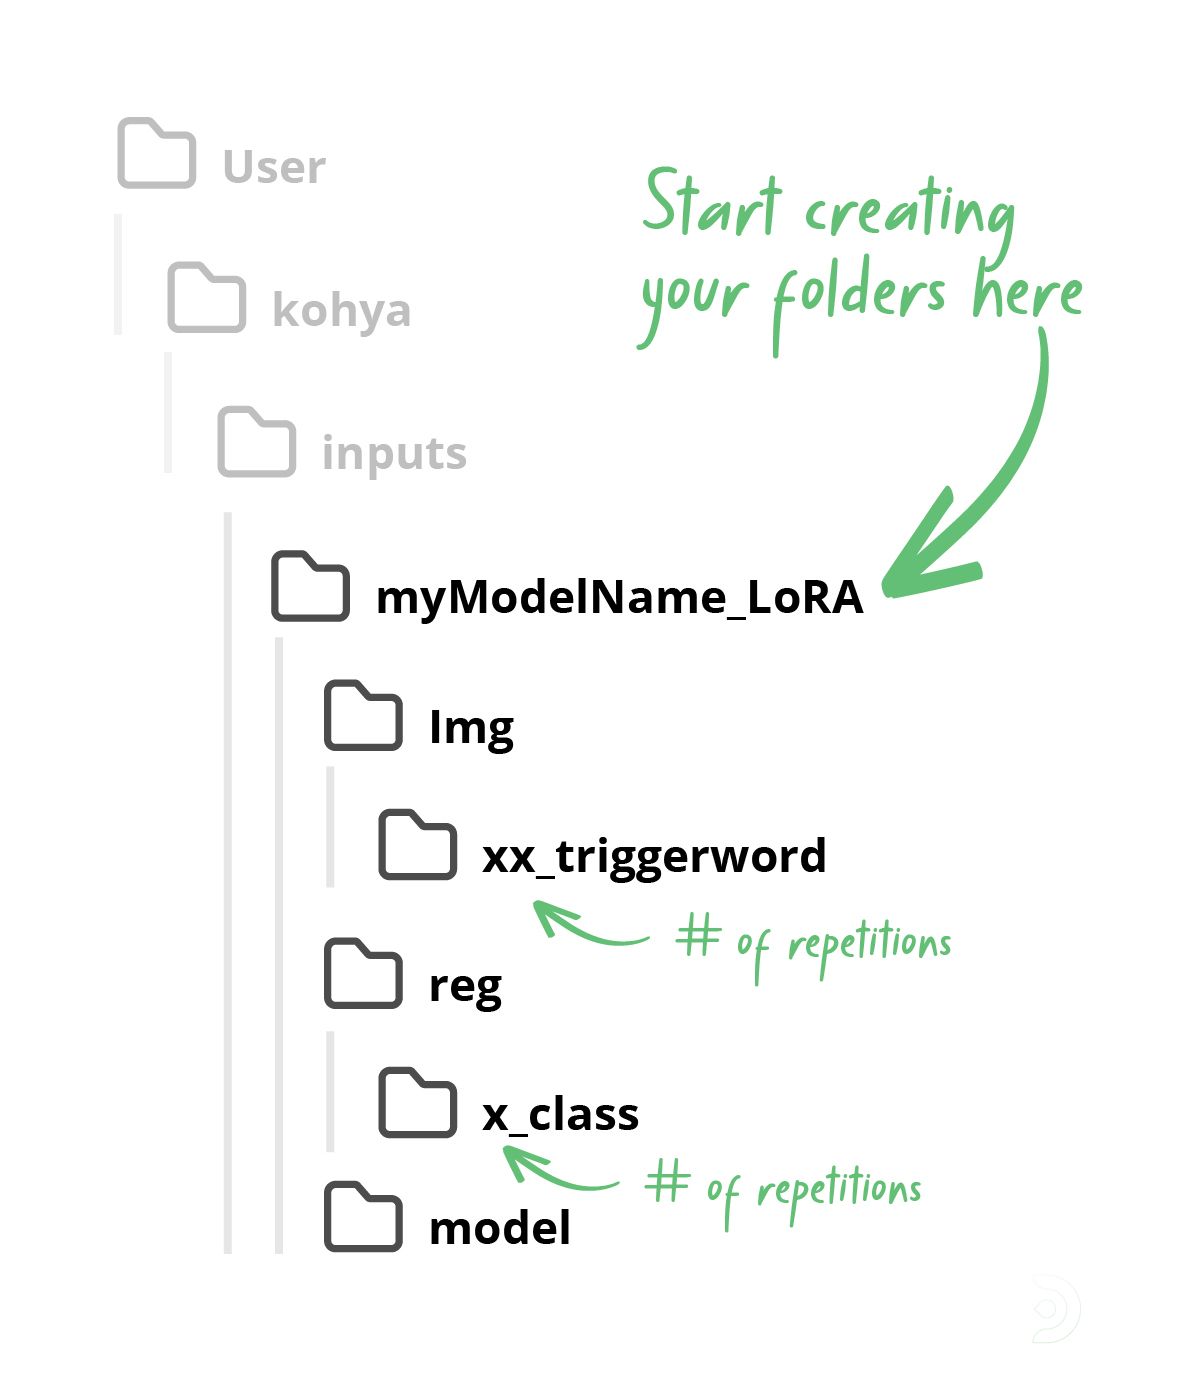
Folder structure
The folder structure is important in Kohya so we need to make sure we set this up correctly.
( For more info on how to navigate and use your personal drive on ThinkDiffusion, click here )
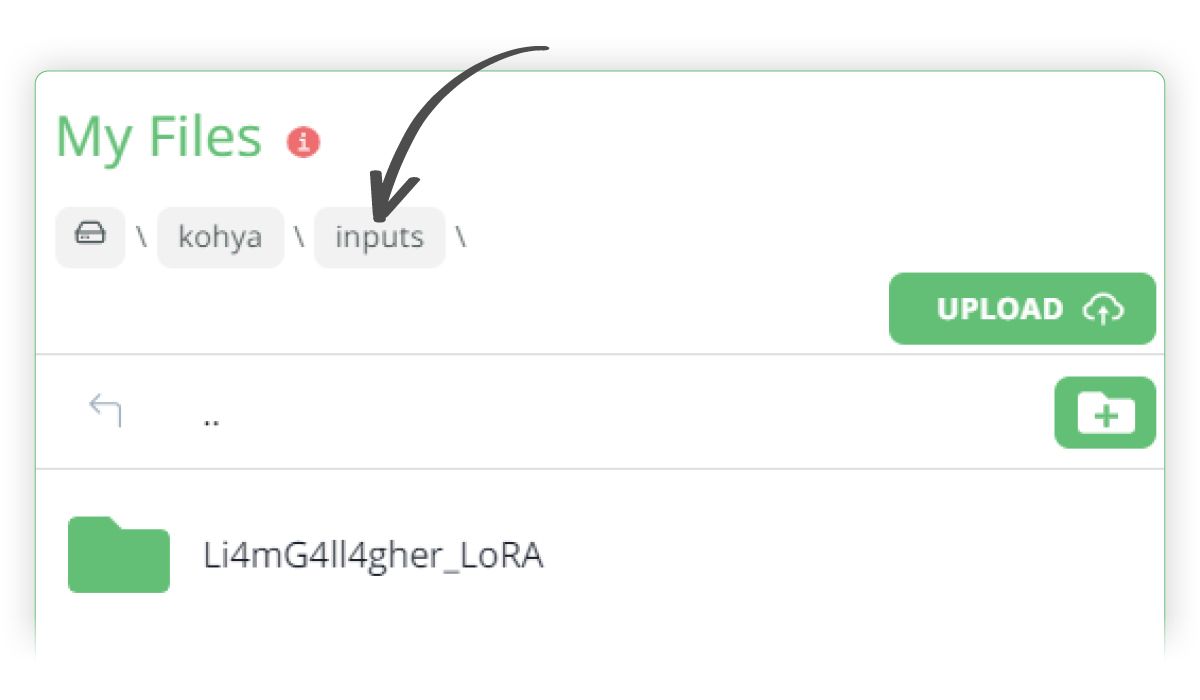
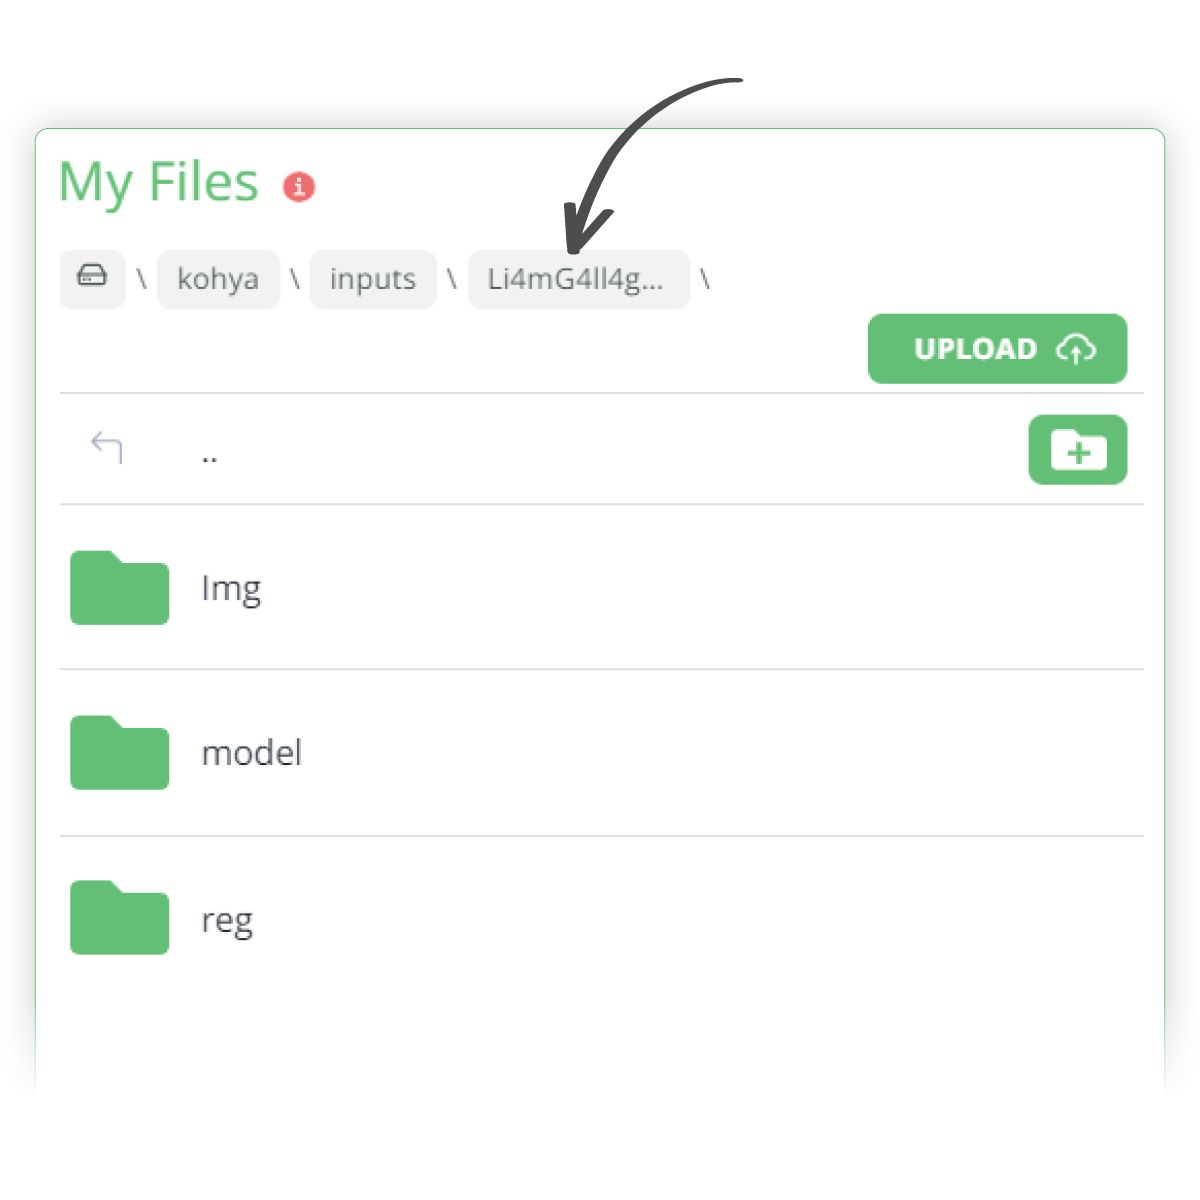
- Within the kohya/inputs folder I have created a new top folder called Li4mG4ll4gher_LoRA
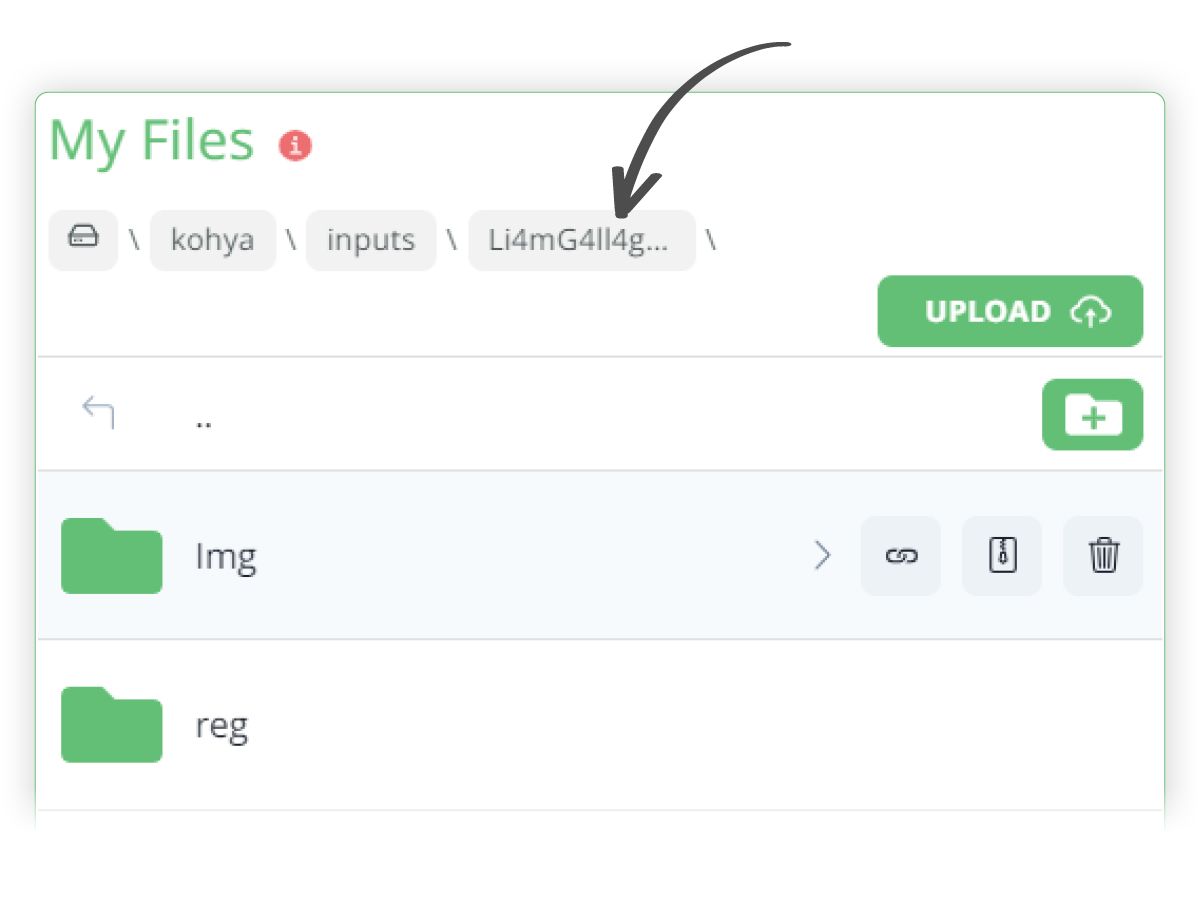
- Within this folder, create 2 new folders, called Img and reg
- Within the Img folder, create a sub folder, called 25_Li4mG4ll4gher, which represents the xx_triggerword class.
- xx represents the number of repetitions, which in our case is going to be 25. You can typically set this to between 25-100
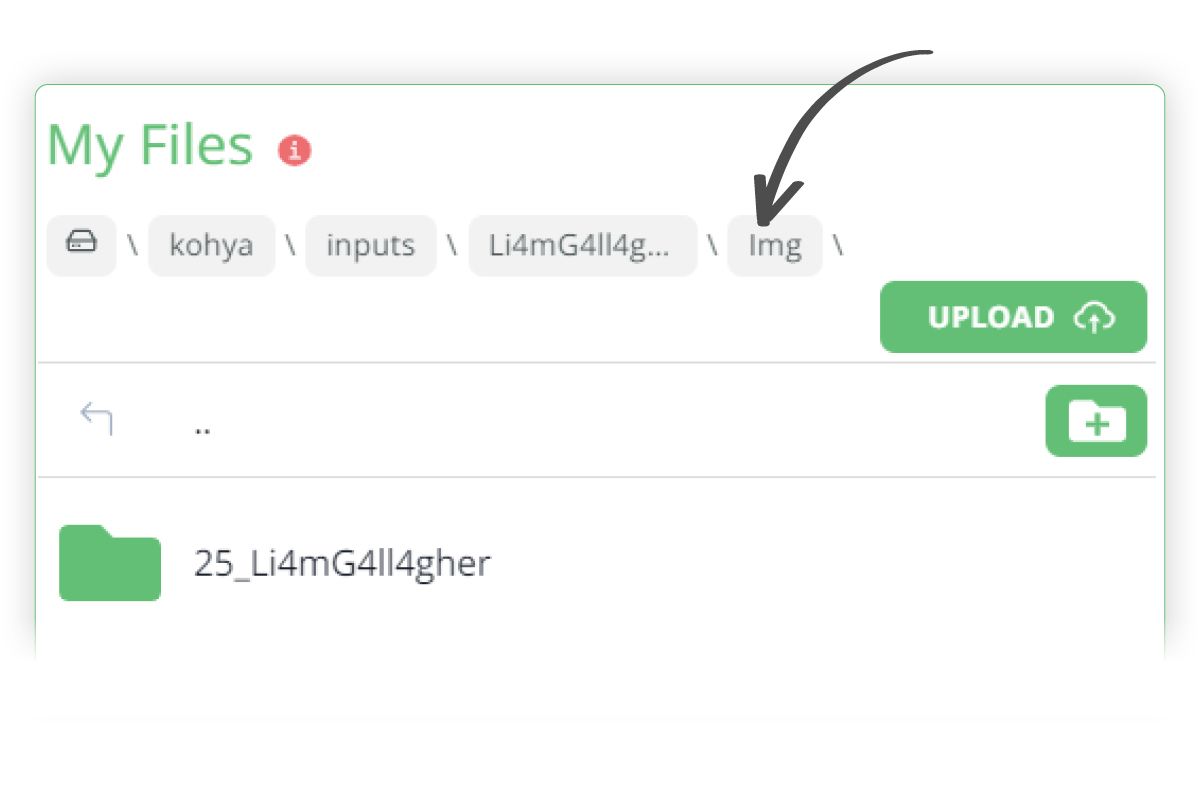
- Upload your subject images to this 25_L14mG4ll4gher sub folder. In my case, I have uploaded 30 source images
- Within the reg folder, create a subfolder with the following format: x_class where:
- x - number of repetitions. I usually set this to 1
- 'class' should be the same as the one used in the naming of your image folder.
- Our folder name for for placing the regularisation images is 1_man
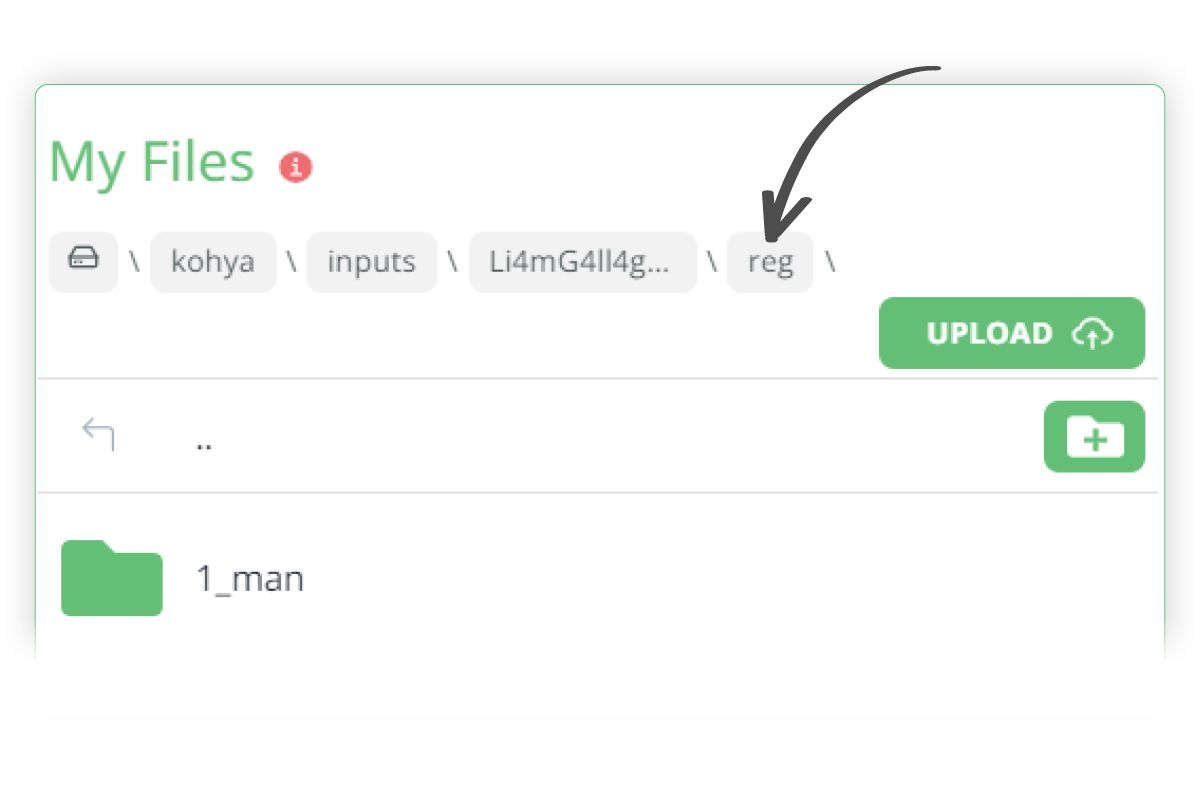
- You then need to upload your regularisation images to the 1_man folder. I have 752 images that I created in txt2Img that I have uploaded to this folder
- Finally, create a subfolder called model within the Li4mG4ll4gher main folder. This is where our eventual LoRA will be outputted to.
Captioning
We are now ready to caption our source images!
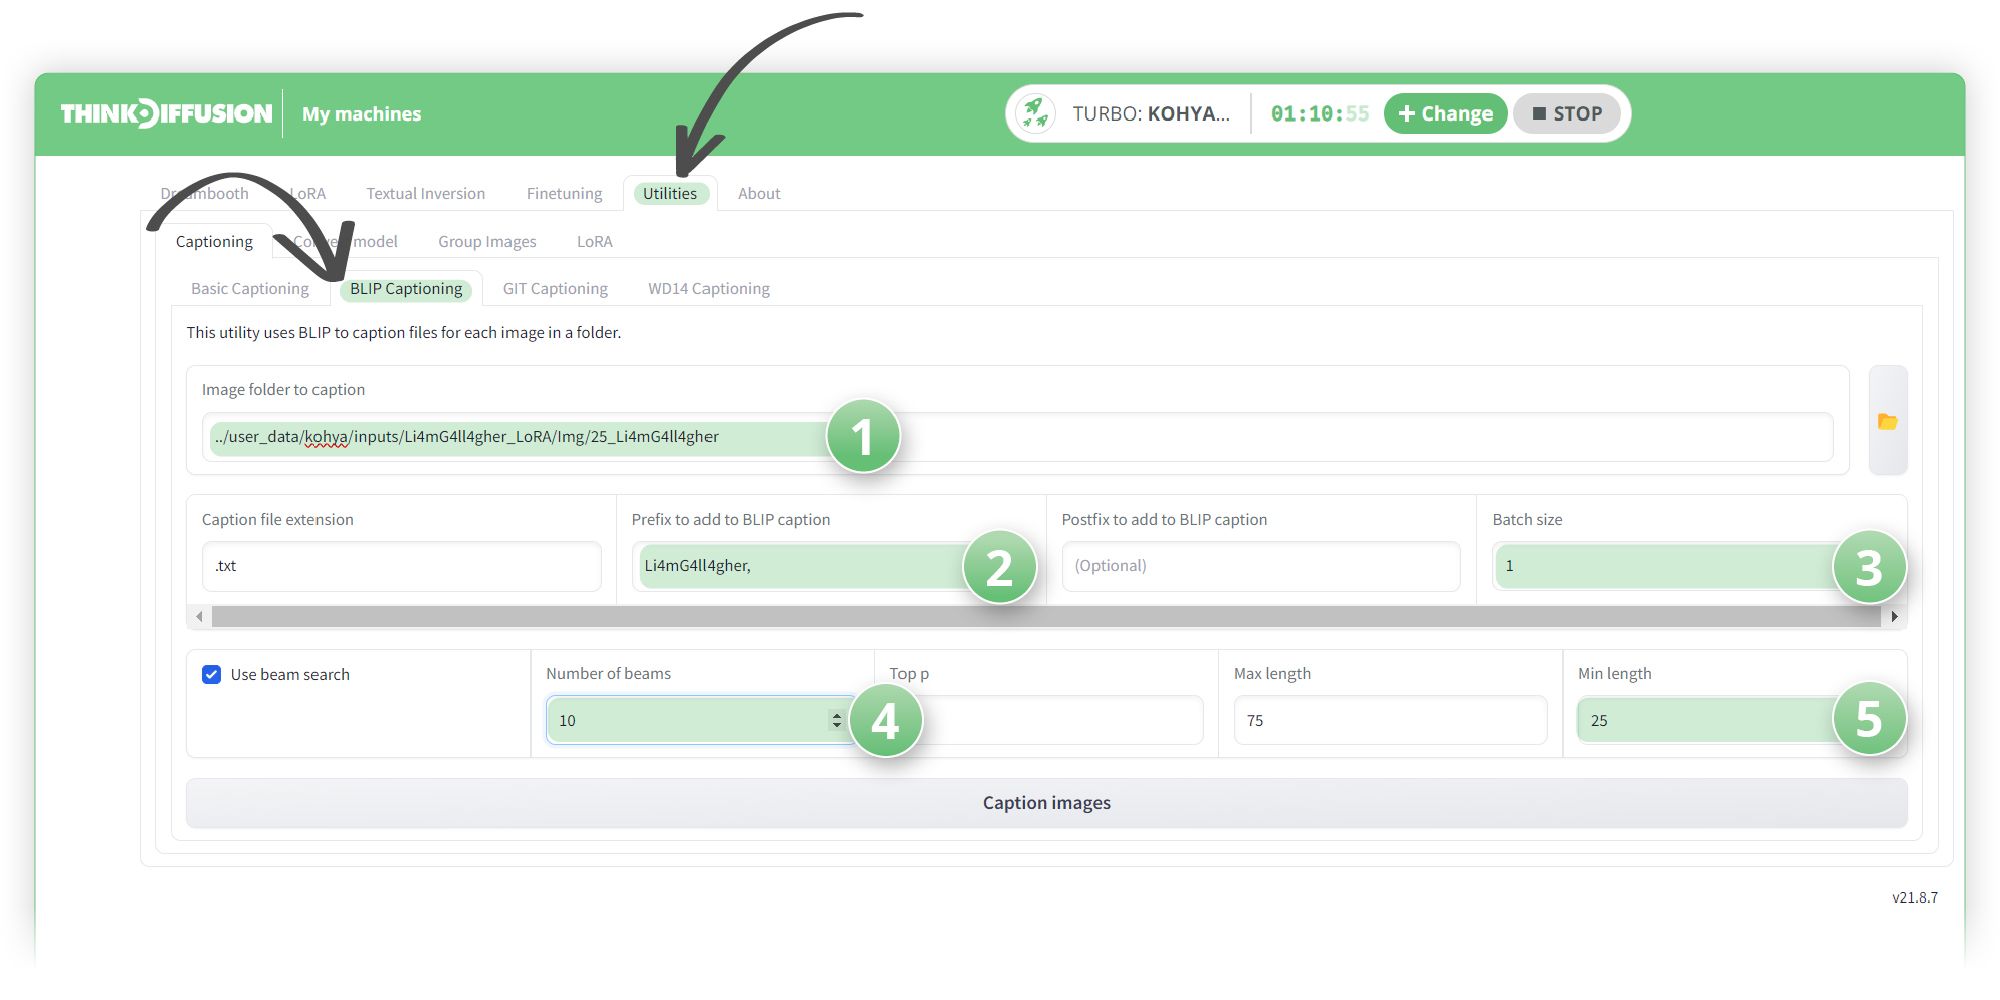
Head over to the Utilities tab and the Blip Captioning tab:
- (1) Copy and paste the link to our source images that we want to caption, in this case it is: ../user_data/kohya/inputs/Li4mG4ll4gher_LoRA/Img/25_Li4mG4ll4gher
- (2) Set the Prefix to Li4mG4ll4gher, (with a comma and a space)
- (3) The batch size can be set to 1-2 or higher if you have enough Vram
- (4) Set the number of beams to 10 as this will help produce better sentences
- (5) Set the minimum length to 25, otherwise the captions will be too short
- Hit Caption Images and a .txt file will be spit out for each image
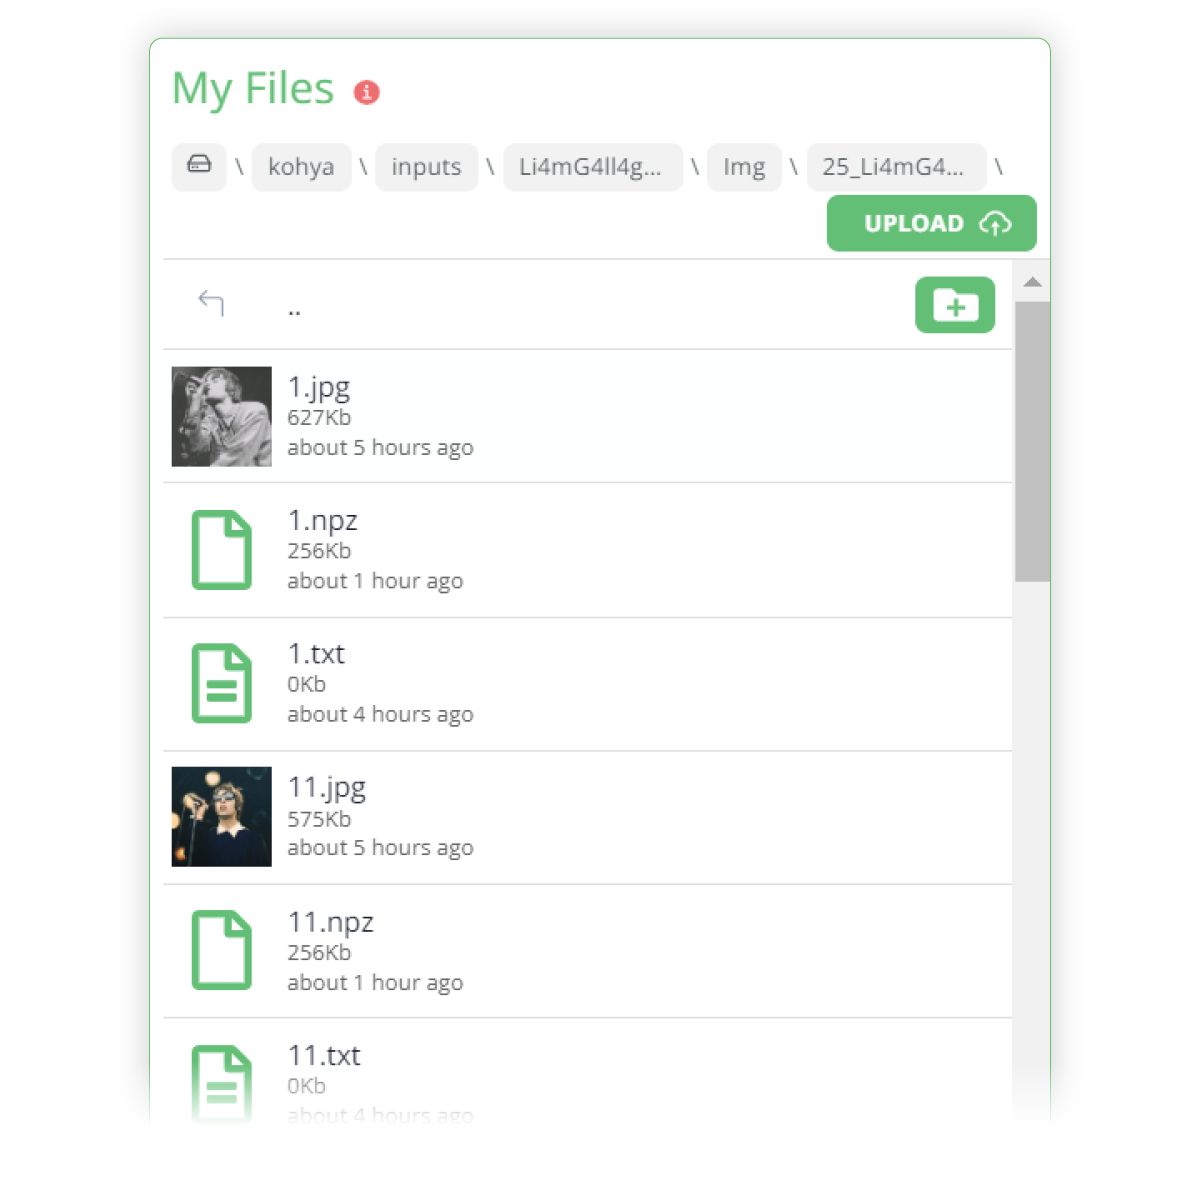
- You can then manually inspect each .txt file and see if it captures the image in text format. It is advisable to manually edit these to provide more accuracy.
We now have all of our images and our folder structure set up and we can now head back over to the LoRA tab:
Source Model
In my user_data/kohya/inputs/Models/ folder, I have uploaded the JuggernautXL_version3 checkpoint model.
Protip 💡: You can upload models by URL with 1-click, more info here
Next, under the Source model tab we:
- (1) Set the Model Quick Pick to Custom
- (2) Copy and paste the path of the uploaded checkpoint model to the Pretrained model name or path textbox: ../user_data/kohya/inputs/Models/juggernautXL_version3.safetensors
- (3) Select the ✅ SDXL Model checkbox

Protip 💡: You can grab the file path by hovering over the file and clicking the 🔗 icon. More info on getting a file path here
Set Folder Paths
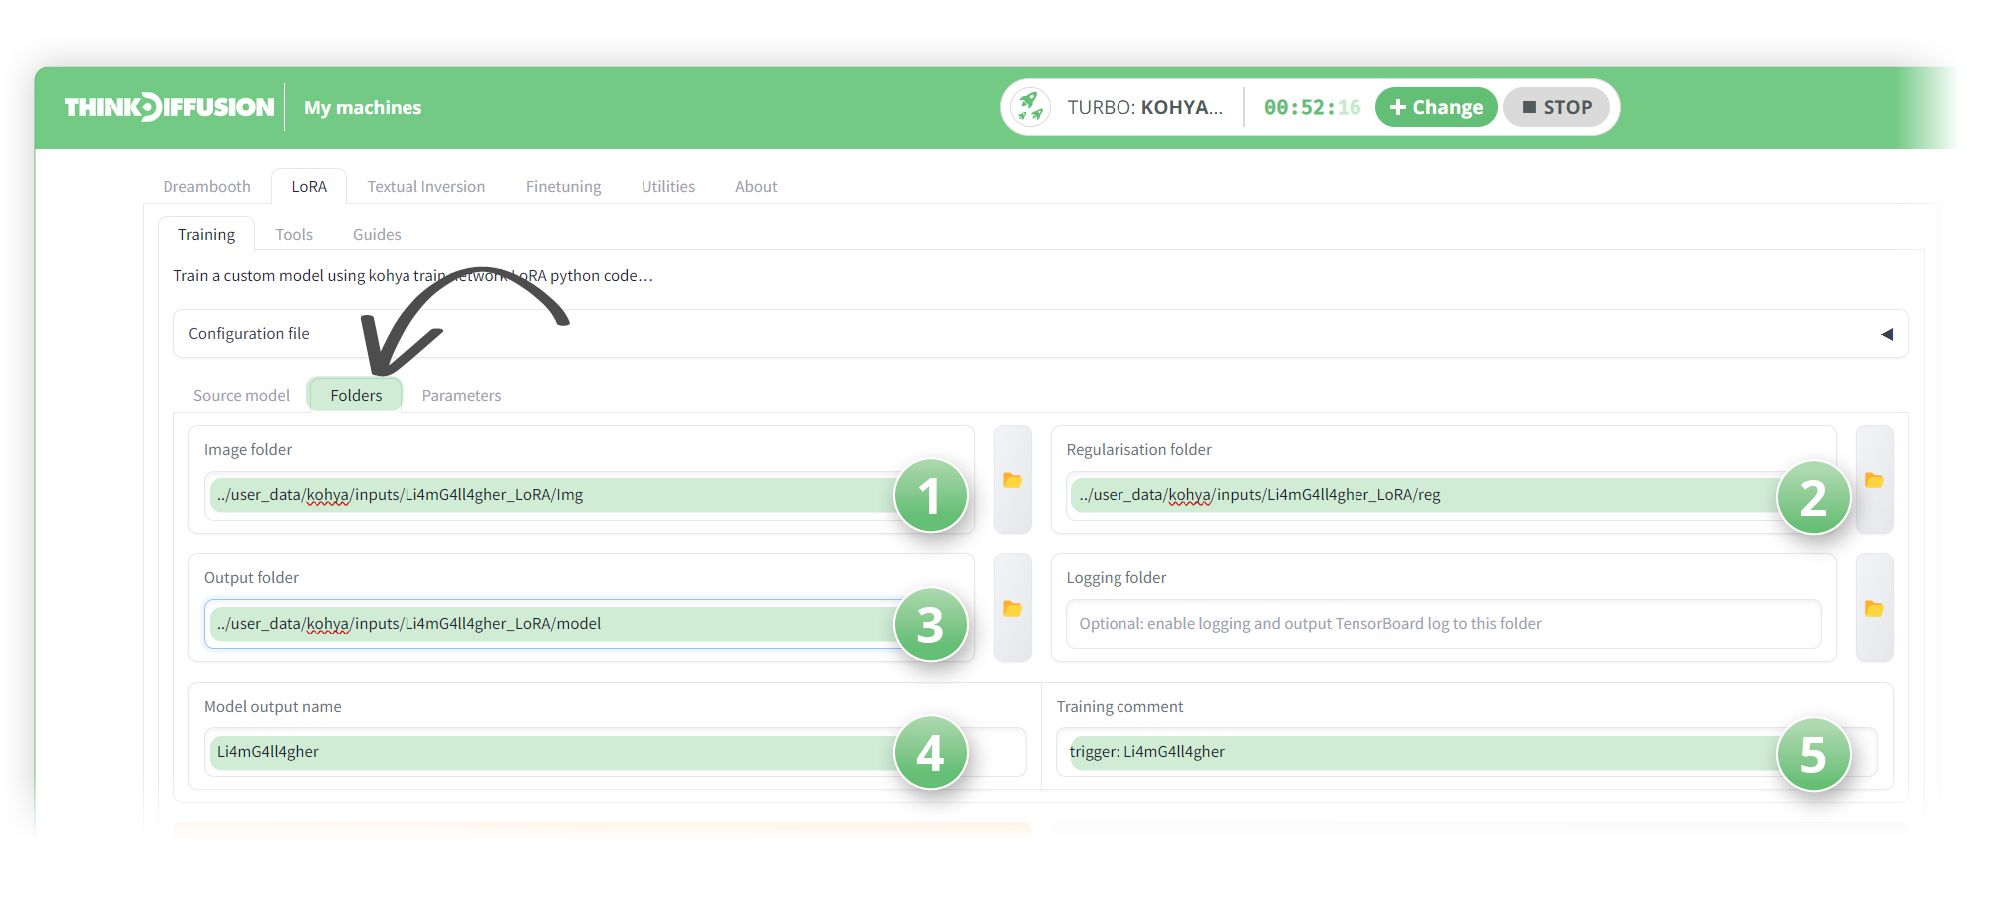
Let's moving on to the Folders sub tab.
We correctly set up our folder structure earlier, and now we can simply copy the paths into the relevant fields
- (1) Set the image folder to our source images: ../user_data/kohya/inputs/Li4mG4ll4gher_LoRA/Img
- (2) Set the Regularisation folder to our regularisation images folder: ../user_data/kohya/inputs/Li4mG4ll4gher_LoRA/reg
- (3) Set the ouput folder to:
../user_data/kohya/inputs/Li4mG4ll4gher_LoRA/model - (4) Set the model name to Li4mG4ll4gher as this is what our LoRA will be named as
- (5) Set the Training comment to trigger: Li4mG4ll4gher as this will be our trigger word to activate the LoRA
Parameters
Head over to the Parameters tab where we can really get into the weeds of training our LoRA!
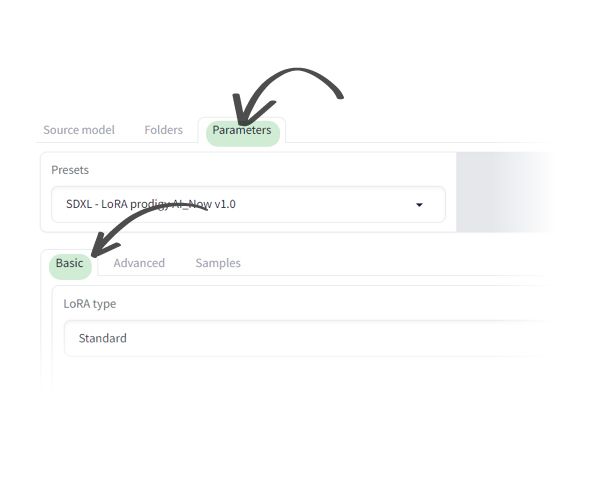
The Basic Subtab:
- Set the presets dropdown to: SDXL - LoRA prodigy AI_now v1.0 (UPDATED)
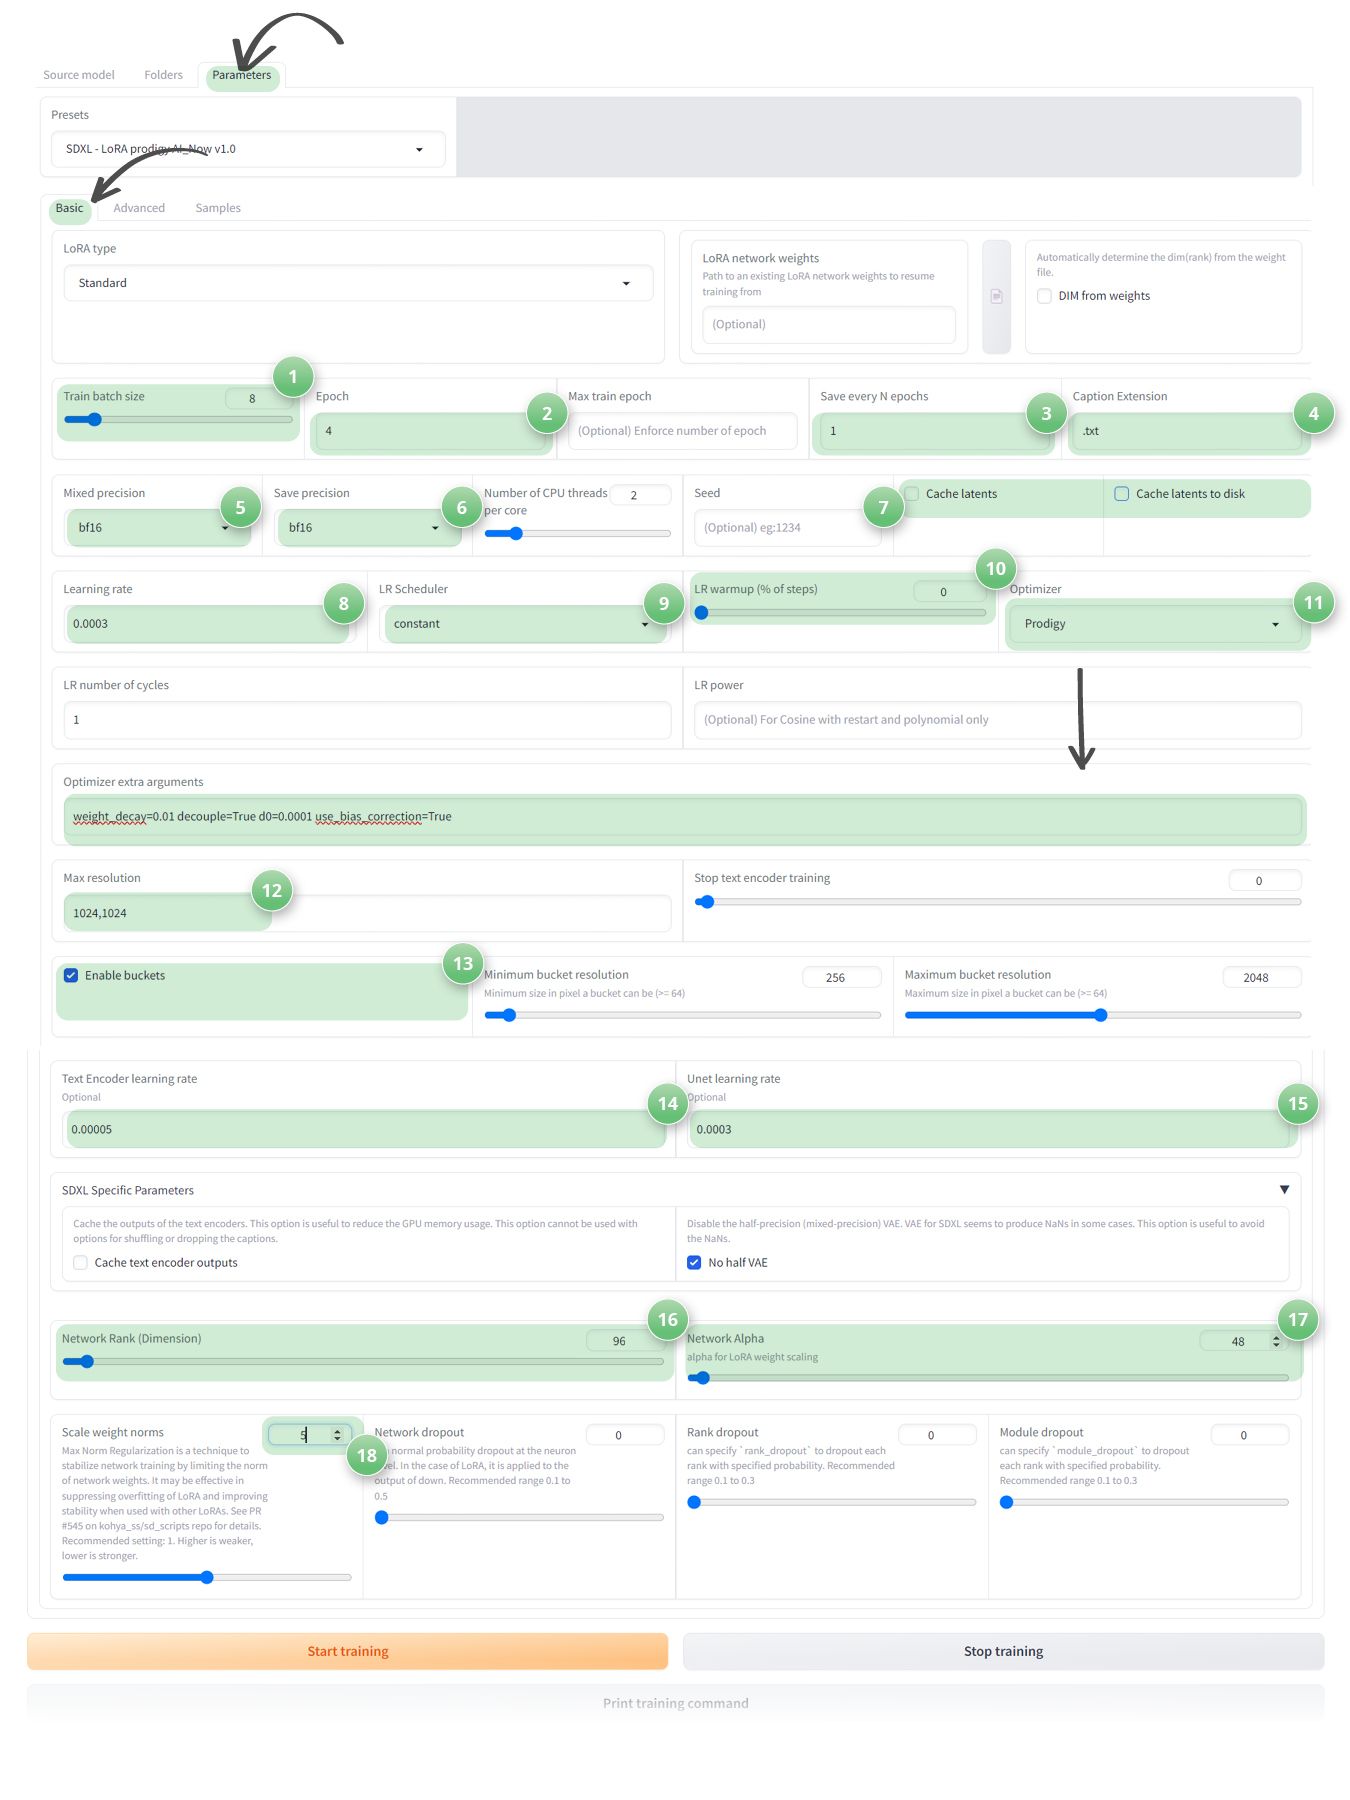
- 1. Train Batch Size: 2
As we are using ThinkDiffusion we can set the batch size to 2, but if you are on a lower end GPU, then you should leave this as 1. The batch size determines how many images the model processes simultaneously. The higher the batch size the faster the training will be but it will be more demanding on your GPU. (UPDATED) Please note that you can sometimes have an out of memory error when setting the batch size to 2. If you encounter this, you should lower the batch size to 1 - 2. Epochs: 4
Set the number of Epochs to 4. You can experiment with this figure but as a rule the higher the number of Epochs, the more chance of overtraining the model. Epoch's represent a cycle of training. For example, if we have 20 repeats and 30 images and 4 Epoch's then this would equate to 30 x 20 x 4 = 2,400 steps. - 3. Save every n Epoch's: 1
This is useful to see if you are undertraining or overtraining your LoRA. If we are running 4 Epoch's and we save every 1 Epoch then a LoRA will be created at the end of each Epoch. In essence, we will have 4 LoRA's that are created at the end of each Epoch cycle - 4. Caption Extension: .txt
Use the '.txt' extension for your captions. This is necessary as Kohya now requires captioned images to avoid warnings. - 5. Mixed Precision: bf16
Set your training precision to 'bf16'. If you are using ThinkDiffusion then you can go with the bf16 precision as it is demanding on your Vram. If you are running locally with a lower graphics card then you should opt for a precision of 'fp16' - 6. Save Precision: bf16
Use 'bf16' for saving model checkpoints, with the same considerations as for Mixed Precision mentioned above. - 7. Cache Latents: Uncheck
It's advisable to uncheck this option, especially if you're using regularisation images, as caching latents can significantly increase training time. - 8. Learning Rate: between 0.0001 and 0.0003
Set to between 0.0001 and 0.0003 - Typically, the higher the learning rate, the sooner you will finish training the LoRA - 9. LR Scheduler: Constant
Change the LR Scheduler to Constant. - 10. LR Warmup: 0
Set the LR Warmup (% of steps) to 0 - 11. Optimizer: Prodigy
Set the Optimizer to 'prodigy'. If you select 'prodigy' then you will need to add some extra optimizer parameters of 'weight_decay=0.01 decouple=True d0=0.0001 use_bias_correction=True'.
If you are running locally with a lower graphics card, you can select Adafactor as the optimizer and enter the following extra arguments 'scale_parameter=False relative_step=False warmup_init=False'.
Below is the syntax for using 'Prodigy' on ThinkDiffusion

- 12. resolution: 1024,1024 or 512,512
Set the max resolution to be 1024 x 1024, when training an SDXL LoRA and 512 x 512 if you are training a 1.5 LoRA - 13. Enable Buckets: Keep Checked
Keep this option checked, especially if your images vary in size. This is a very useful feature in Kohya that means we can have different resolutions of images and there is no need to crop them. Essentially Kohya will drop your images into separate buckets of the same sizes. - 14. Text Encoder learning rate: 0 (UPDATED)
Set the Text Encoder learning rate to 0 - 15. Unet learning rate: 0 (UPDATED)
Set the Unet learning rate to around 0 - 16. Network Rank: 96
Set the Network Rank to 96. This parameter influences the AI's expressiveness. A higher value allows for more creativity. This can typically be set between 32 to 256 as a rule of thumb. The higher the network rank, the bigger the file size of the LoRA will be. However, a larger network rank will also help the LoRA retain more details to improve the quality of the images - 17. Network Alpha: 48
Set Network Alpha to approximately half of the Network Rank value, which in our case would be 48. This parameter acts as a creativity regulator. - 18. Scale weight norms: 5
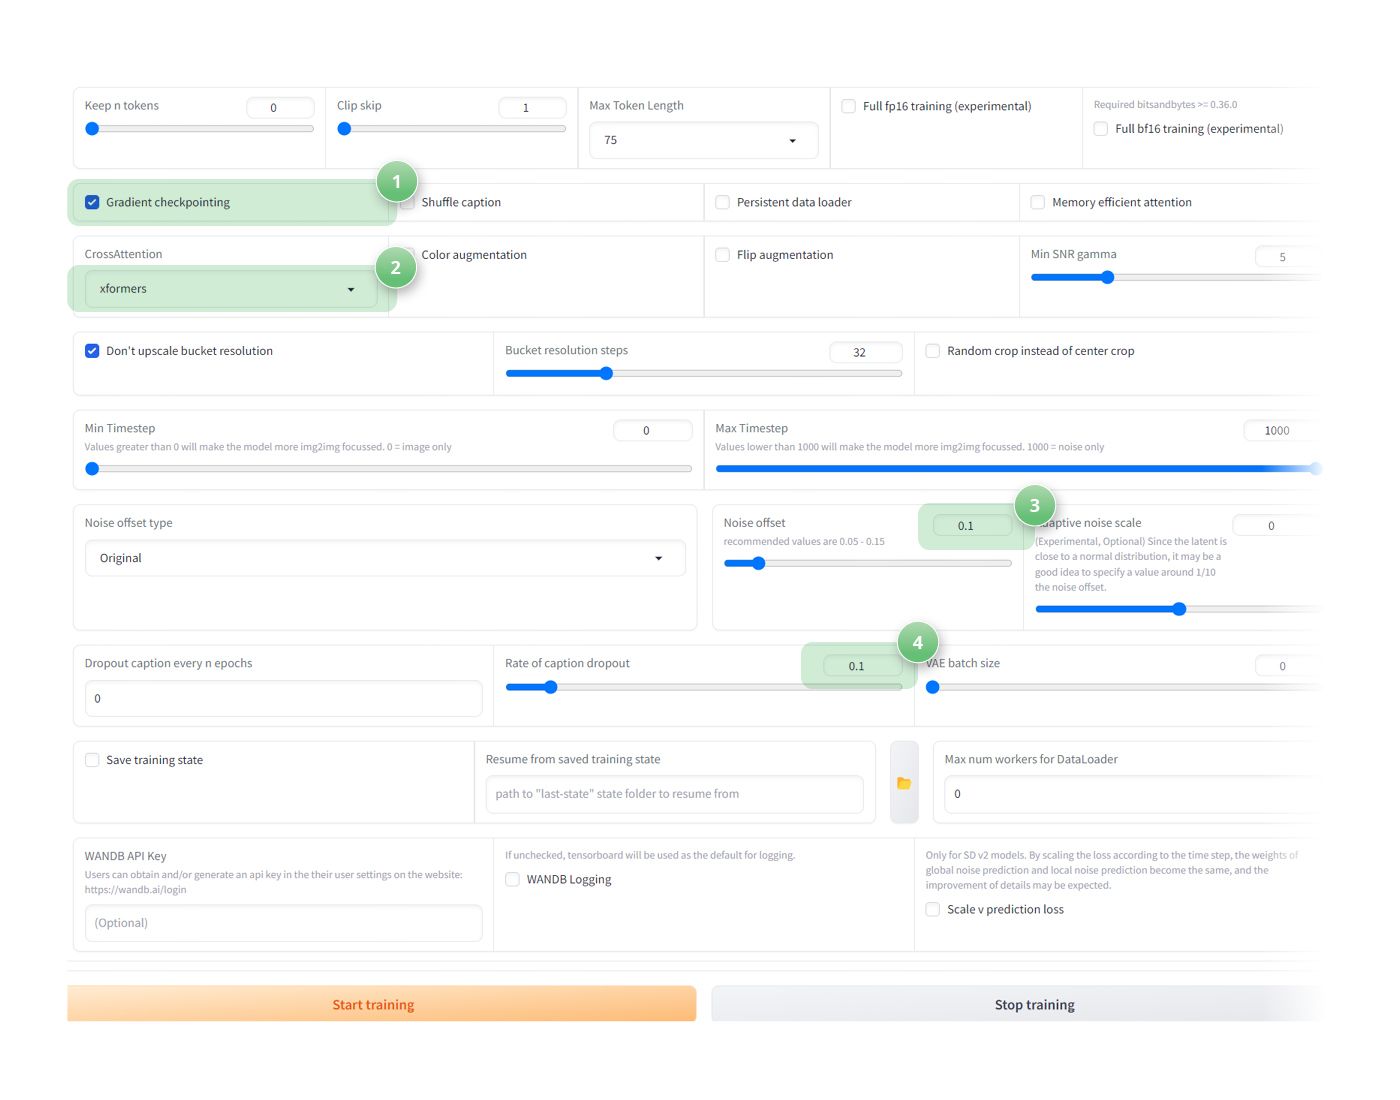
Advanced settings subtab
- (1) Gradient checkpointing: Check ✅!
- (2) CrossAttention: xformers
- (3) Noise Offset: 0.1.
- (4) Rate of Caption Dropout: 0.1
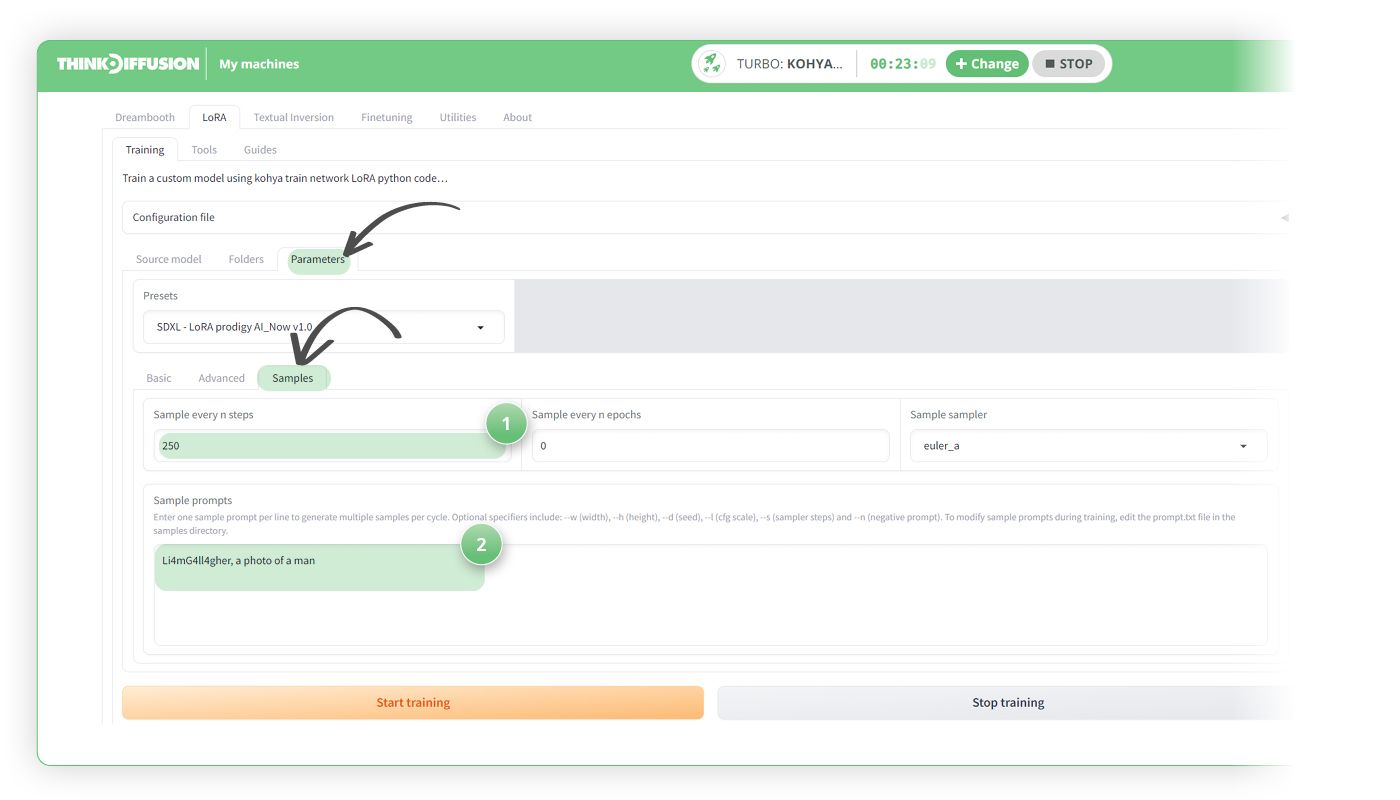
Sample Images Configuration subtab
- (1) Sample Every n Steps: 250
Set this value to 250 for the interval at which you generate sample images. - (2) Sample Prompts:
Format your prompts like 'triggerword, a photo of a class.' For example, 'Li4mG4ll4gher, a photo of a man.'
You are now ready to hit 'Start Training!'
(NOTE: There is no progress indicator bar in Kohya, to see the progress of your training, you will need to open the logs file which can be found here:- ../user_data/kohya/logging/kohya.txt - You can refresh this page to continue to see updates
After Training is Finished
Once you have your LoRA, you can then upload this to your normal version of auto1111 within the ../user_data/a1111/models/Lora folder.
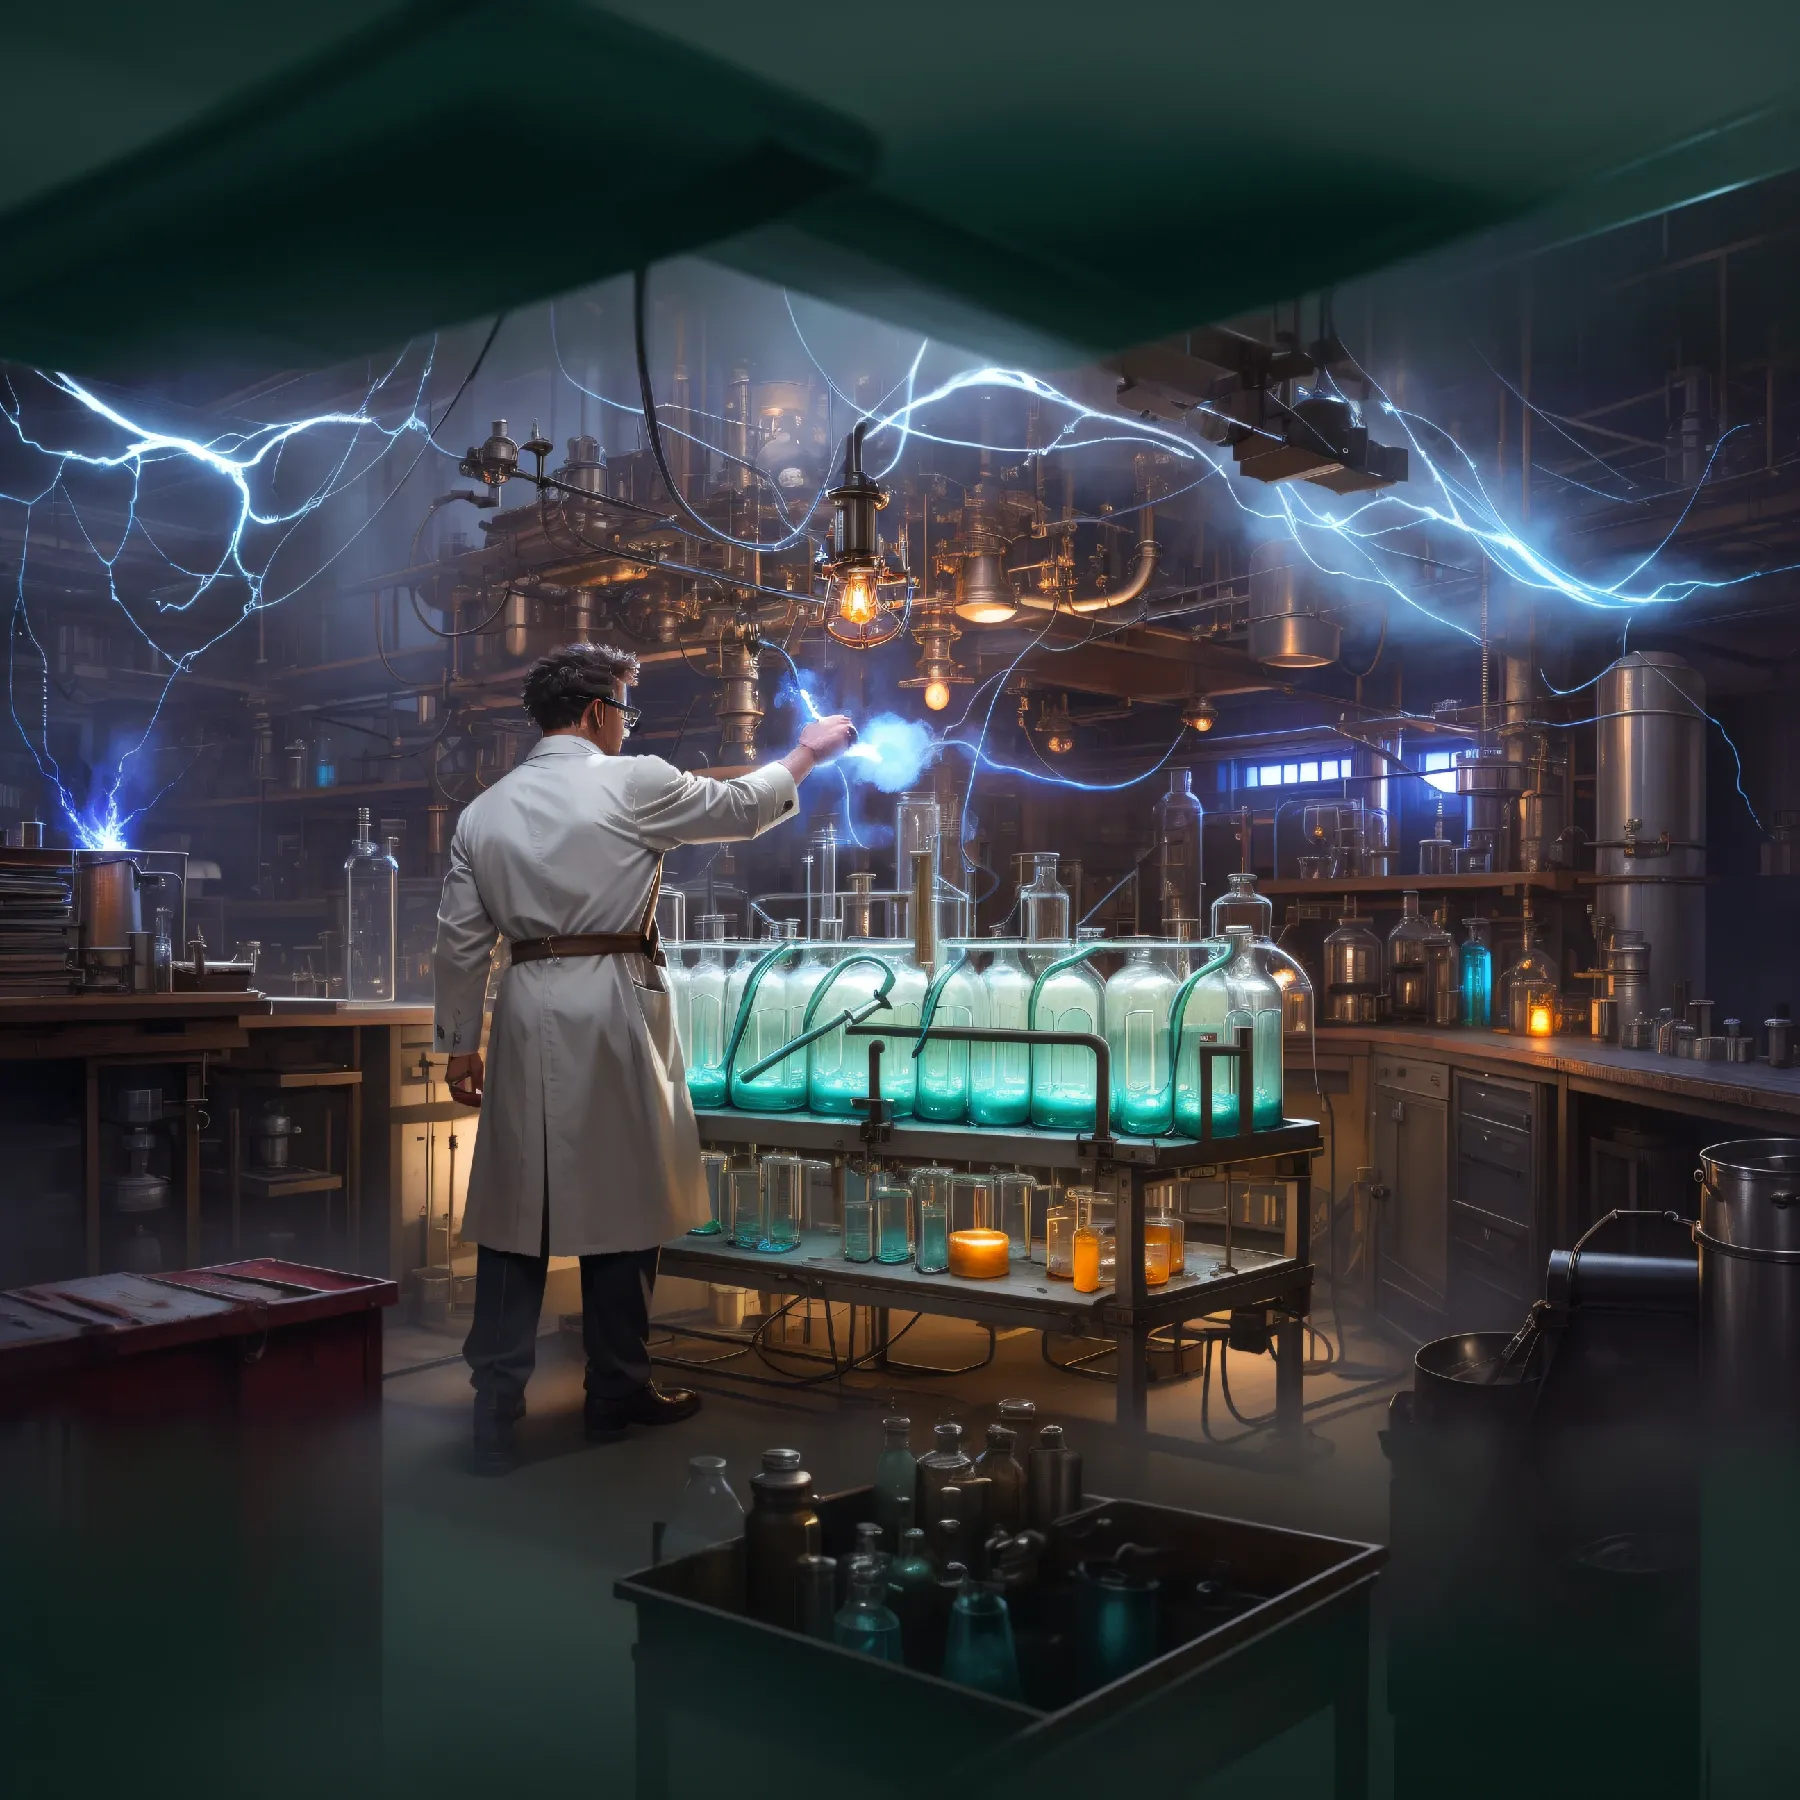
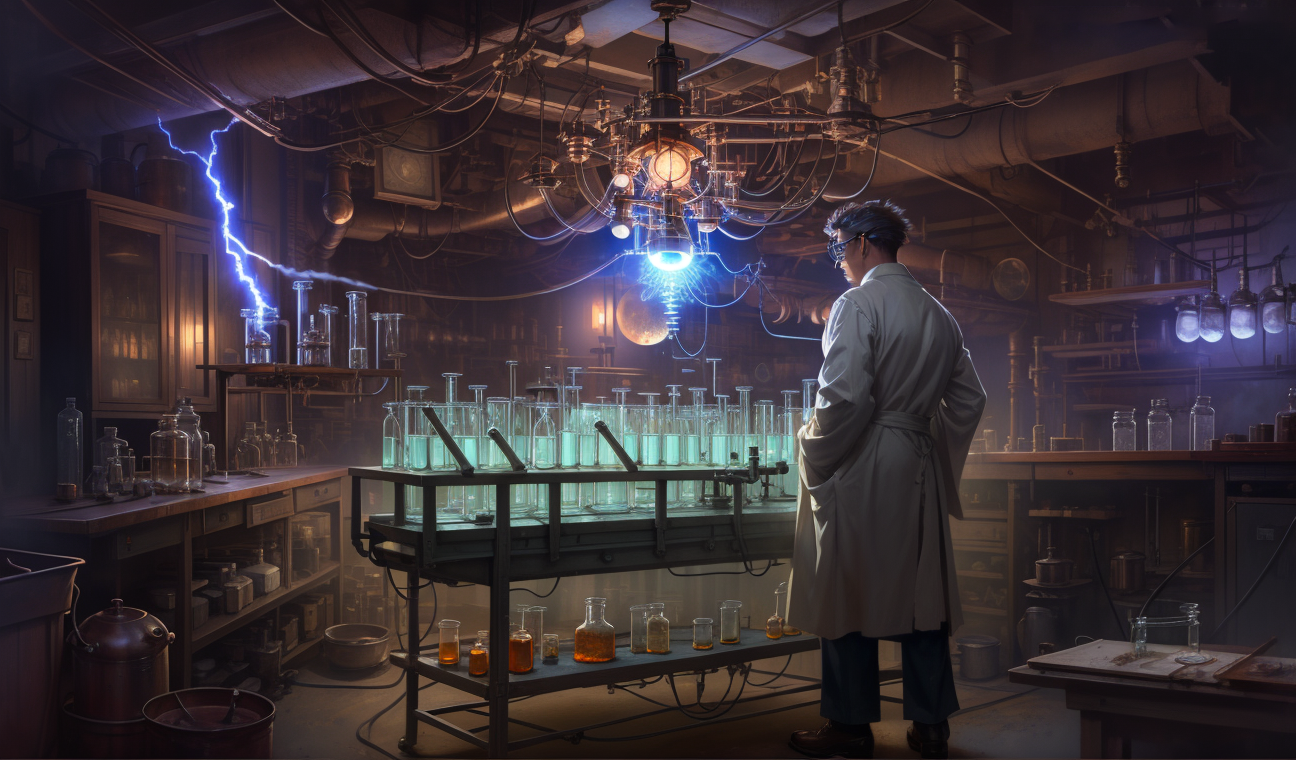
We can now test generating a picture with our LoRA and without our LoRA to see the difference
Here are the prompts with and without LoRA selected:
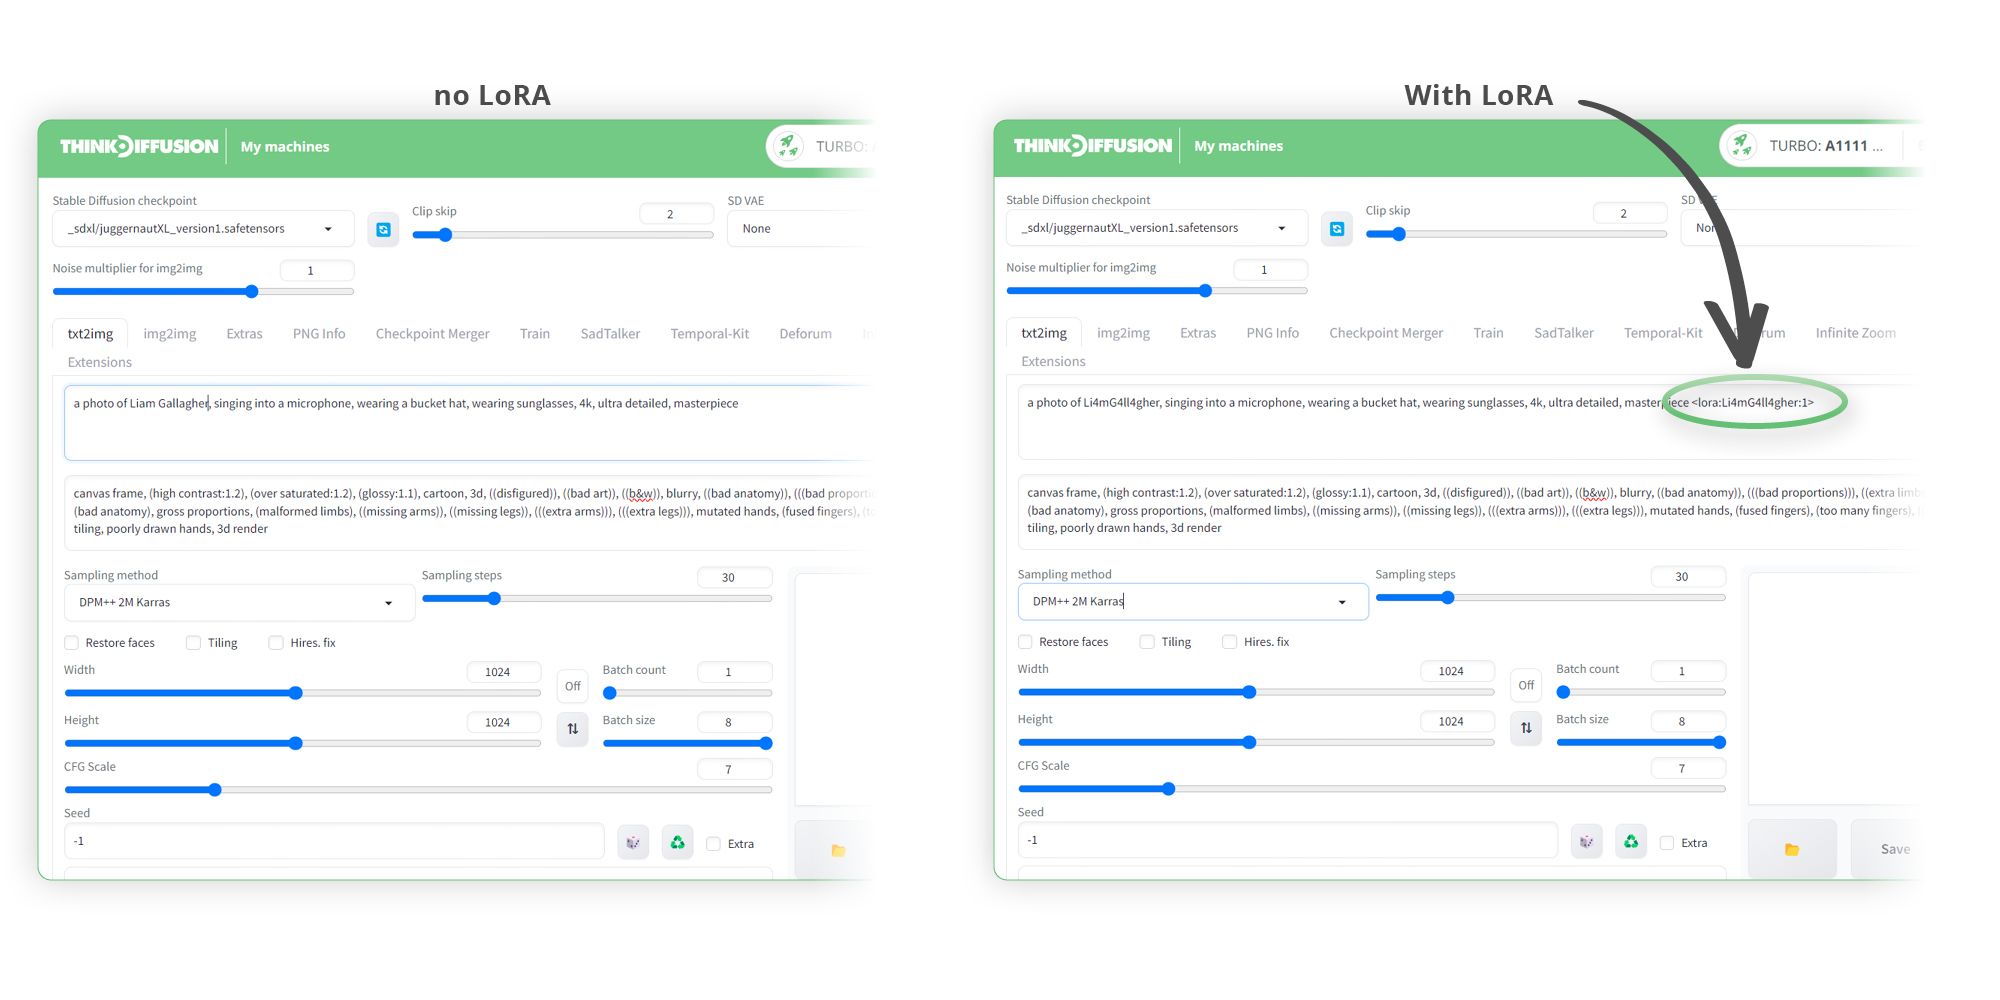
Below you can see the difference that our LoRA had on creating a much more accurate image!
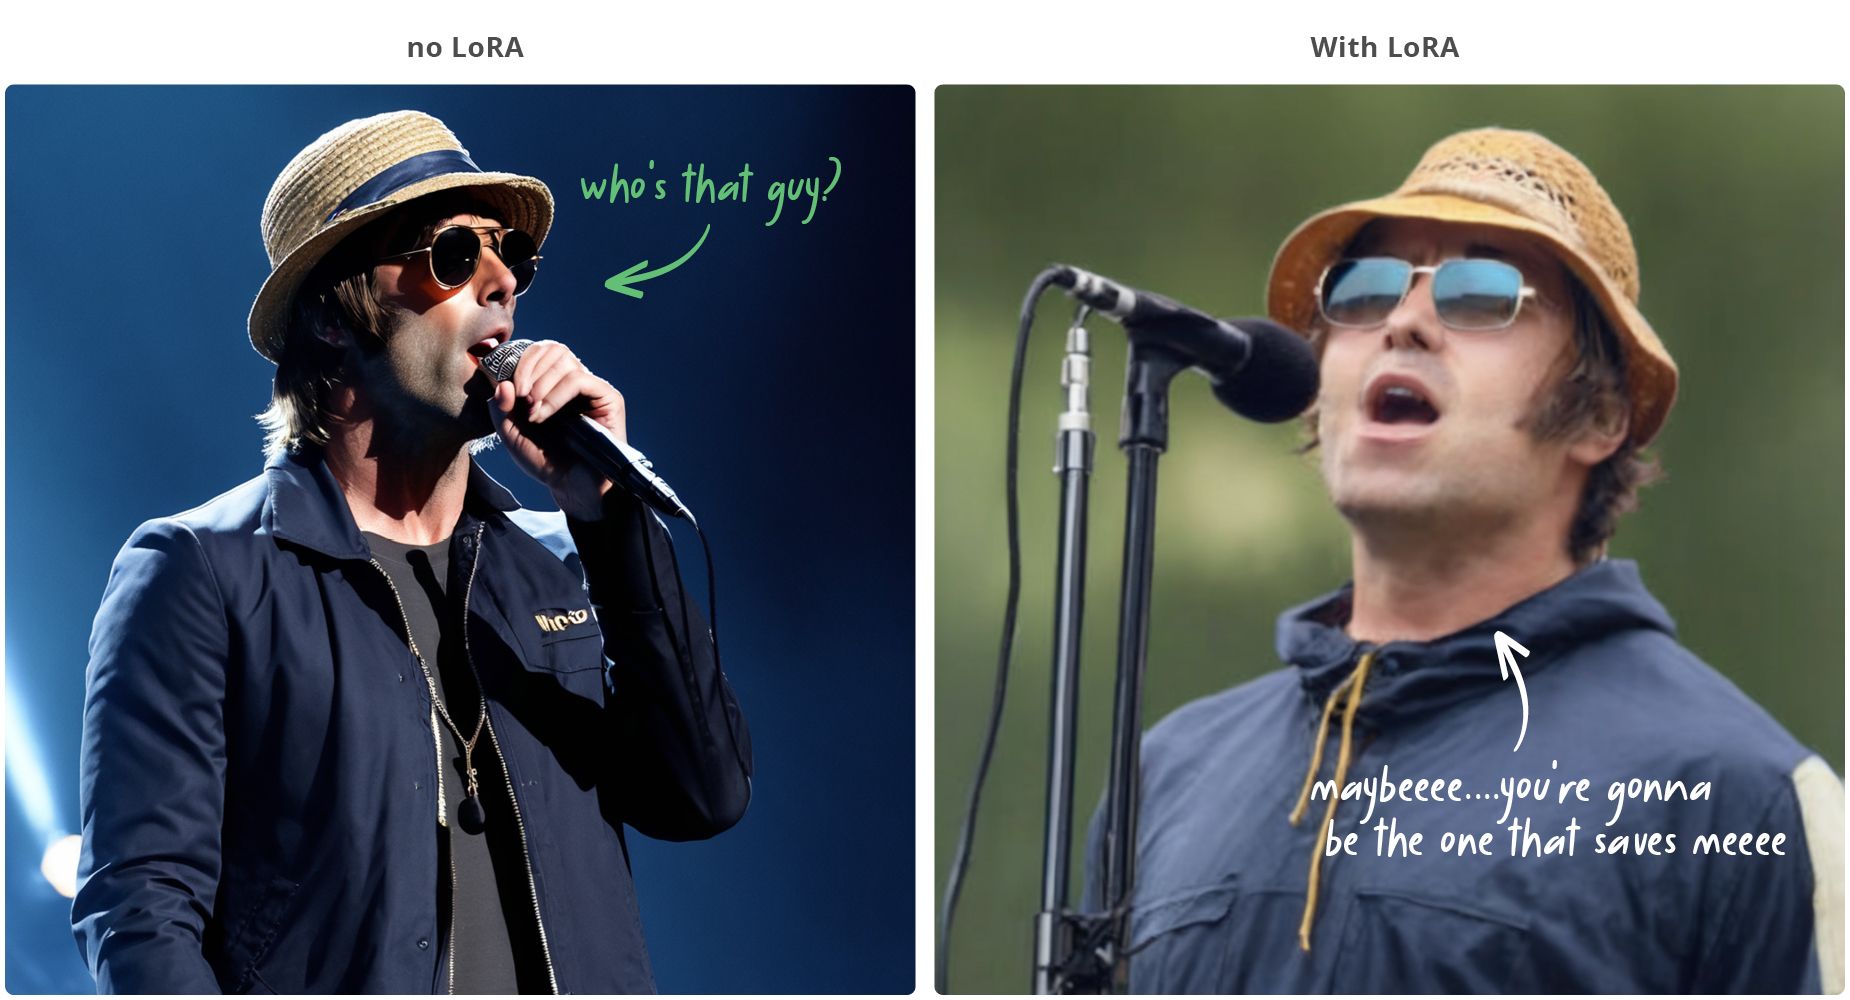
You can see that by using our SDXL LoRA, we can create a much more realistic image of our subject!
Any of our workflows can run on a local version of SD but if you’re having issues with installation or slow hardware, you can try any of these workflows on a more powerful GPU in your browser with ThinkDiffusion.
If you’d like to have more control over your character's poses, check out my post to using OpenPose here. Let me know what you're making with LoRAs, and enjoy creating your new models!
Member discussion