
What is Style Transfer in AI?
Style transfer in AI is a way to take the look or style of one image and apply it to another. For example, imagine you have a photo of a city's skyline and a famous painting like Van Gogh's "Starry Night." With AI style transfer, you can change the photo so it looks like Van Gogh painted it, with his special swirls and colors. This technology mixes the details of your photo with the style of the painting to create something new and beautiful.
In this guide, we will explain some basic ideas behind this method and show you how to do it yourself in ComfyUI. We'll be transforming a dancing video of a human into a dancing noodle dish.
Big fat special shout out to the original creator of this concept, the talented James Gerde! Please check out his incredible work here.
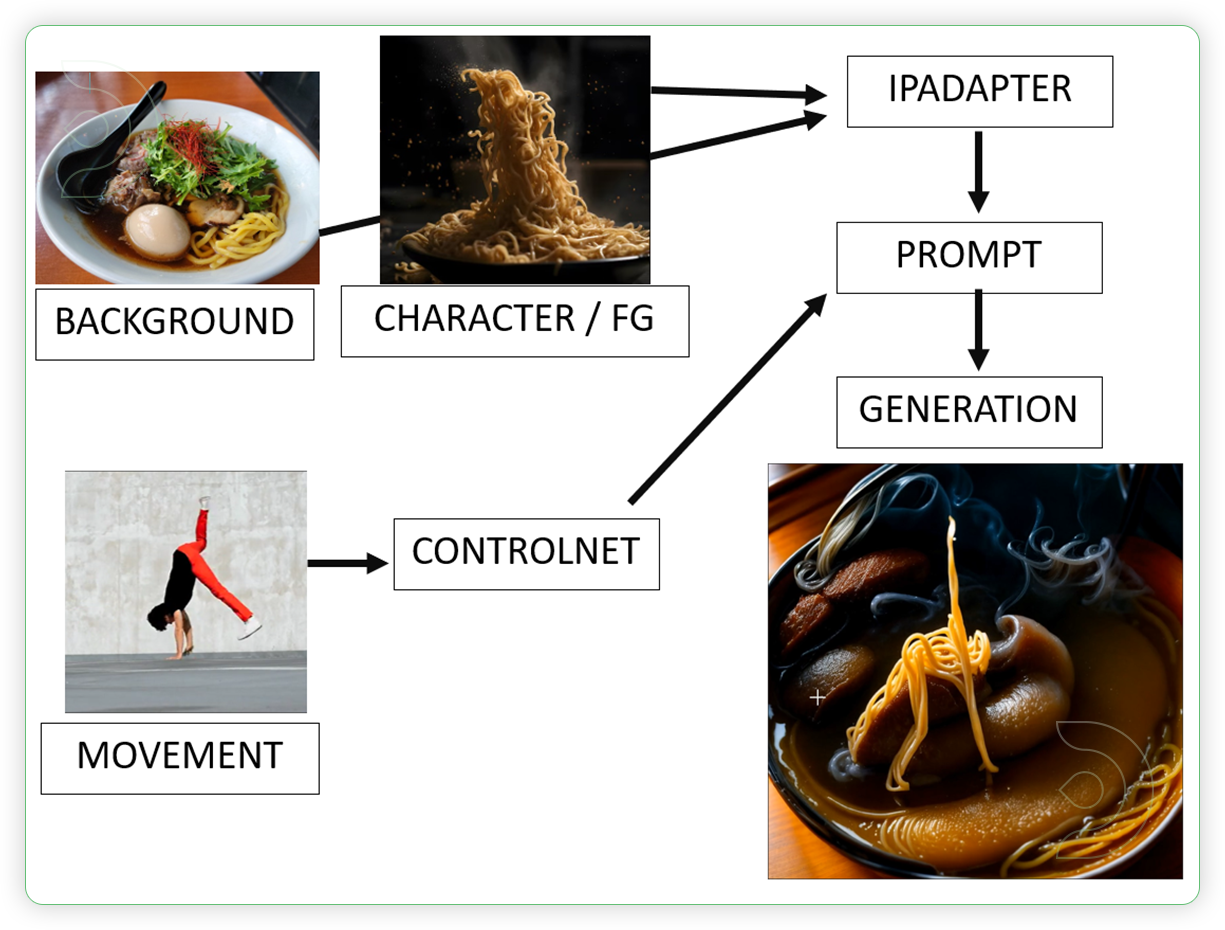
The purpose of style transfer is to generate a new image that has both the semantic content of a content image and the style of a reference style image.
Why use ComfyUI?
- User-Friendly Workflow Sharing: Download workflows with preset settings so you can get straight to work.
- Creative Applications: Ideal for artists, designers and marketers who want to create unique visuals and engaging content.
- Democratized Creativity: ComfyUI uses powerful open source AI, allowing anyone to create stunning, style-rich images and videos quickly.
One-Time Setup
Step 1: Load the ComfyUI workflow into ThinkDiffusion
Download the workflow and drag & drop or 'Load' it into your ComfyUI window, whether locally or on ThinkDiffusion. If you're using ThinkDiffusion, use the ComfyUI machine. It's necessary to use at minimum the Turbo 24gb machine, but we do recommend the Ultra 48gb machine.
Step 2: Install Custom Nodes
If there are red nodes in the workflow, it means that the workflow lacks the certain required nodes. Install the custom nodes in order for the workflow to work.
- Go to ComfyUI Manager > Click Install Missing Custom Nodes
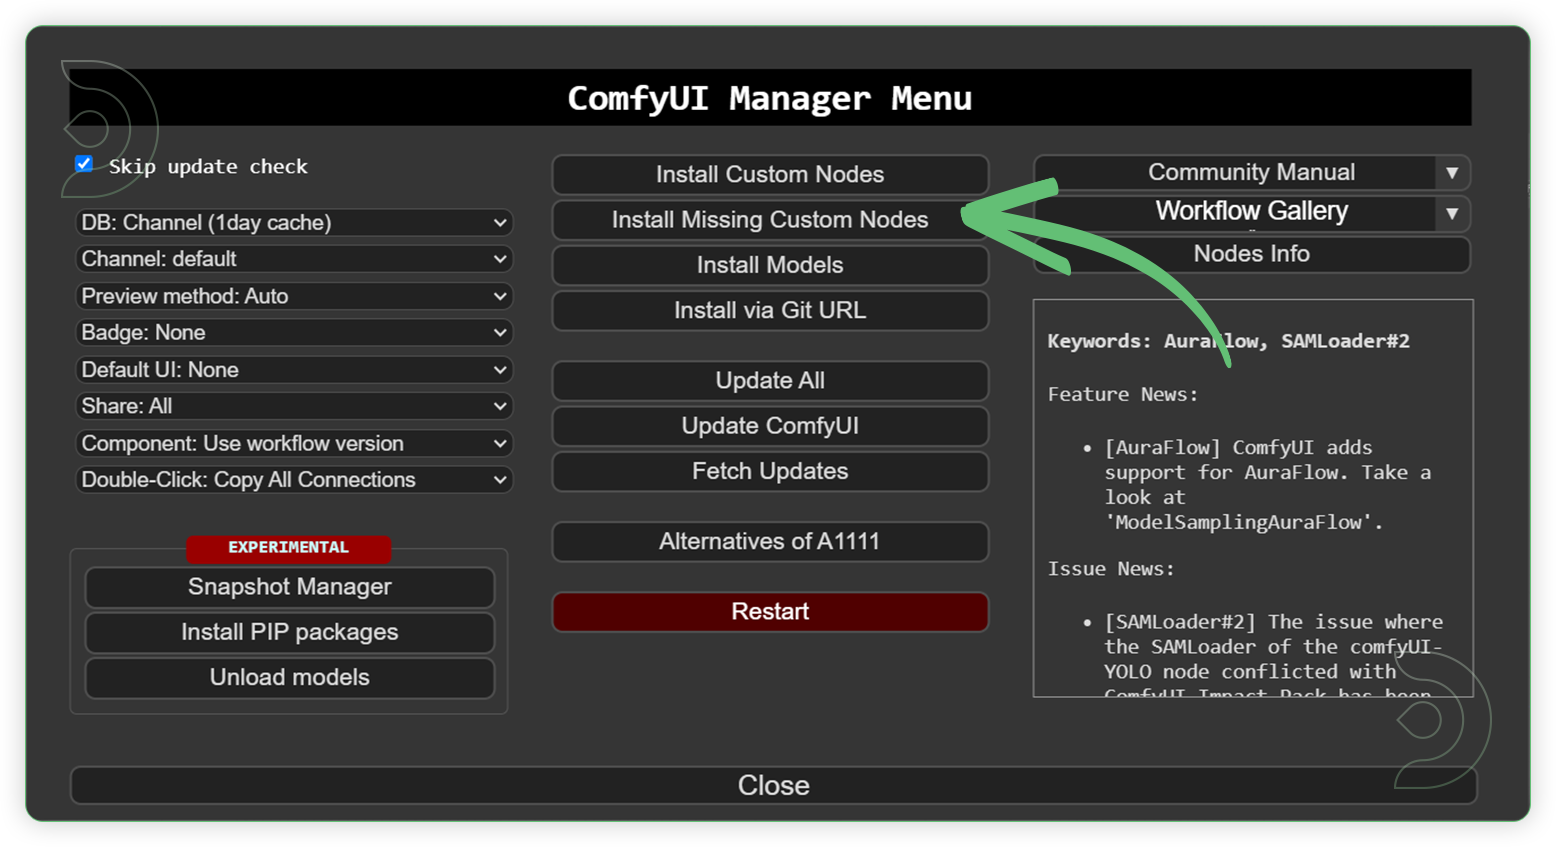
- Check the list below if there's a list of custom nodes that needs to be installed and click the install.
Step 3: Install Models
Download the recommended models (see list below) using the ComfyUI manager and go to Install models. Refresh or restart the machine after the files have downloaded.
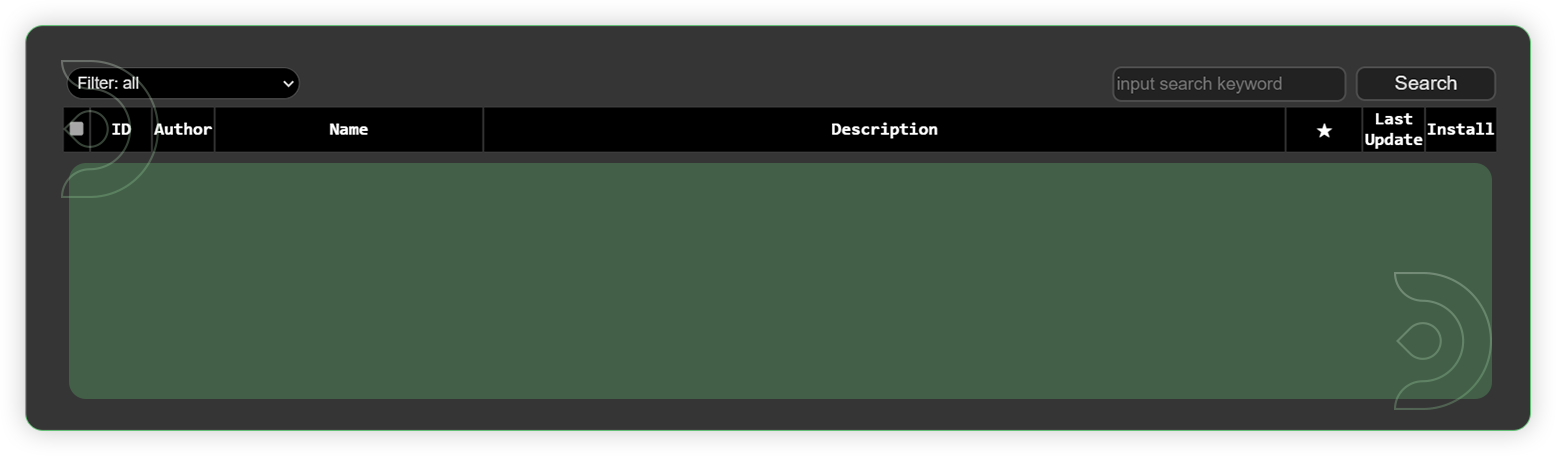
- Go to ComfyUI Manager > Click Install Models
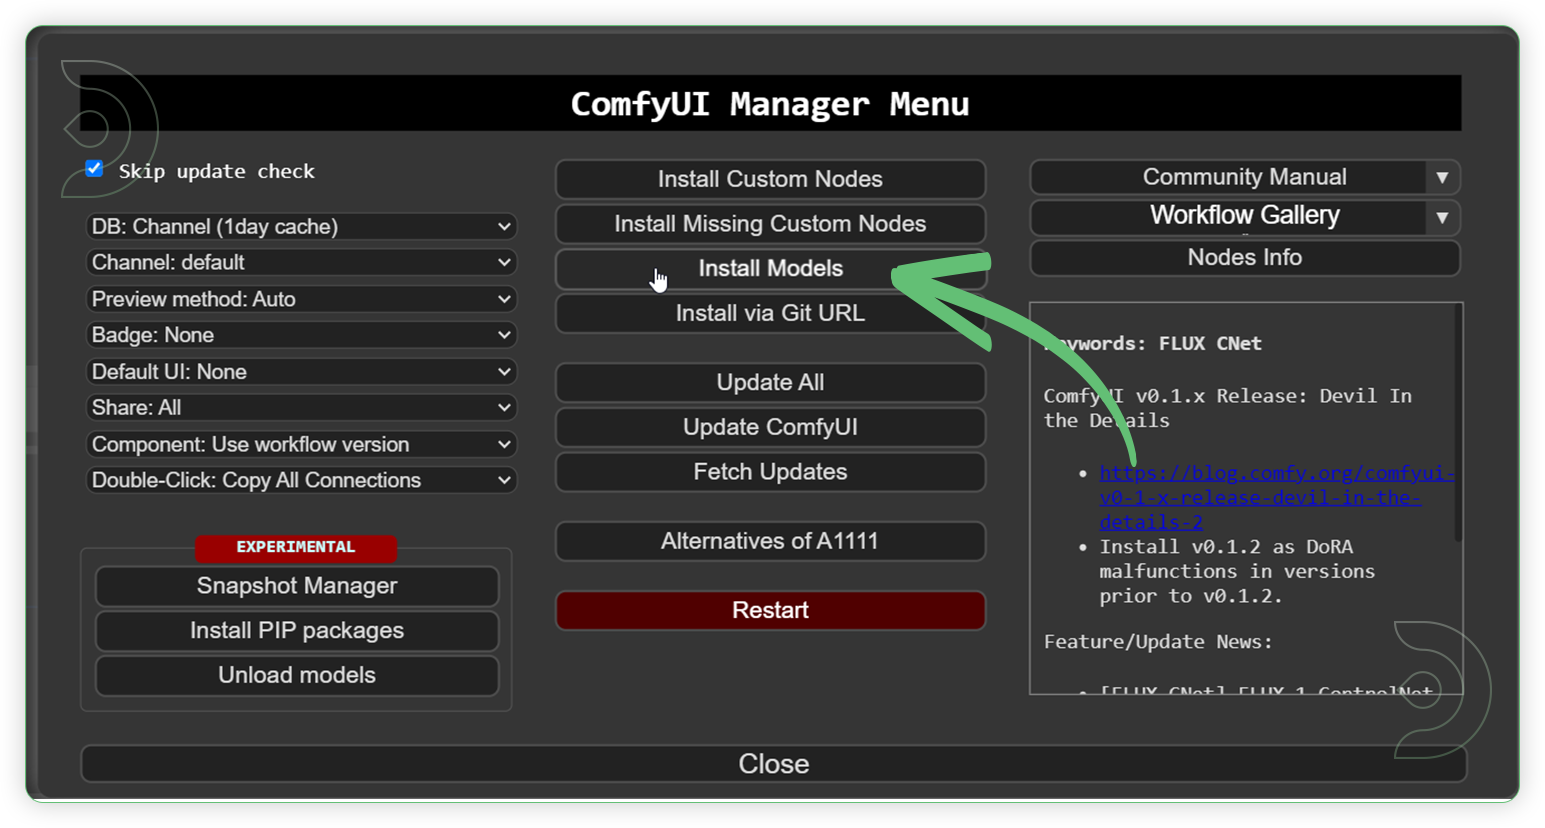
- When you find the exact model that you're looking for, click install and make sure to press refresh when you are finished.
Check the List of Models Here
- dreamshaper_8LCM.safetensors
- vae-ft-mse-840000-ema-pruned.safetensors
- Ghibli_v6.safetensors
- add_detail.safetensors
- Ip-adapter-plus_sd15.safetensors
- aid-RUN-Motion_Lora.safetensors
- AnimateLCM_sd15_t2v.ckpt
- control_v1p_sd15_qrcode_monster.safetensors
- control_v11p_sd15_lineart.pth
- model.pth
- 4x_NMKD-Siax_200k.pth

Model Path Source
The easier way to install the models, is to 'Copy Path' from the table below and paste the URL into ThinkDiffusion MyFiles using the 'upload' option. Use the 'Guide Table' to find the directory for each model.
| Model Name | Model Link Address | ThinkDiffusion Upload Directory |
|---|---|---|
| dreamshaper_8LCM.safetensors | ...comfyui/models/checkpoint/ |
|
| vae-ft-mse-840000-ema-pruned.safetensors | .../comfyui/models/vae/ |
|
| Ghibli_v6.safetensors | .../comfyui/models/loras/ |
|
| add_detail.safetensors | .../comfyui/models/loras/ |
|
| Ip-adapter-plus_sd15.safetensors PLUS (High Strength) |
.../comfyui/models/ipadapter/ |
|
| aid-RUN-Motion_Lora.safetensors | .../comfyui/models/animatediff_motion_lora/ |
|
| AnimateLCM_sd15_t2v.ckpt | .../comfyui/models/animatediff_models/
|
|
| control_v1p_sd15_qrcode_monster.safetensors | .../comfyui/models/controlnet/ |
|
| control_v11p_sd15_lineart.pth | .../comfyui/models/controlnet/
|
|
| model.pth | .../custom_nodes/ComfyUI_LayerStyle/RMBG-1.4/ |
|
| 4x_NMKD-Siax_200k.pth | .../comfyui/models/upscale_models/ |
Tips
Step 4: Run the workflow
Now that the hard work is out of the way, let's get creative. You need to follow the steps from top to bottom. The workflow is a one-click process after everything has been set up.
| Steps | Recommended Nodes |
|---|---|
| 1. Load an Images and Video | 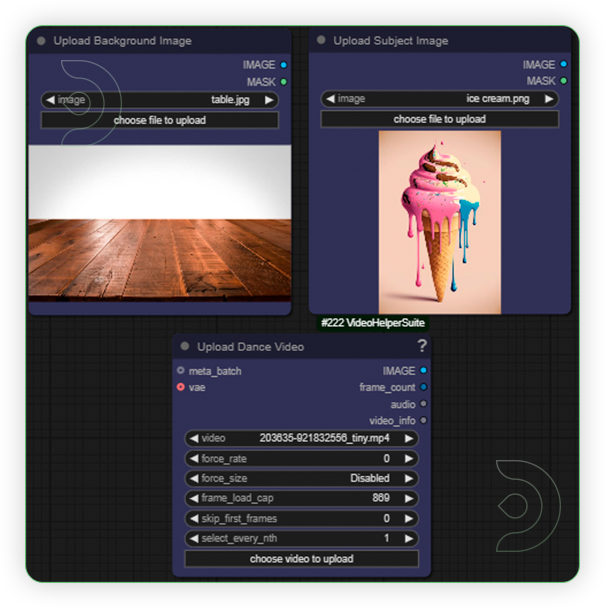 |
| 2. Set the Size | 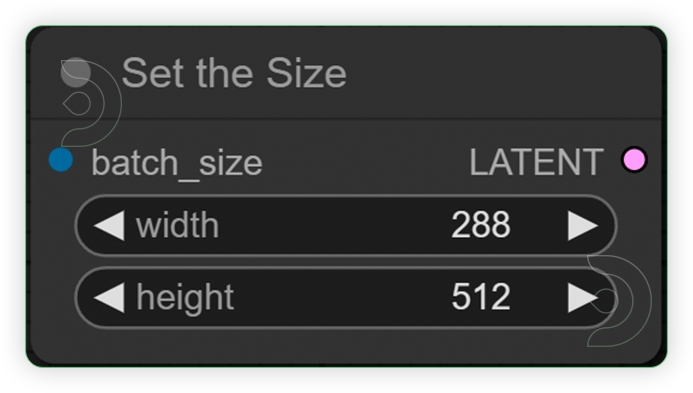 |
| 3. Set the Models |  |
| 4. Set the Models and Write the Prompt Set the models as seen on the image. The 1st text box is for positive prompt while 2nd box is for the negative prompt. |
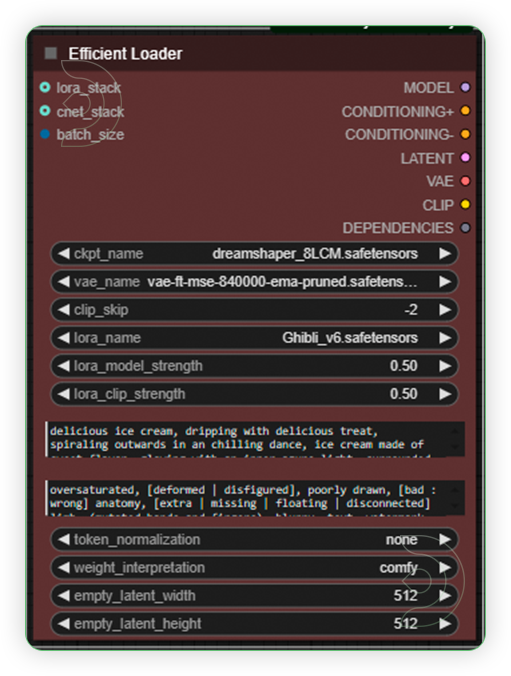 |
| 5. Run the Prompt | |
| 6. Check the Generated Video The 3 video preview consist of 1st video preview, upscaled video and interpolated video. |
 |
Tips
Examples
You can check the examples below together with its prompt settings.
Click the toggle below for you view the recommended settings.
Cactus Dance Settings
Prompt: Translucent cactus, glistening with spikes, spiraling outwards in an green color dance, cactus made of scary thorns, glowing with an inner azure light, surrounded by a faint smoke
Steps - 10, cfg 1.5, lcm, sgm_uniform
qrcode - 0.4 , lineart - 0.4
Ice Cream Dance Settings
Prompt: delicious ice cream, dripping with delicious treat, spiraling outwards in an chilling dance, ice cream made of sweet flavor, glowing with an inner azure light, surrounded by frozen effect
Steps - 10, cfg 1.55, lcm, sgm_uniform
qrcode - 0.4, lineart - 0.5
Fire Dance Settings
Prompt: burning flame, blazing with fire aura, spiraling outwards in an intricate dance, made of delicate flame burst, glowing with an inner fire and smoke, surrounded by a smoldering amber, background is snow landscape
Steps - 10, cfg 1.55, lcm, sgm_uniform
qrcode - 0.4, lineart - 0.4
Resources
Download the Input and Output Files Here

It contains of images and videos for you to test in the workflow.
Frequently Ask Questions
How can we define Style Transfer in AI?
This process creates a new image that preserves the key elements of the original photo but mimics the artistic appearance of the second image. This technology is commonly used in digital art and photo/video editing to generate unique and striking visuals.
How to use ComfyUI with Civitai on Mac?
We recommend using ThinkDiffusion so you don't have to install locally on your mac, but here are some quick steps on installing on a Mac computer.
To use ComfyUI with Civitai on a Mac, first install Python, clone the ComfyUI repository, and set up a virtual environment. Install dependencies using pip, download models from Civitai, and configure ComfyUI to recognize them. Launch ComfyUI, access it via your browser, and load the Civitai models. Upload your content, apply the desired style transfer, then save and export your final images or videos.
How to create a dancing noodles video with AI?
Follow this guide and you can create your own dancing noodle video with ThinkDiffusion. To produce a video of dancing noodles using artificial intelligence, begin by generating a noodle dance using the picture of a noodle and background of ramen bowl within the ComfyUI interface. Subsequently, employ an AI-driven animatediff, ipadapter and controlnet nodes to imbue the noodles with dancing movements. Assemble the animations using a video editing software like Adobe, which allows you to include backgrounds, synchronize music and finetune your result.
If you’re having issues with installation or slow hardware, you can try any of these workflows on a more powerful GPU in your browser with ThinkDiffusion.
If you enjoy ComfyUI and you want to test out creating awesome animations, then feel free to check out this AnimateDiff tutorial here. And have fun out there with your noodles!
Member discussion