

🧠 GETTING STARTED

Onboarding
Hey there, we're excited to have you exploring TD, and discovering the amazing potential of open source AI art creation. To help you get started, check out the onboarding video below.
A quick onboarding video for getting started on ThinkDiffusion
We'll walk you through:
- Selecting/Launching your own virtual machine
- Key features of the TD platform
- App overview of a few popular apps Fooocus/A1111/ComfyUI
When you're ready to jump in, click the button below:
Our free intro course to Stable Diffusion and more tutorials are at ThinkDiffusion.com/learn
Join our community on Discord to connect with others, learn more awesome tips, tricks and share your creations. And as always, have fun creating!
How to run Stable Diffusion in any browser
Watch MDMZ create a video using Stable Diffusion and Deforum on his laptop and phone with Think Diffusion.
It’s easy, simply fire up the device and browser of your choice. Like this one!
If you’re reading this somewhere, chances are you can run ThinkDiffusion in it, click here to get started.
You can also run multiple SD machines in your browser, click here to learn more.

How to select a machine
2 Fast 2 Diffurious
After clicking Get started, you'll see a few options:
1. Choose your UI
There are currently 2 web user interfaces (UI's) to choose from:
- Automatic1111 (A111) or SD.Next.
Both are very similar but are styled slightly differently.
- Within A1111, there are 2 SD versions:
Stable Diffusion v1.5 or Stable Diffusion XL (SDXL).
💡 How are SD v1.5 and SDXL Different?
- SD1.5 will be what most people are familiar with and works with controlnet and all extensions and works best with images at a resolution of 512 x 512.
- SDXL is the new base model that has been trained on images at a resolution of 1024 x 1024. At the time of writing, certain extensions such as controlnet are not yet supported on SDXL but other extensions such as Roop, InfiniteZoom, Deforum, Inpaint Anything, and many others continue to be compatible with SDXL workflows since they simply post-processes the outputs of SDXL and are not intertwined with the underlying scripts.
2. Choose your speed
You can then choose which machine to launch:
- The FAST machine with 16gb of Vram ($0.50 per hour) or...
- The RAPID machine with 24gb of Vram ($1.50 per hour)

How to set the Auto-stop timer at Launch
So you don't have to remember if you turned off the stove...
We built the Auto-stop timer so you could set an upper limit for your session - just a handy safety measure in case you forget to turn it off, like Dad nagging you to turn off the lights, dammit.
Right before you launch your machine, simply press the 🔼 & 🔽 buttons until you're happy with it.
- ⚡️Protip: You can always [▪️STOP ] or [ ➕CHANGE ] the timer at any time. See [Extending Session]
- ⚡️Protip 2: If you [▪️STOP ] early, any remaining time will be credited back

How to launch multiple machines
One of the great benefits of using ThinkDiffusion is that you can manage multiple machines at the same time. This is especially useful if you have a machine tied up because you are doing some training or creating a large video.
1. Simply click on My Machines menu item to slide open the side panel
2. Then hit the [ ↗️ Launch another machine ] button
- ⚡️Protip 1: After your machine starts, you'll be able manage it in the My Machines panel.
- ⚡️Protip 2: You can launch as many machines as you want. 🚀🚀🚀
- ⚡️Protip 3: Any device logged in can launch and manage the same machines in real-time. Try it with you phone and computer.

How are my credits used?
Your credits only run down when you have a machine actively running.
You can turn your machine on and off (like you're at an Internet cafe from the 90s) by hitting the stop button at any time on top of app bar, or adjusting your auto stop timer to shut down the machine at a predetermined time, allotting enough time to finish whatever it is you're doing while making sure it shuts off on time.
The advantage of this architecture is that you have a dedicated VM workspace that will be consistently fast for your generations, letting you do your work uninterrupted and not wasting time in a public queue.

How to extend your session(s)
When you launch a machine, the timer's default setting is 1 hour.
If you'd like to extend your session at any time:
1. Click the [ ➕Change ] button on the top bar:
2. Press the 🔼 & 🔽 buttons by any amount to modify your session.
3. Hit Confirm. Your new updated time will then be displayed on the timer
- ⚡️Protip 1: You can ➕Change/extend your session at any time. And you'll get a warning message when the timer hits 10 mins left
- ⚡️Protip 2: If you Stop your session early, then any remaining credits will be added back to your balance ➡💰🤑

How is my workspace dedicated and private?
Your private computer & storage for all users regardless of plan
Think Diffusion creates private and dedicated cloud workspaces for every individual, with everyone’s files staying secure and untouched.
Everything happens on a dedicated computer created for each individual.
All A.I. work is done on a private CPU/GPU, each assigned to a single user. It’s like having your own private computer and software, without the technical costs and maintenance.
This architecture is fundamental to Think Diffusion, and all users enjoy this benefit regardless of their pricing plan.
📂 YOUR FILES
How to master your files like a Pro
Our built-in file management browser and tools provide you with a personal and persistent cloud storage drive and a robust system that's essentially an extension of your own device.
Your files will stay persistent across all sessions & machines, and with a subscription will have increased storage with no inactivity cap.
To access your file browser panel, click on the file browser panel icon.

Just like your own drive, you can fully navigate its file structure to transfer and organize your work:
- Create new folders
- Copy a file’s link
- Upload files, models and extensions from your device
- Upload large models directly by URL or directly from Google drive

How to create a new folder
Maybe we should just have a Dogs folder preinstalled?
It's super easy to organize files in Think Diffusion. Within the My Files panel:
- Simply click on the ➕ plus button and name the folder anything.
- ⚡️Protip: I tend to put all new folders in the ../user_data/a1111/inputs/ folder as it helps me organize my inputs, but you're free to create new folders wherever you'd like:

How to copy a file's link
We debated whether making a video for this was necessary, but decided it was. For consistency!
Simply click on the copy path button on any file.
It's the first 🔗 link button next to the file uploaded.
⚡️ CUSTOMIZATIONS
Your persistent files, extensions & customizations
All your customizations are automatically are saved for you to pick right back up the next time you launch a machine:
Automatic1111 Prompt styles
Save your favorite style settings, and they'll stay safe for you to use next time. Learn more here
Automatic1111 Settings
You can always adjust and save settings to your preference in the Settings tab.
For guidance click here
Automatic1111 UI Elements
Not only that, but you've can also save default values for all A1111 UI elements. Learn more about it here
Models and Art generation files
Your files are safely secured on your dedicated and private drive.
Extensions
Any extensions you install, beyond the preloaded ones, will remain available and personalized to you every time you launch a new machine. It's a complete game-changer. For more information on how to install extensions click here
ComfyUI - Persistent Custom Nodes
ComfyUI already has persistent custom nodes. Install custom nodes once, and they'll stay accessible across different machines as well as the next time you boot up another machine, no need to re-install each time.
🚨 Note for non-TD-Pro members:
Your files, installed extensions and settings will be cleared after 48 hours of inactivity.
Pro members have no inactivity cap. To sign up for TD-PRO click here

How to load & reuse prompts with 1-click
Okok, fine technically 2 clicks, but barely!
1. To load prompts, simply click on the ⬇️ button in the Styles field.
2. Hit the 📋clipboard icon to load the text into the Prompt fields.

How to save your prompts & styles
When you've entered a prompt that you like and want to reuse again later, you can:
- Click the Save Style button
- And then enter a name for your style as shown below:
- Once saved it will be shown in the styles dropdown menu
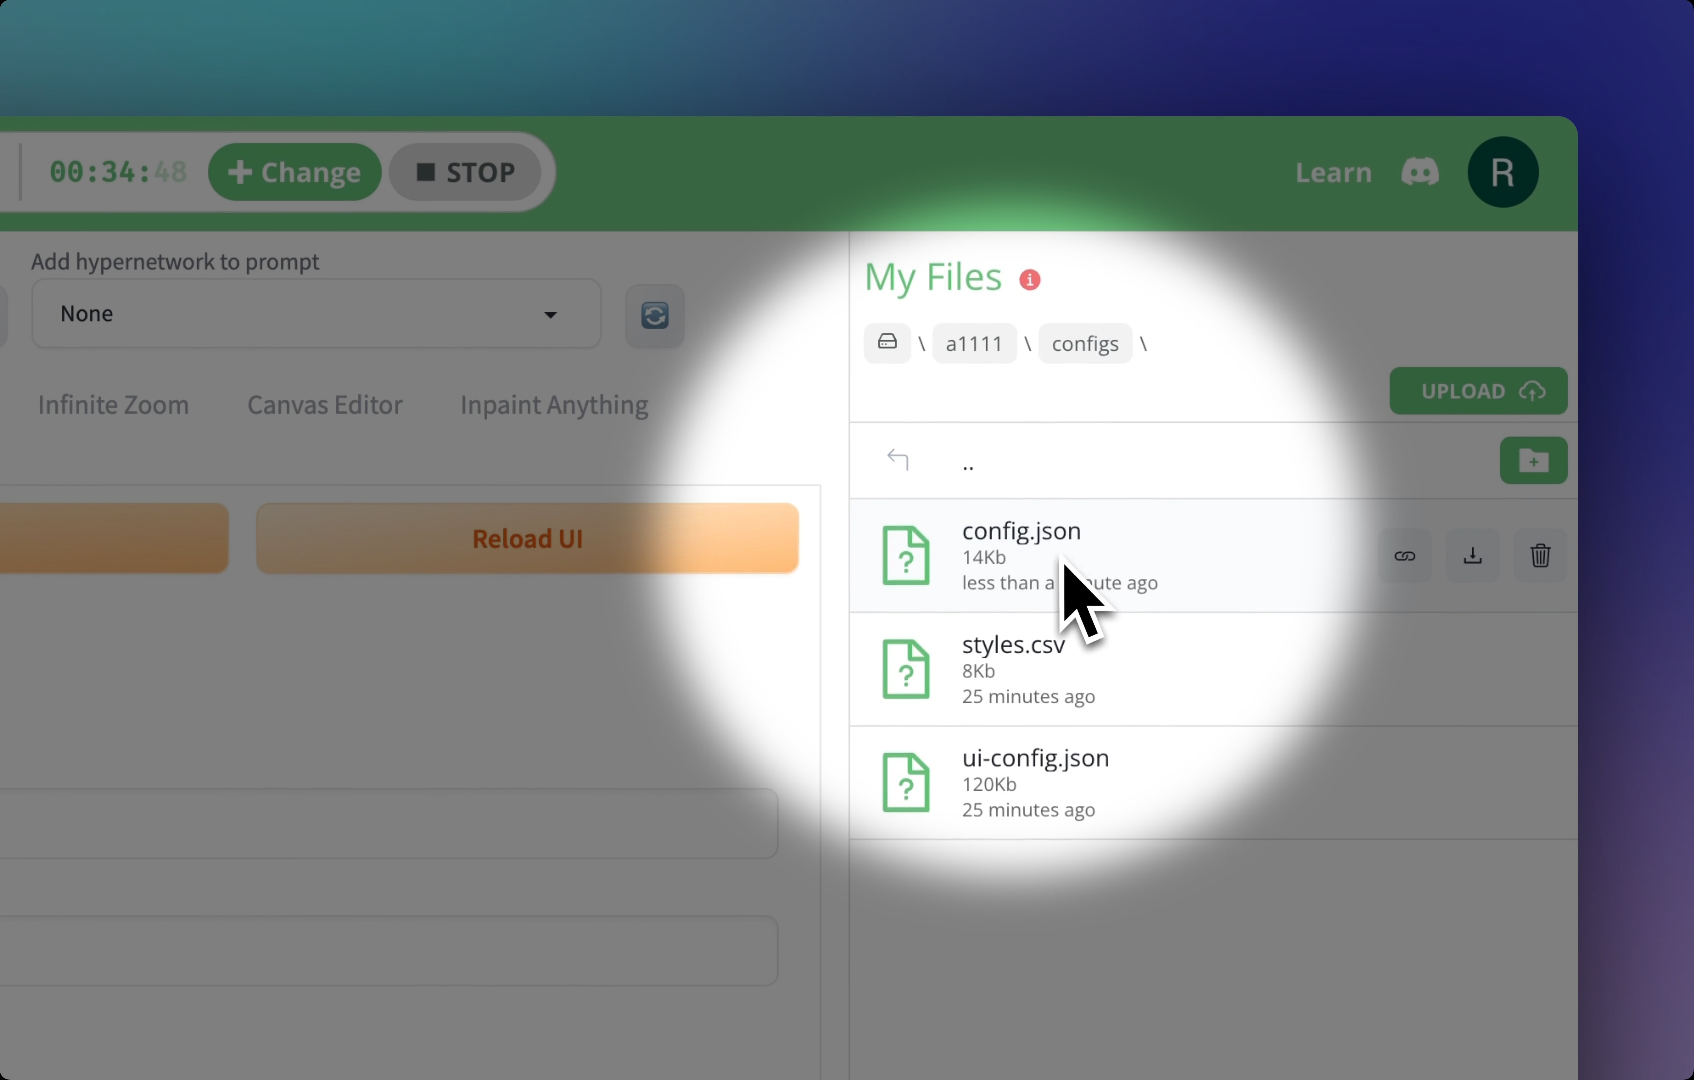
⚡️Protip: styles.csv stores the values in the Styles dropdown. If you’d like to revert to defaults, you can delete this file and next time you launch a machine, a new fresh file with default values will be created for you. You can download it for your own backup as well, by navigating to ../user_data/a1111/configs/styles.csv

How to save your settings in the settings tab
To save Settings that are set inside the Settings tab, simply click Apply Settings, these settings will persist across your machines.
- ⚡️Protip 1: Any changes you make will be stored inside the config.json file ../user_data/a1111/configs/config.json
If you have favorite settings, then you can simply upload the file to overwrite the one there and your setup will be how you want it.
- ⚡️Protip 2: For example you can change defaults such as the samplers displayed, the default image resolution, the default sampling steps etc...
- ⚡️Protip 3: We're always rolling out more features ( you can refer to our release notes ). If a rollout includes updated default settings AND you have custom settings installed already, please note that you will need to remove your customized config.json file and start a new machine to generate a fresh new one. We do this so that your custom file will not be overwritten.

How to save the default values of all the UI elements
If you’ve been updating your UI with all sorts of new values and want to save them all as defaults, you can
1. Navigate to the Settings tab
2. Click on the Defaults menu item
3. Click View changes to review all the changes that will be made to your default values
4. Hit Apply
Now everytime you start up a new machine, these new values will show by default.
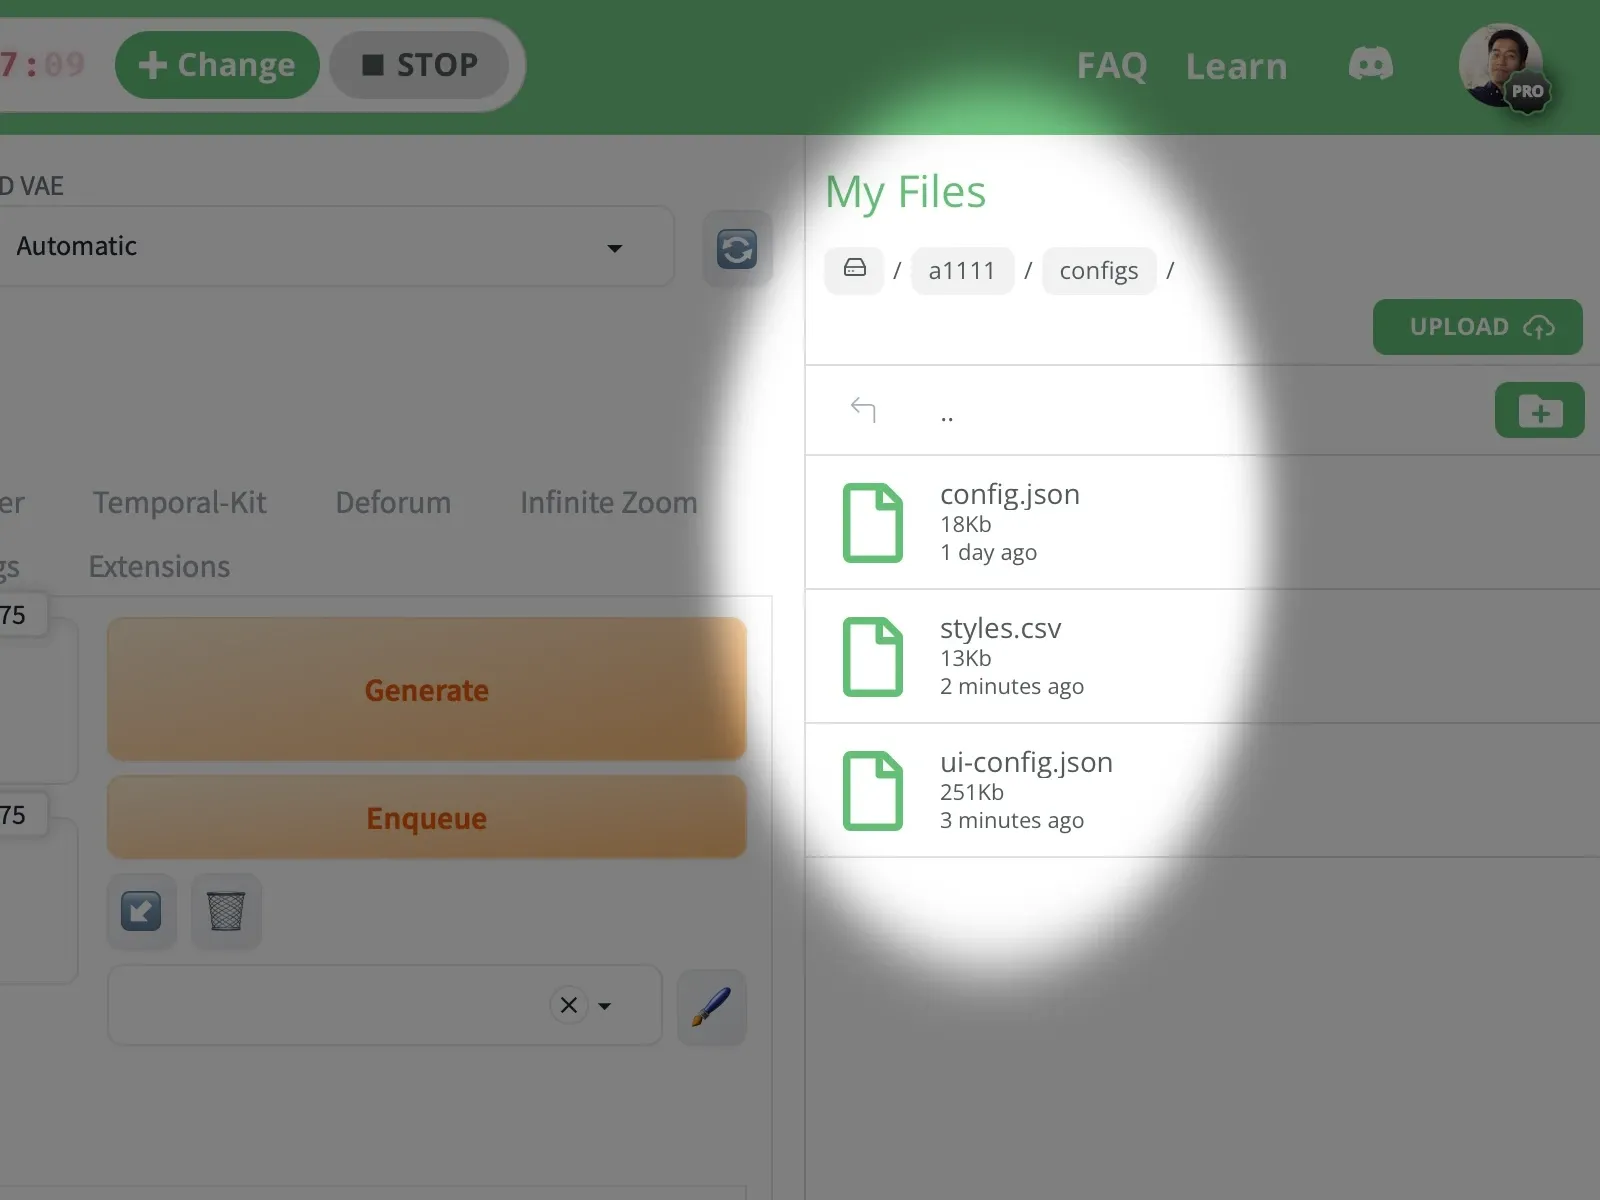
- ⚡️Protip: All the values have been saved to this file: ../user_data/a1111/configs/ui-config.json
So feel free to back it up by downloading it anytime.

How to change the Quicksettings options at the top
Did you ever wonder why certain settings always live at the top of the page (commonly SD Checkpoint, SDVAE Clip skip, etc.) ?
You can actually modify these shortcuts easily:
1. Navigate to the Settings tab, and the User interface menu item
2. Find the Quicksettings list field, and add/remove from its dropdown menu
3. Hit Apply settings and Reload UI
⚡️Protip: If you’d like to backup these settings, they’re contained in the config.json & ui-config.json files in ../user_data/a1111/configs/

How to always have the latest default settings
We’re always rolling out more features ( you can refer to our release notes ), and sometimes they include updated default settings.
However, if a rollout includes updated default settings AND you have custom settings installed already, please note that you'll need to remove your custom config file(s) and start a new machine to create fresh new defaults.
For example, if a Deforum extension gets updated, and you notice that a field in your UI isn't consistent with other screenshots, it could be due to custom config files that you've created, and that we've preserved, as to not be overwritten. (Your settings persists across machines of the same type & app)
You may have changed your custom settings through either:
- updating your settings,
- updating your shortcuts,
- customizing the values in your UI,
- or updating your styles for the style dropdown
❤️ We do this so your custom file(s) won't be overwritten.
👶🏽 All new users naturally receive the latest default settings.
⚡️Protip: Save a backup of your custom config files by 🔽 downloading them before removing.
💡 Where are all the config files and what do they do?
config.json stores all field values in the Settings tab. You can naturally update your Settings, and these settings will persists across your machines. If you’d like to revert to default settings, you can delete this file and next time you launch a machine, a new fresh file with default values will be created for you. Learn more about updating your settings here
ui-config.json stores all field values of all the tabs (img2img, txt2img etc). If you want the values currently seen in all the files of each of the tabs to auto load as default when you boot up a machine, go to Settings>Defaults>View changes > Apply. If you’d like to revert to defaults, you can delete this file and next time you launch a machine, a new fresh file with default values will be created for you.
styles.csv stores the values in the Styles dropdown. If you’d like to revert to defaults, you can delete this file and next time you launch a machine, a new fresh file with default values will be created for you.

How to check terminal logs
Curious what’s going on in the terminal as you’re working?
Every time you launch a machine, it's assigned a distinct name, and a related log file is created for it inside the corresponding app folder. For instance, a log file might be named phu-attention-23213812-logs.txt
- Simply navigate to a1111/logs, comfyui/logs, fooocus/logs, or kohya/logs.
- Click on the <machine_name>.txt file.
- The latest log file will open in a new tab.
Refresh your browser to get the latest status in real-time!
How to reset to default TD settings
- Automatic1111
- Delete all files/folders in the
/a1111/configs/folder - Delete all files in the
/a1111/extensions/folder - New machines will launch with default TD settings
- Delete all files/folders in the
- Comfy
- Delete all files/folders in the
/comfy/custom_nodesfolder - New machines will launch with default TD settings
- Delete all files/folders in the
⬆️ UPLOADING
How to upload a file from your device
To upload a file or image, open your My Files panel
Then simply click the ⬆️ Upload button to reveal the drag & drop/upload area, and tap the area to upload the file of your choice.
You can also upload with a single URL via Sites like Civitai or from file sharing services like Google Drive

How to upload a model by URL ( eg Civitai )
Yeah, it's really that fast, these cloud computers can transfer 5Gb models quicker than you can say "Textual Inversion"
1. Navigate to the appropriate folder, first.
Your uploads will be placed in that file path.
- For example, to upload a custom checkpoint model by URL, open your My Files panel, and navigate to the following folder:
../user_data/a1111/models/Stable-Diffusion/

- If you're uploading a custom LoRA, the path would would be: ../user_data/a1111/models/Lora

2. Click the ⬆️ Upload button to reveal the upload field

3. Paste in the URL of your choosing.
The URL can be from Civitai, huggingface, or any other URL hosting the files.

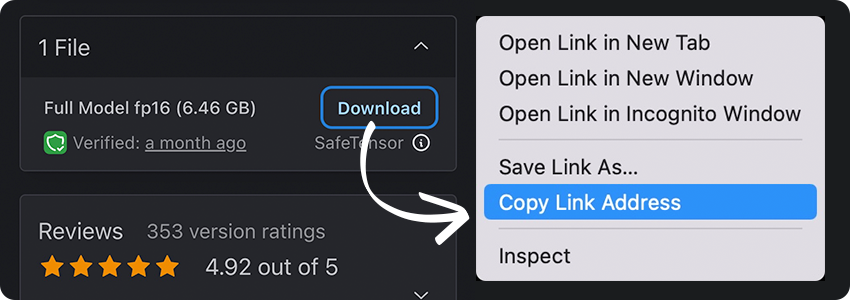
Find the correct link to right-click on Civitai:
Find the correct link to right-click on Huggingface:
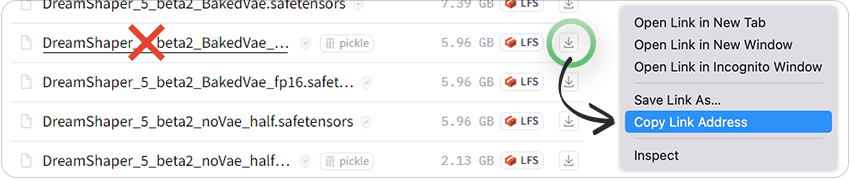
4. Hit the 🔄 Refresh button next to the appropriate models list (if applicable) and Voila! 🪄✨

How to upload from Google Drive
Uploading files with a direct google drive link is as easy as pasting the URL of the file into the URL field.
It’s GETTING the link from Google that’s the tricky part, due to their security checks. In the future, we’ll be implementing a solution for this, and in the meantime you can take the steps below:
⚡️Protip: First confirm your file is publicly available with the link, so that "Anyone with the link" can access the file.
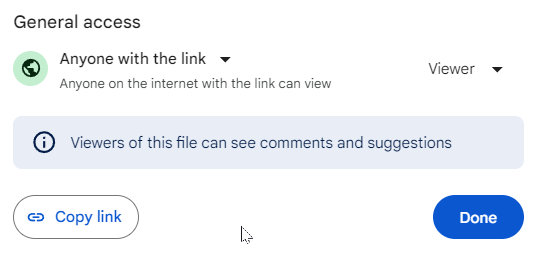
1. "Copy link" from Google drive
- It would look something like this: https://drive.google.com/file/d/1p66tMx0YhzXfzIxlupa8Oaqp-BJZA0Rf/view?usp=drive_link
2. Convert the Google Drive public URL to a fully downloadable link
- You can use the format:
https://drive.google.com/uc?export=download&id=YOUR_FILE_ID
3. Replace “YOUR_FILE_ID” with the actual file ID from your Google Drive URL.
- In this example, the file ID is 1p66tMx0YhzXfzIxlupa8Oaqp-BJZA0Rf
so the fully downloadable link would be:
https://drive.google.com/uc?export=download&id=1p66tMx0YhzXfzIxlupa8Oaqp-BJZA0Rf
Important: If your file is too large, Google drive will present you with this confirmation:
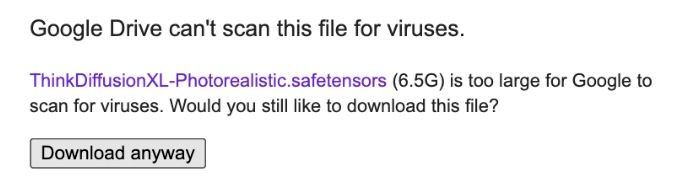
You then need to follow these steps below to get the correct URL:
1. Go to Inspect mode with a right click & Inspect (or F12 button on Windows).
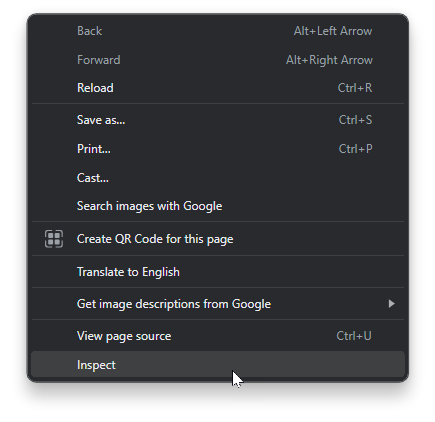
2. Select the Network tab
3. Click on the "Download anyway" button, then click Cancel when the download window pops up.
4. Click on the "uc?id=......" in the Name column on the left.
5. Click on the "Headers" Sub tab
6. Copy the Request URL
( which you can find in the: Network Tab > Headers Sub tab > Request URL )
The Request URL is the fully downloadable URL to your file. Now you can FINALLY paste THAT into the Think Diffusion Upload via URL field!


How to upload into ComfyUI
Uploading into ComfyUI through our file browser is exactly the same as you would through A1111 - see those instructions above. Basically:
- In My Files, navigate to the correct folder.
- And click upload to reveal the URL field for your URL.
The important step is navigating to the correct folder depending on the type of model you're uploading.
Navigate to: / comfyui / models /
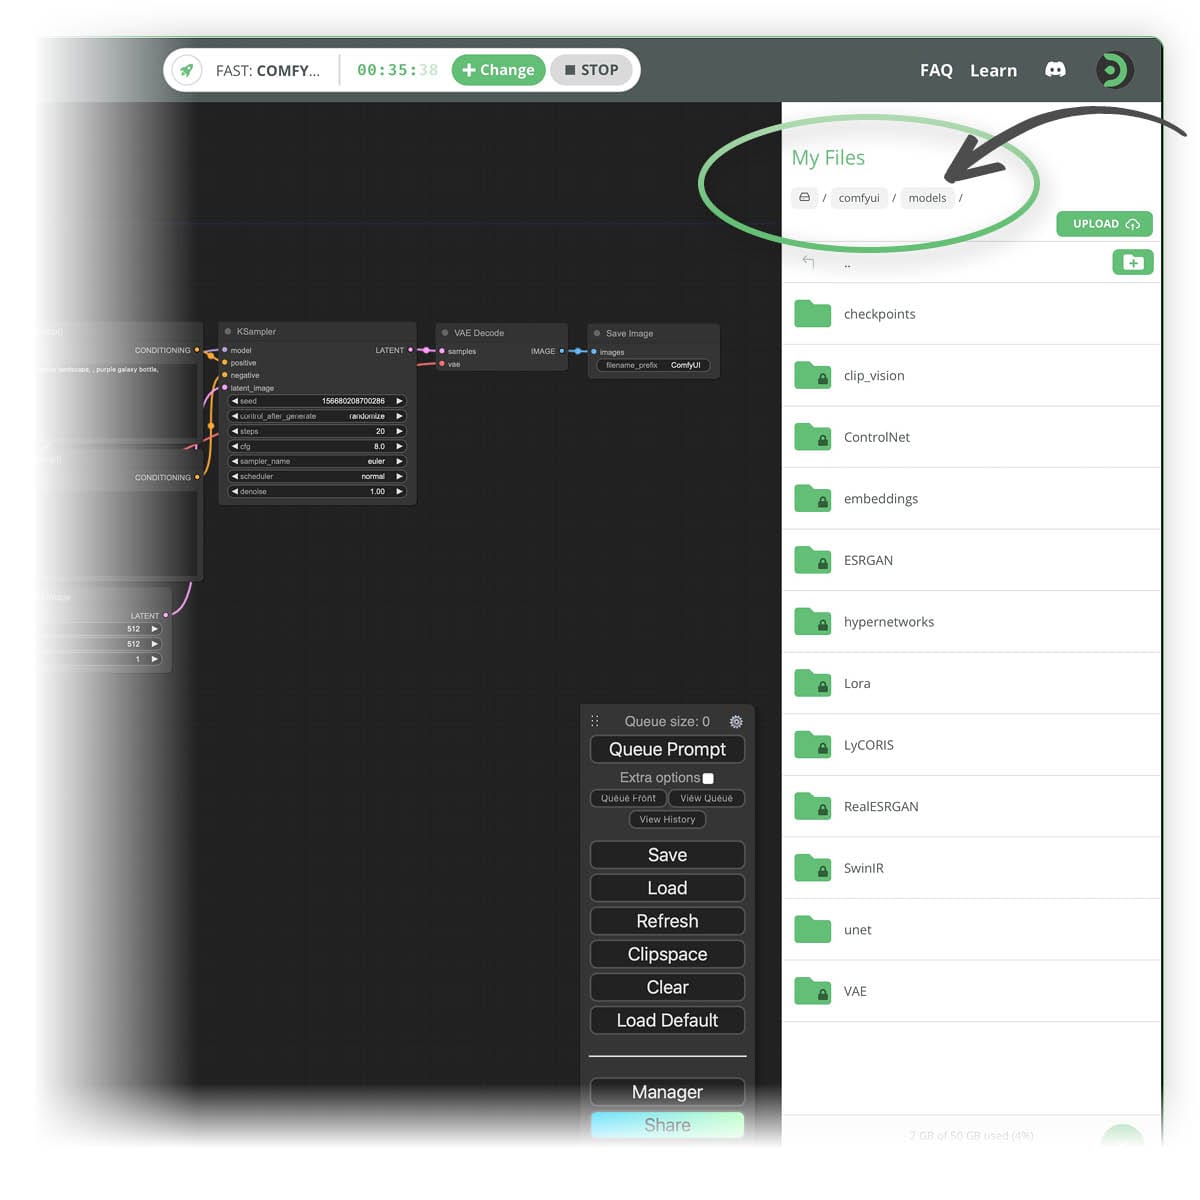
You'll see that Checkpoints, ControlNet Models, LoRAs, LyCORIS', VAEs, and Hypernetworks all have their corresponding and designated subfolder within the models folder.
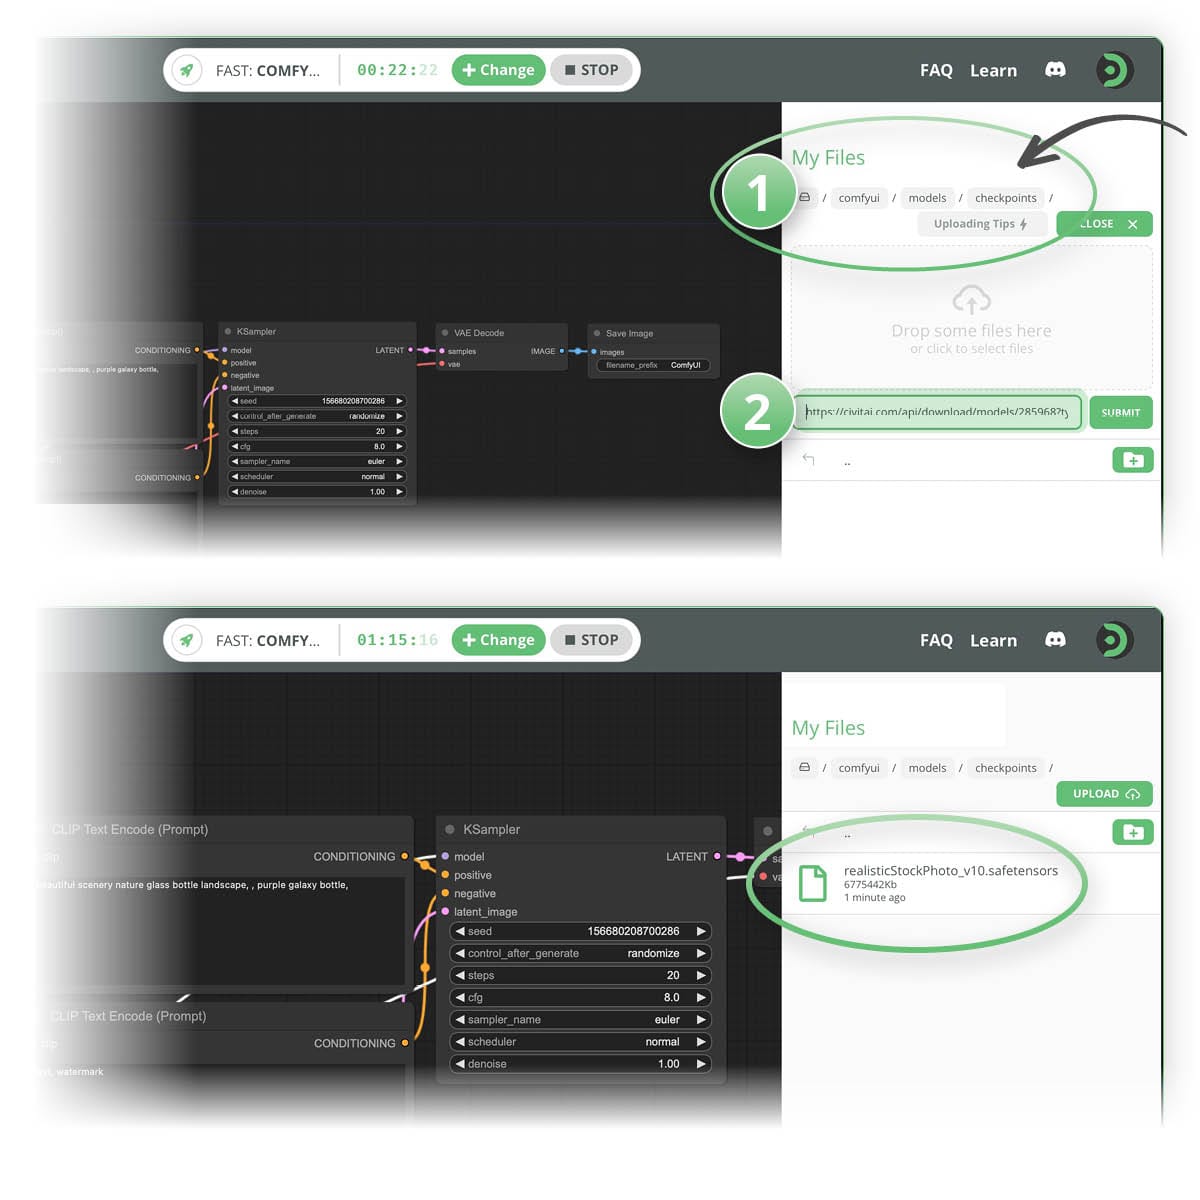
Choose the subfolder that matches the file type you're uploading. In the example below, we will:
- (1) Navigate to the /checkpoints/ subfolder to upload a checkpoint file.
- (2) Paste the URL of your file into the upload field.
You'll see your newly uploaded model show up below in the file area.
Learn how to find the URL of the file you're uploading
Civitai - Click here and scroll down
HuggingFace - Click here and scroll down
Google Drive - Click here
Click on RESTART UI so ComfyUI refreshes its model listing.
Sometimes Comfy requires you to refresh the browser.
🔮 ALL ABOUT MODELS
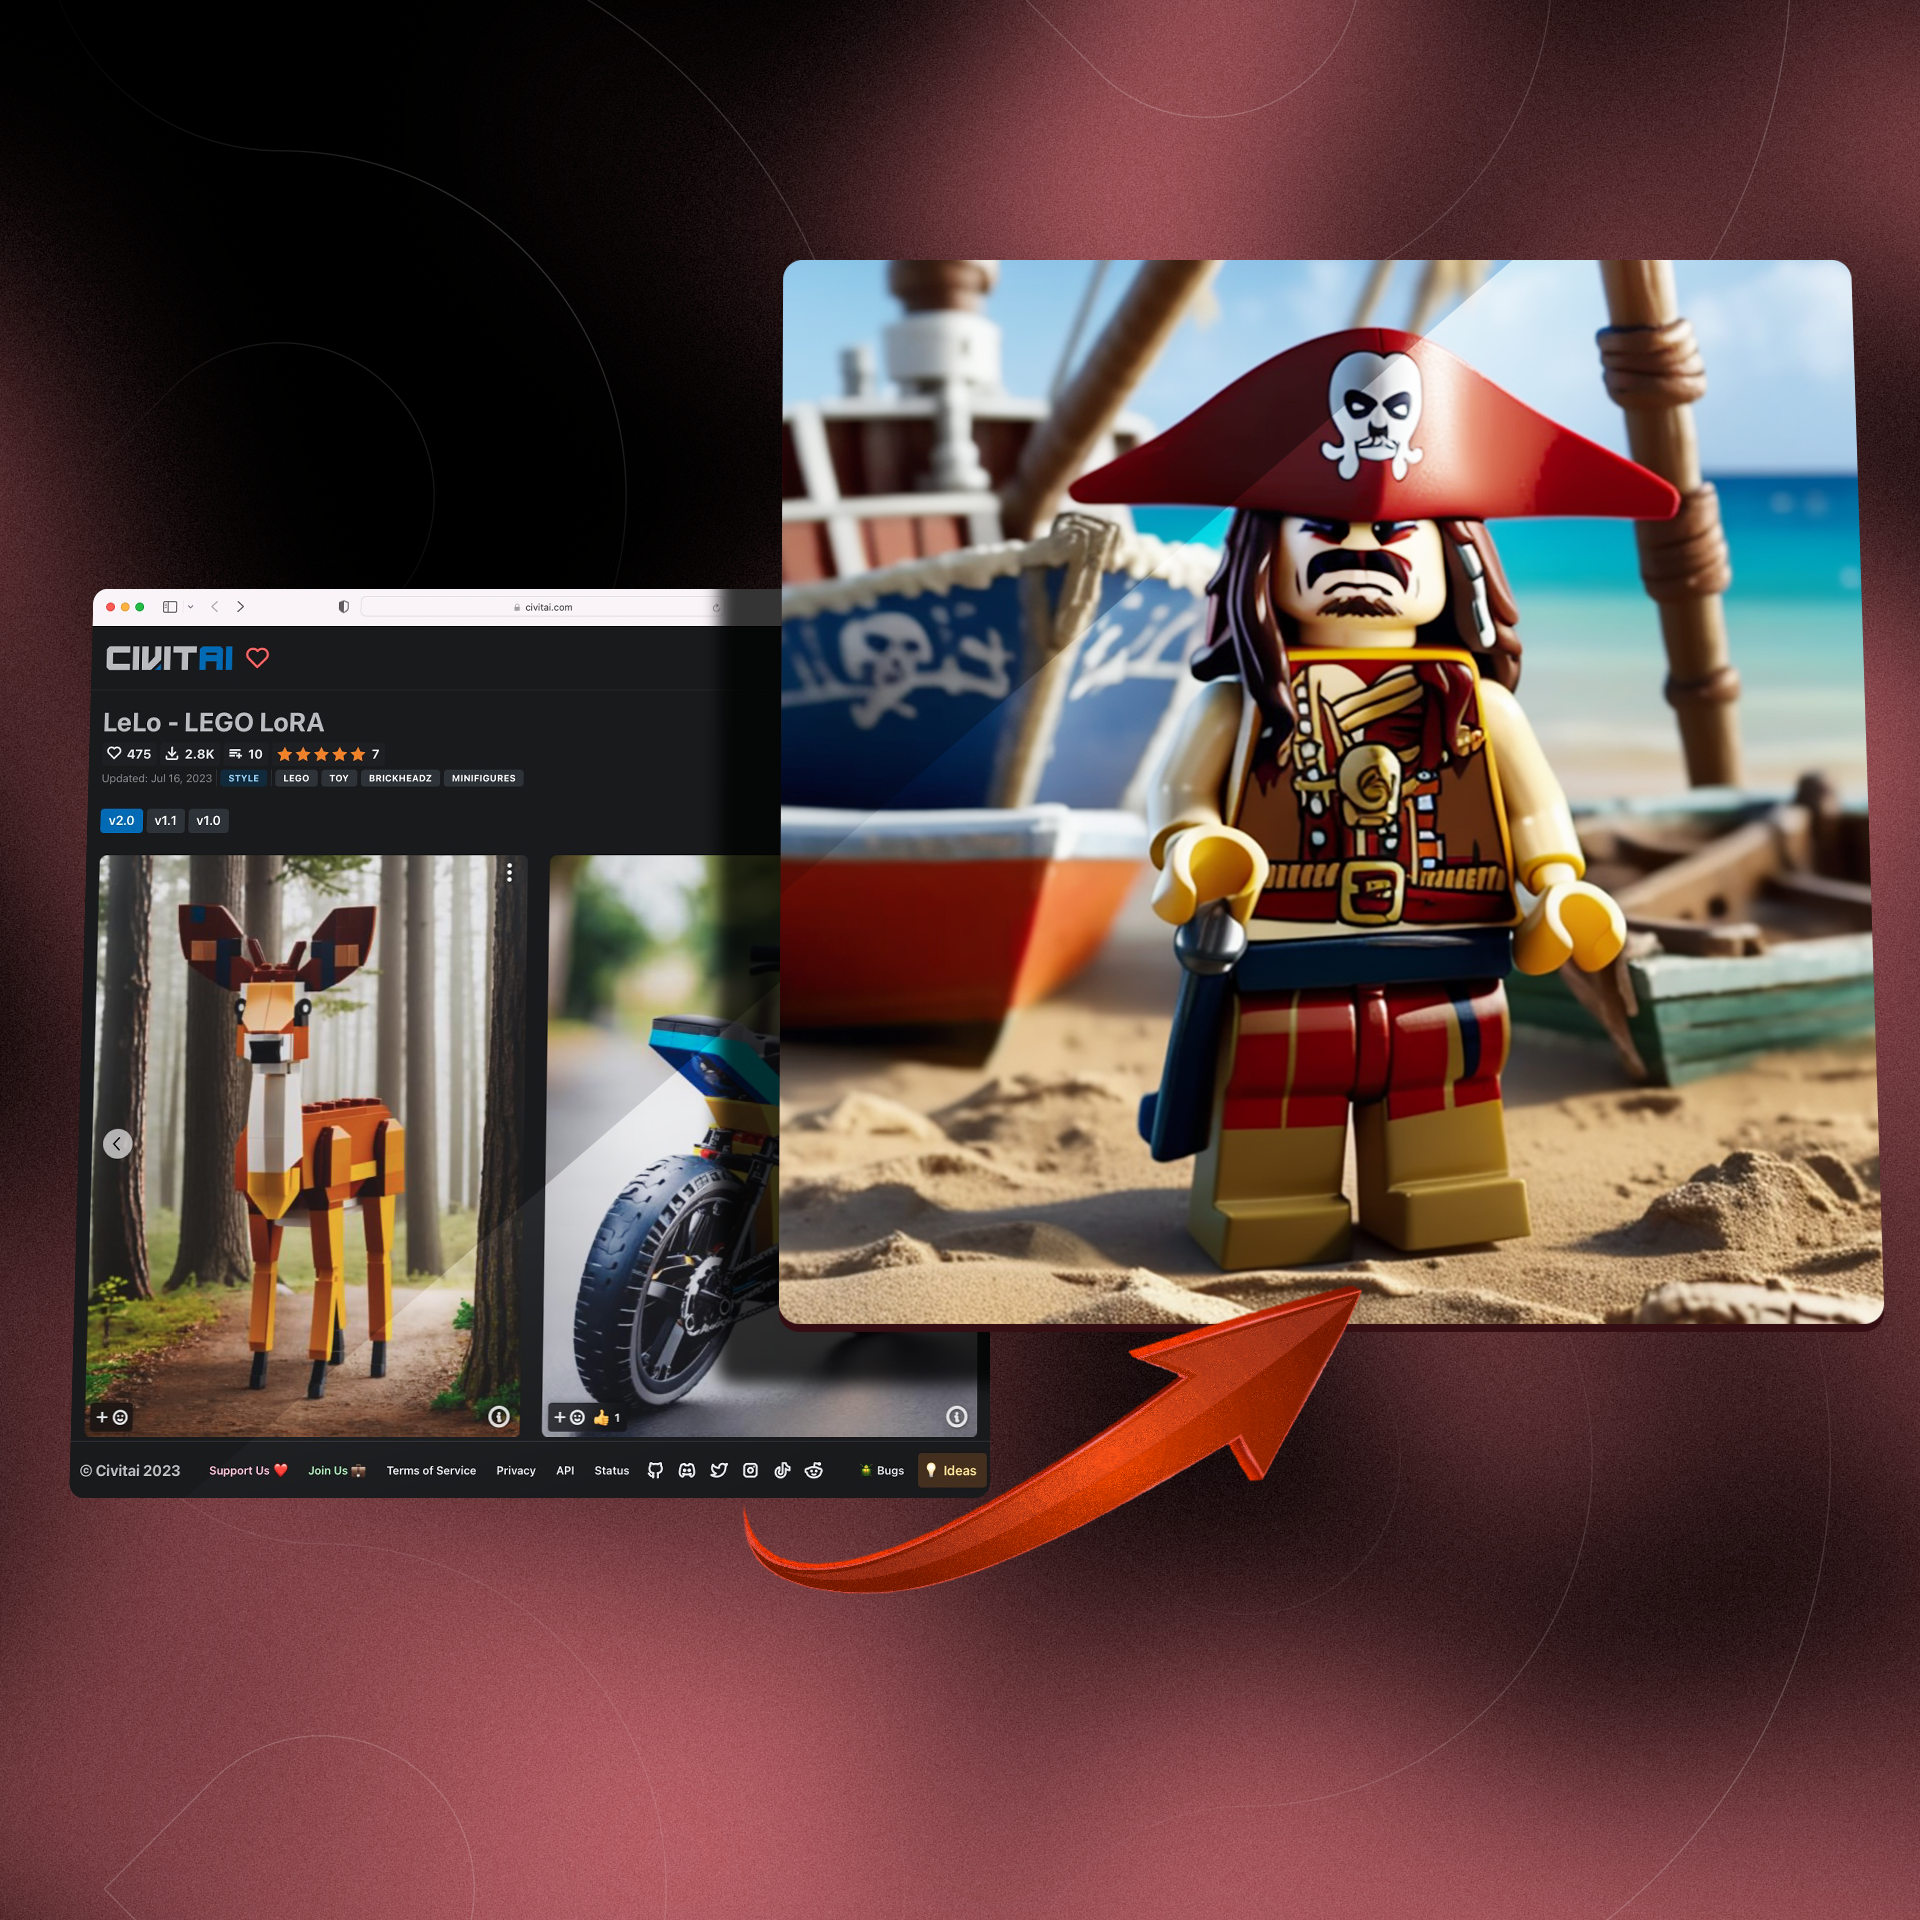
How to use LORA's
Hey LORA, let me loosen some of those safetensors in your shoulders.
To use LORA's you need to:
1. Upload your LORA safetensors file
- Use the following folder: ../user_data/a1111/models/Lora/
2. Click on the 🚨show/hide extra networks icon when uploaded.
- Head over to the LORA tab and you'll see your LORA file.
- ⚡️Protip: If for some reason it does not show then simply click refresh and your LORA file will appear
3. To use your LORA, you simply need to:
- Enter your prompts
- And click on the LORA file and it will add the correct syntax to your prompt as shown below
💡 What does the colon syntax mean? eg. " :1 "
The:1 at the end of the angled brackets is the weighting of how much of the LORA is applied, so you can change this to 0.5 as an example to weight it less
Check out out Tutorial on creating amazing art with LoRA Models here.

How to use LyCORIS
To use LyCORIS you need to:
1. Upload your LyCORIS safetensors file
- Use the following folder: ../user_data/a1111/models/LyCORIS/
2. Click on the 🚨Show/Hide extra networks icon, once uploaded
- head over to the LyCORIS tab and you will see your LyCORIS file.
- If for some reason it does not show then simply click refresh and your LyCORIS file will appear
3. To use your LyCORIS , you simply need to:
- Enter your prompts
- And click on the LyCORIS file and it will add the correct syntax to your prompt as shown above.

How to load & use a textual inversion embedding
1. Copy the URL of your favorite textual inversion embedding
2. In your files panel, navigate to your a1111\embeddings\ subfolder
3. Click the ⬆️ upload icon, paste the URL in the address bar, and hit Submit
4. Hit the 🚨show/hide icon to reveal the Textual inversion tab
( you may have to hit Refresh )
5. And click on the embedding thumbnail to activate it in your prompt field
What’s so great about textual inversions?
They can inject new objects and styles into a model, without having to actually change the model. They can be activated by a certain keyword to trigger the textual inversion’s contents to do their magic.

How to create a textual inversion
1. Head over to the Train tab
2. Enter a name for your embedding
(Use the field under the create embedding tab)
3. And click Create embedding
- ⚡️Protip: This will create an empty .pt file in ../user_data/a1111/embeddings/MyEmbedding.pt
4. To use the embeddings file for training, you can head over to the Train tab and you will see your Embedding file available.

How to create a Hypernetwork
Within the Train tab and and under the Create hypernetwork tab:
1. Enter a name for your embedding
2. And click Create hypernetwork
- The empty .pt file will appear under ../user_data/a1111/models/hypernetworks/
- ⚡️Protip: Please ignore the 'Created None' when you do it as it does create the empty .pt file in the correct place
3. To use the hypernetwork file for training, you can head over to the Train tab and you will see your Hypernetwork file available.

How to add more ControlNet models
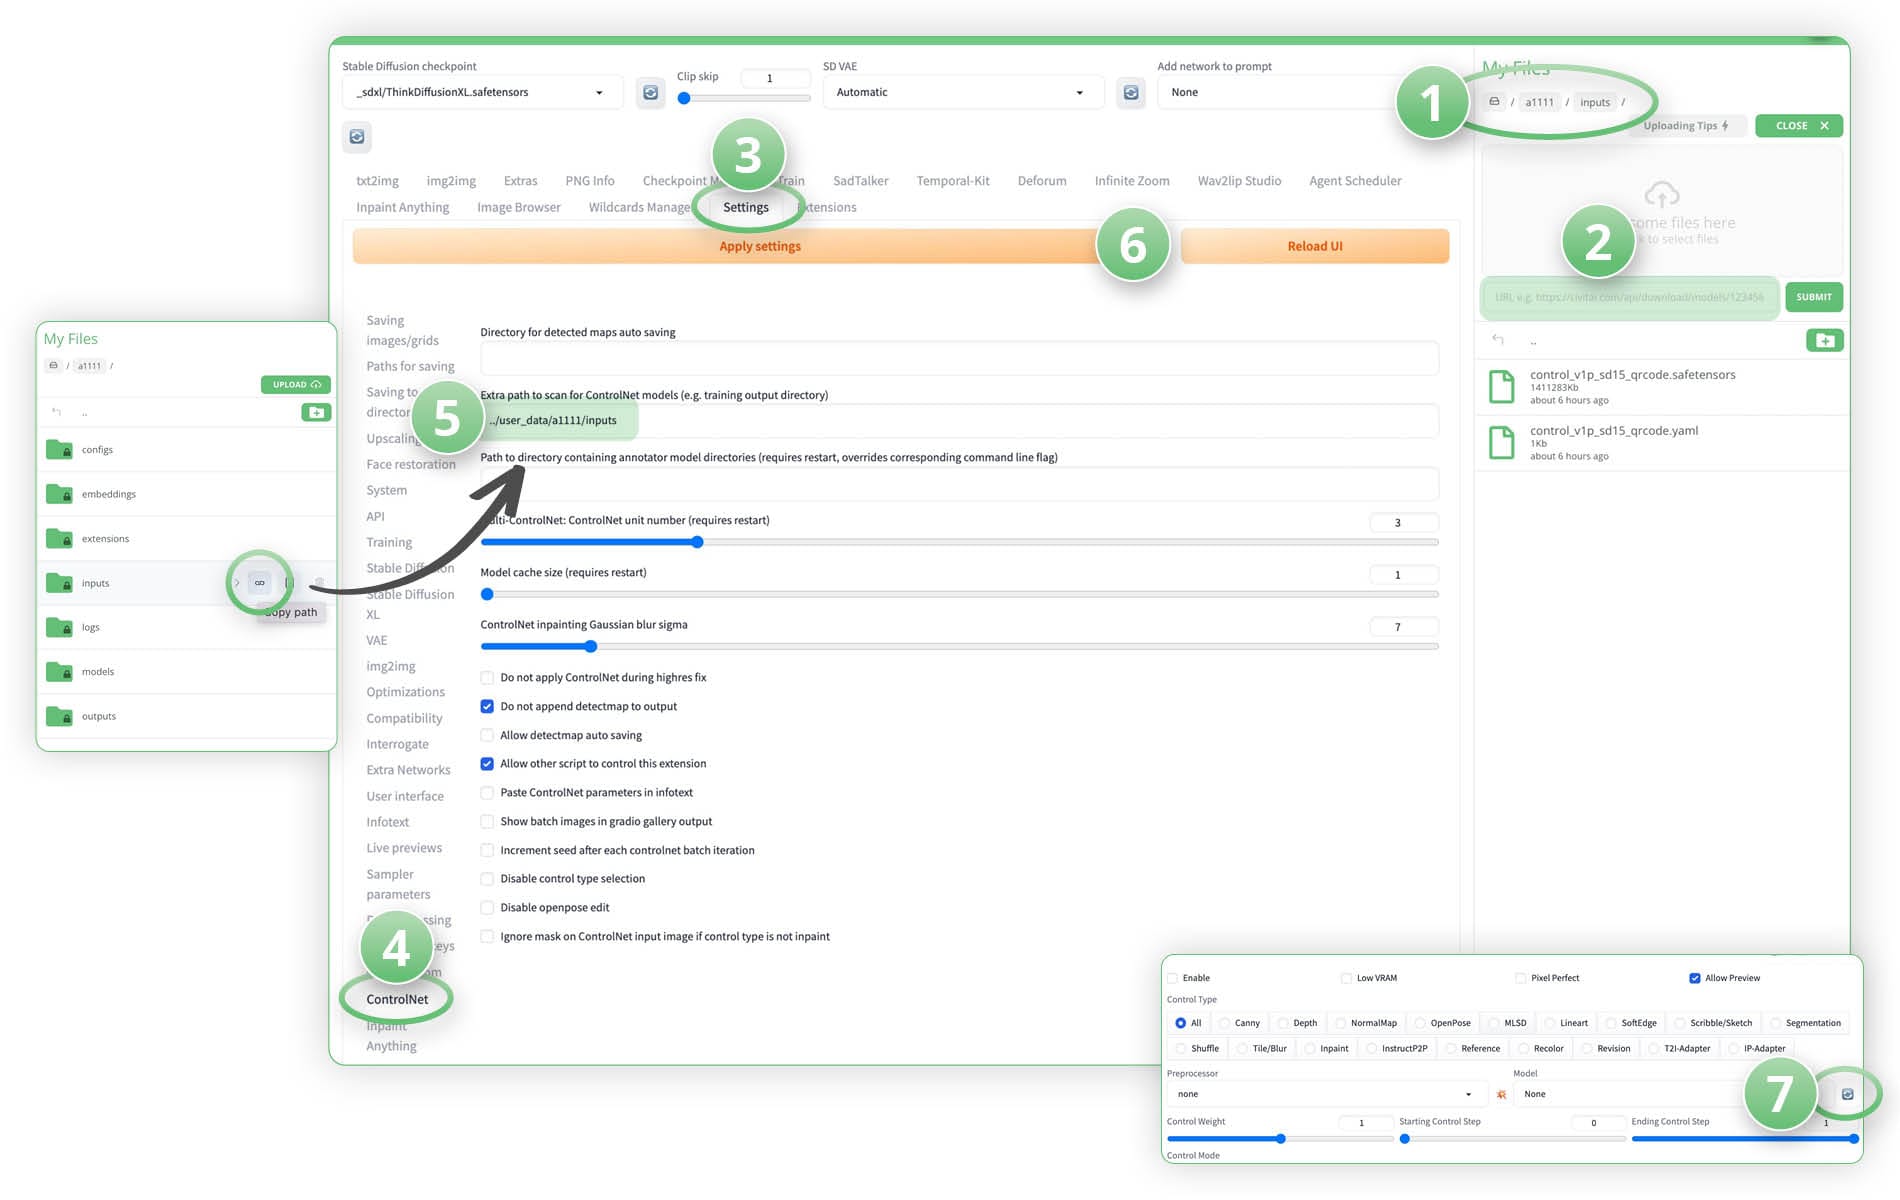
1. Navigate to your a1111\inputs folder
2. Upload *.safetensors and *.yaml file. For more info on uploading, click here
3. Go to the Settings tab
4. Click on the ControlNet menu item on the left side
5. Add the inputs folder path to the "Extra path to scan for ControlNet models (e.g. training output directory)" field
(you can easily copy the folder path via the link button next to the Input folder; it should be "../user_data/a1111/inputs")
6. Apply the changes by clicking "Apply settings"
7. In the ControlNet section, click the 🔄 refresh button next the "Model" dropdown. You will have to do this separately for txt2img and img2img.
🧩 ALL ABOUT EXTENSIONS
What are extensions?

Extensions are technically scripts, but you can think of them as helpful modules/plugins created by the open source community that enhance and extend functionality, ease of use, shape our workflows and make Stable Diffusion the most powerful AI art generator in the world.
Some popular extensions include: ReActor faceswap, ADetailer, AnimateDiff, AgentScheduler, ControlNet, Deforum, Infinite Zoom, Inpaint Anything, Loopback Wave, Openpose Editor, Regional Prompter, SadTalker, Temporal-Kit, Ultimate SD Upscale, and Wav2Lip Studio. They're all preinstalled on Think Diffusion machines.

How can I tell what extensions are pre-installed?
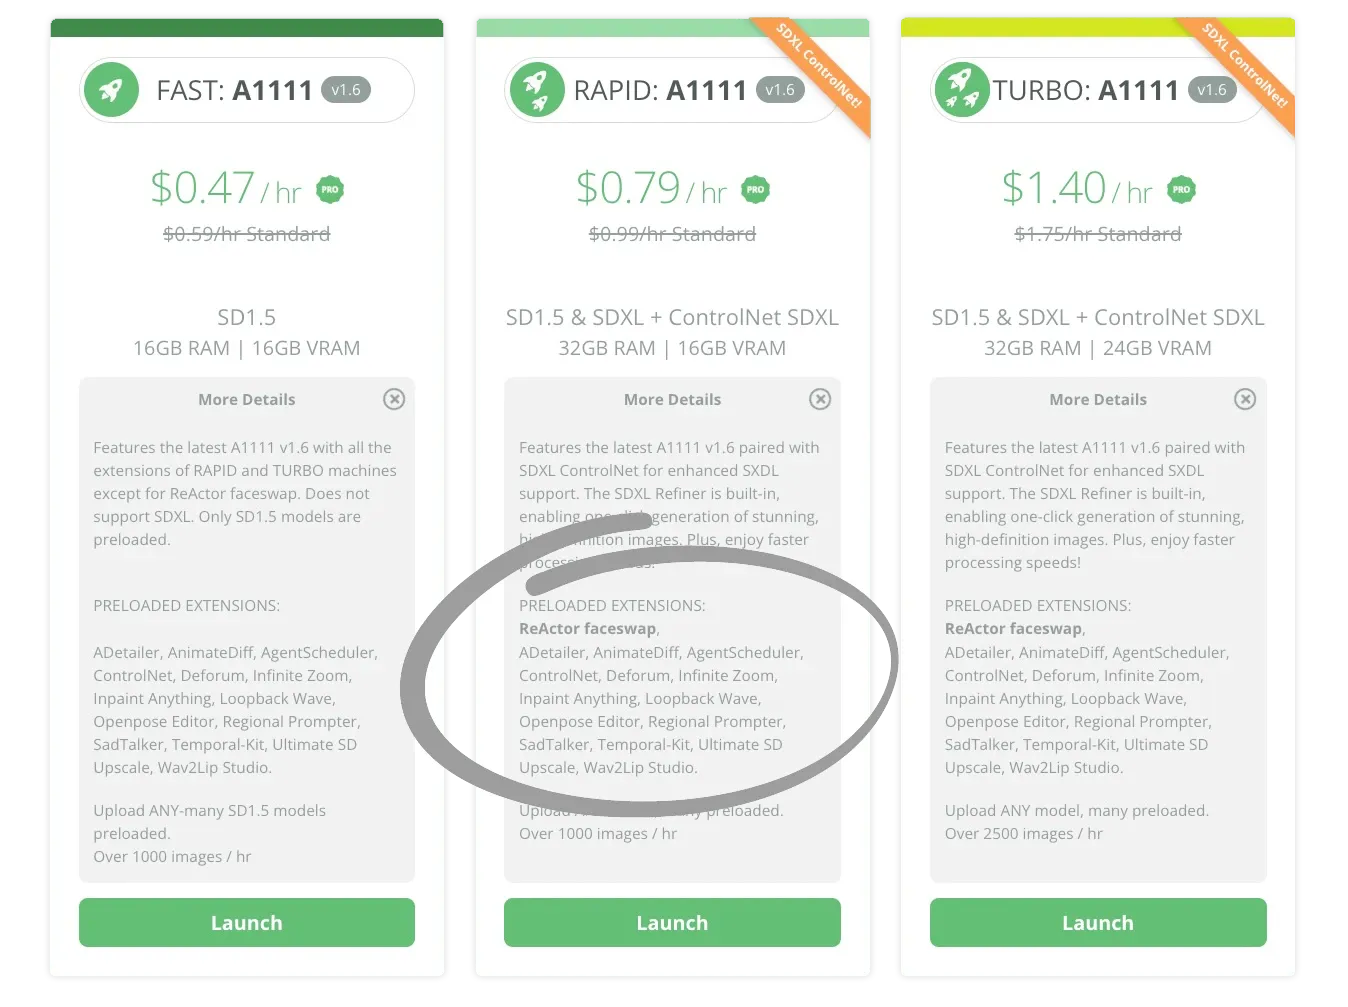
Preloaded extensions are noted on machine cards. Simply click the "More Details" area on the machine cards while on the machine selection page.

How do I install extensions?
Most extensions can be installed by user with the steps below:
- Open the Extensions Tab in Automatic1111 SD Web U
- In the Extension Tab Open the "Install from URL" tab
- Paste the extensions link into the URL input ( i.e. https://github.com/fkunn1326/openpose-editor.git)
- Press install and wait for it to complete
- Restart Automatic1111 by going to the extensions tab and clicking the "Apply and Restart" UI Button
For complex extensions that require additional installation steps beyond the self-serve Extensions tab, we're here to help. Ping us a message in the 💡-feature-requests Discord channel.

How to use an init image
It's bloody easy, init??
Once you have an image uploaded, you can then copy the link to use as an init image.
For example, if you are creating a deforum video and want to use an init image, copy the link and then paste it in the init image text box
1. Simply click on the copy path button on any file.
- It's the first 🔗 link button next to the file uploaded.
2. Navigate to the Init Image field, and paste!
- ⚡️Protip: remember to select the ✅ Use init checkbox!

How to load your Deforum Settings
If you want to load your favorite template for Deforum Settings, you can
1. Upload that file or navigate to it in the My Files panel
2. Copy its path into the Settings File field
3. Hit the "Load All Settings" button
- ⚡️Protip: It will then appear in your My Files section ready for you to load when you next launch a machine
🌮 ALL ABOUT COMFYUI
How to add Models & Nodes in Comfy
You can find out how to upload models in the upload section here
As of January 2024, here is the list of preinstalled models which our team has already integrated to all Comfy machines:
- Oasis-SDXL.safetensors
- dreamshaperXL10_alpha2Xl10.safetensors
- juggernautXL_v8.safetensors
- sdXL_v10RefinerVAEFix.safetensors
- vaeFtMse840000Ema_v100.pt
- svd.safetensors
- svd_xt.safetensors
- dreamshaperXL_turboDpmppSDE.safetensors
- juggernautXL_version5.safetensors
- sdXL_v10VAEFix.safetensors
- wget-log
- ThinkDiffusionXL.safetensors
- dreamshaper_8.safetensors
- put_checkpoints_here
- sd_xl_base_1.0_0.9vae.safetensors
- darkSushiMixMix_colorful.safetensors
- epicrealism_naturalSinRC1VAE.safetensors
- realisticVisionV60B1_v60B1VAE.safetensors
- sd_xl_refiner_1.0_0.9vae.safetensors
- deliberate_v11.safetensors
- helloworldSDXL10.safetensors
- samaritan3dCartoon_v40SDXL.safetensors
- sdxl_vae.safetensors
Here is the list of preinstalled custom nodes, which might require additional installation steps:
- ComfyUI Manager
- Searge SDXL
- ComfyUI Animatediff
- ComfyUI Advanced ControlNet
- ComfyUI AnimateDiff Evolved
- ComfyUI Controlnet Aux
- ComfyUI VideoHelperSuite
For importing installed nodes:
- (1) Press right click at the blank space and click on Add Nodes
- (2) And choose the option according to your requirements
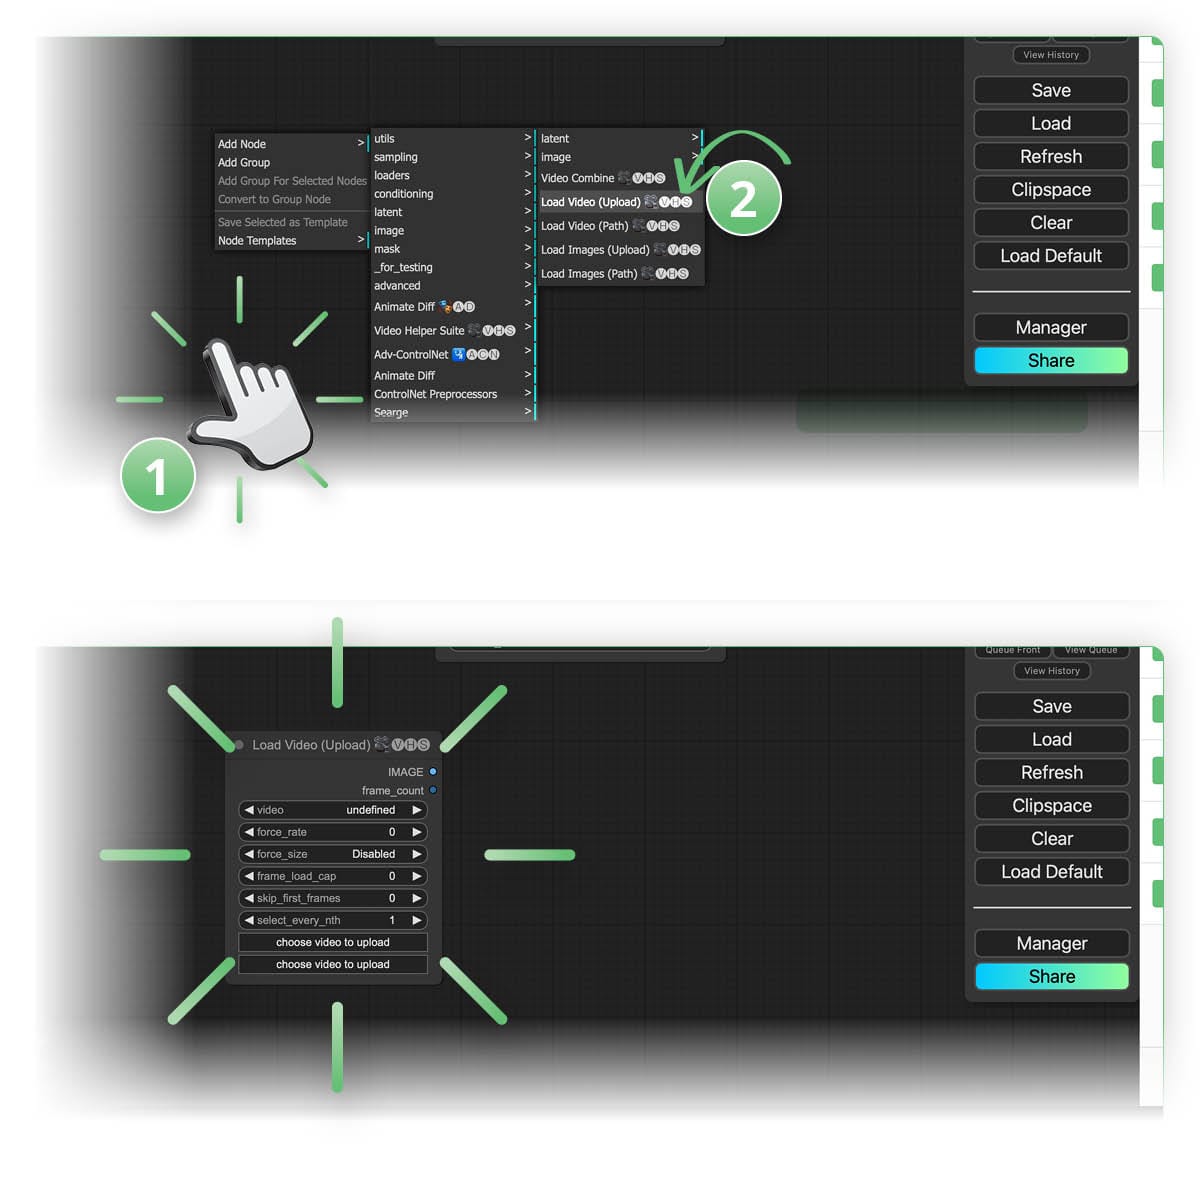
✨ Voila! Now you will be able to see the custom node added. Now we can merge and connect it according to our workflow requirements.
Install custom nodes through manager:
Missing custom nodes, can be installed through manager:
- (1) Go to manager.
- (2) Click on install missing nodes & it will show up the missing custom node list & user can install them one by one by clicking on install button.
Or user can install via GIT url in case node is not available in comfy preloaded node list.
How to add models temporarily through the Comfy manager
We have preloaded a comprehensive selection of models for you.
In the case that you have found updated models or specific models that are not already preloaded, and cannot be uploaded by the method above, please let us know in our discord help-desk channel to add them for you.
You can also use the built-in Comfy manager.
As of January 2024, here is the list of preinstalled models which our team has already integrated to all Comfy machines:
- Oasis-SDXL.safetensors
- dreamshaperXL10_alpha2Xl10.safetensors
- juggernautXL_v8.safetensors
- sdXL_v10RefinerVAEFix.safetensors
- vaeFtMse840000Ema_v100.pt
- svd.safetensors
- svd_xt.safetensors
- dreamshaperXL_turboDpmppSDE.safetensors
- juggernautXL_version5.safetensors
- sdXL_v10VAEFix.safetensors
- wget-log
- ThinkDiffusionXL.safetensors
- dreamshaper_8.safetensors
- put_checkpoints_here
- sd_xl_base_1.0_0.9vae.safetensors
- darkSushiMixMix_colorful.safetensors
- epicrealism_naturalSinRC1VAE.safetensors
- realisticVisionV60B1_v60B1VAE.safetensors
- sd_xl_refiner_1.0_0.9vae.safetensors
- deliberate_v11.safetensors
- helloworldSDXL10.safetensors
- samaritan3dCartoon_v40SDXL.safetensors
- sdxl_vae.safetensors
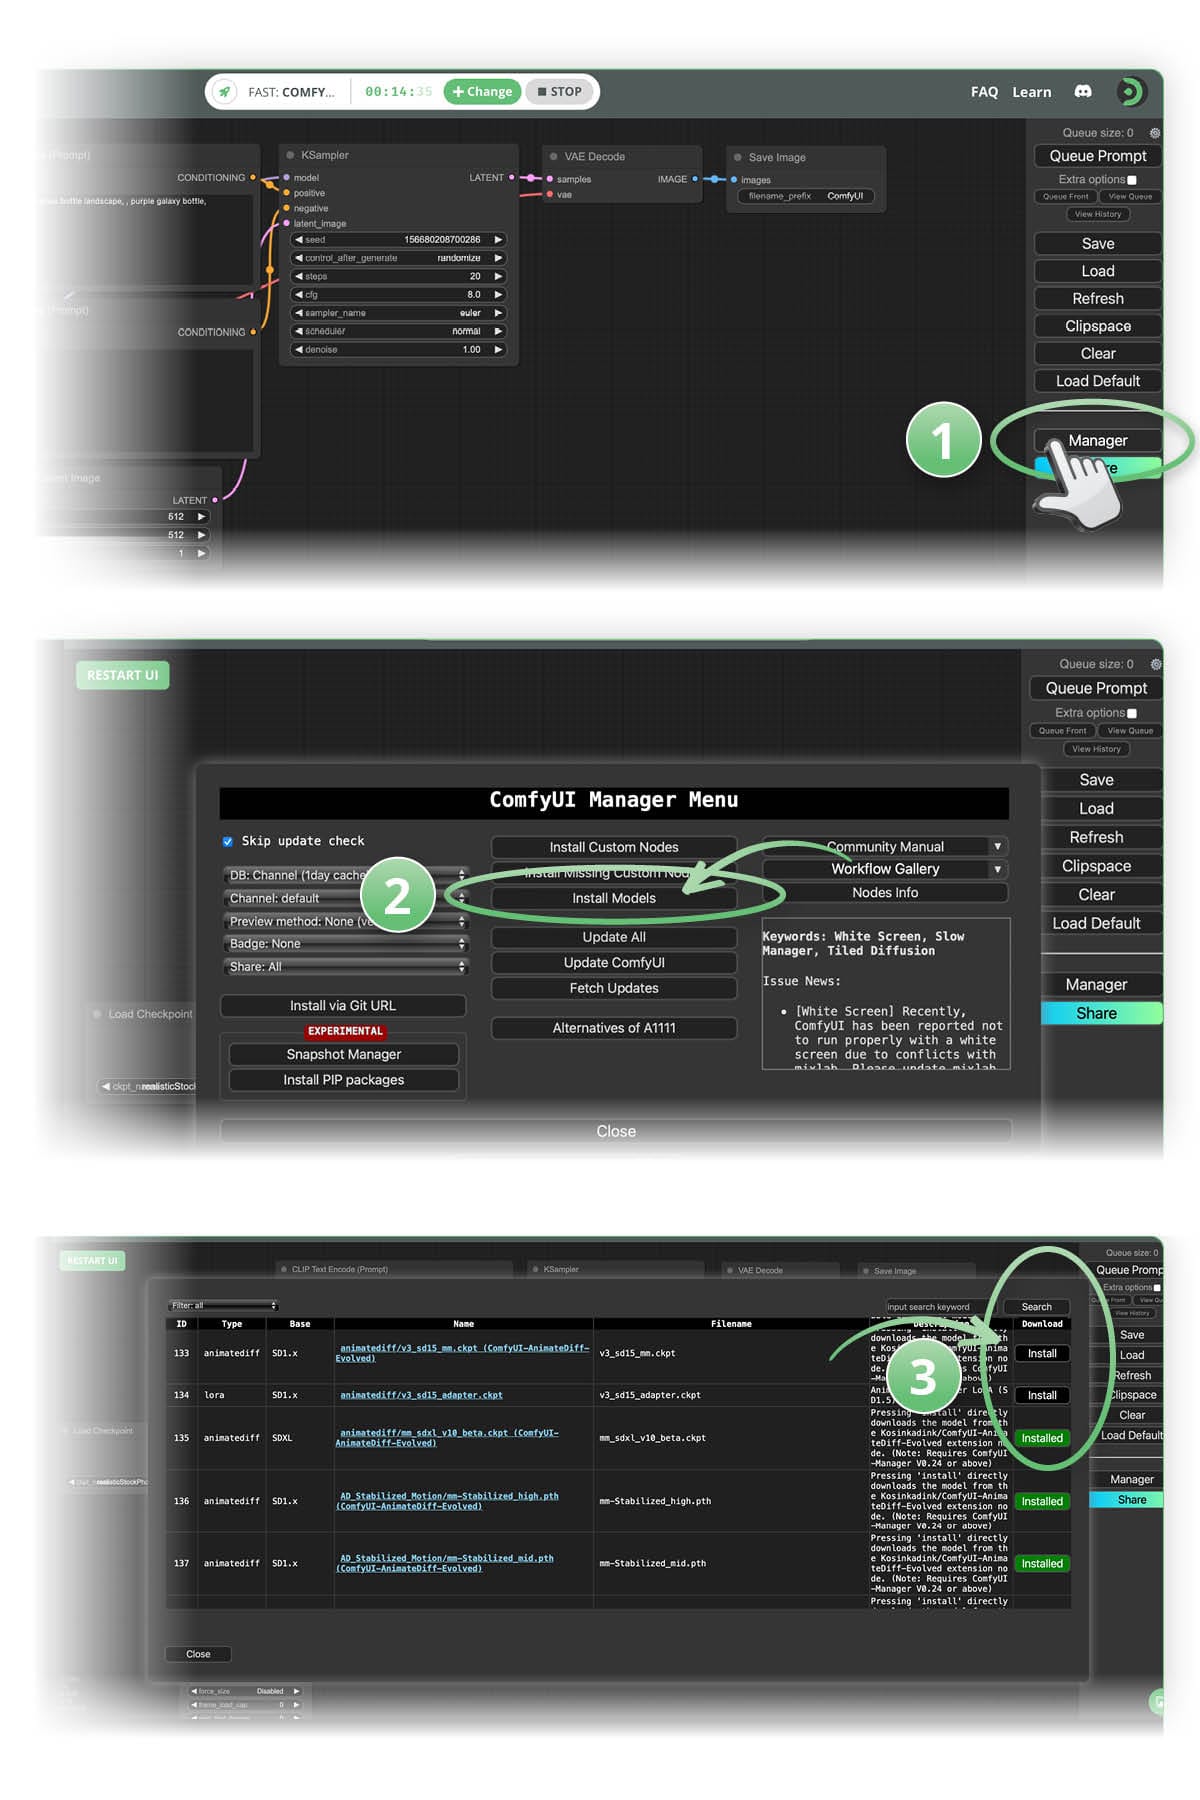
To use the Manager, you can take these steps to add the models, however, these added models added through the manager will not persist and you will have to take the steps below each time you launch a machine.
- Click on the Manager
- Go to Install Models
- Click Install to install the model of your choice
How to add persistent models in ComfyUI
Models added through the manager are not retained between sessions. This section outlines how to incorporate various types of models to ensure they persist across different machine sessions.
Here are some typical directories for uploading models and their corresponding mappings:
- Embeddings - Embeddings can be downloaded and placed under
comfyui/models/embeddingse.g. - Useful Quality Embeddings - Checkpoints - One can download there checkpoints models and place it under
comfyui/models/checkpoints
e.g. JuggernautXL - Clip_vison - Download your clip vision model and put it under
comfyui/models/clip_vision
e.g. IPAdapter Models - ControlNets - Download your checkpoint model and put it under
comfyui/models/ControlNet
e.g. Controlnet on huggingface - Lora - All the LORA or motion-LORA models must be under
comfyui/models/loras
e.g. Loras on Civitai - VAE - Download your VAE and place it under comfyui/models/VAE
e.g. Vae on CivitAI - LyCORIS - Download your LyCORIS model and place it under
comfyui/models/LyCORIS
e.g. Lycoris models on CivitAI - ESRGAN - One can download any upscaler model (esrgan) and place it under
comfyui/models/ESRGAN
e.g. Ultimate ESRGAN Upscalers
⚙️ ADVANCED
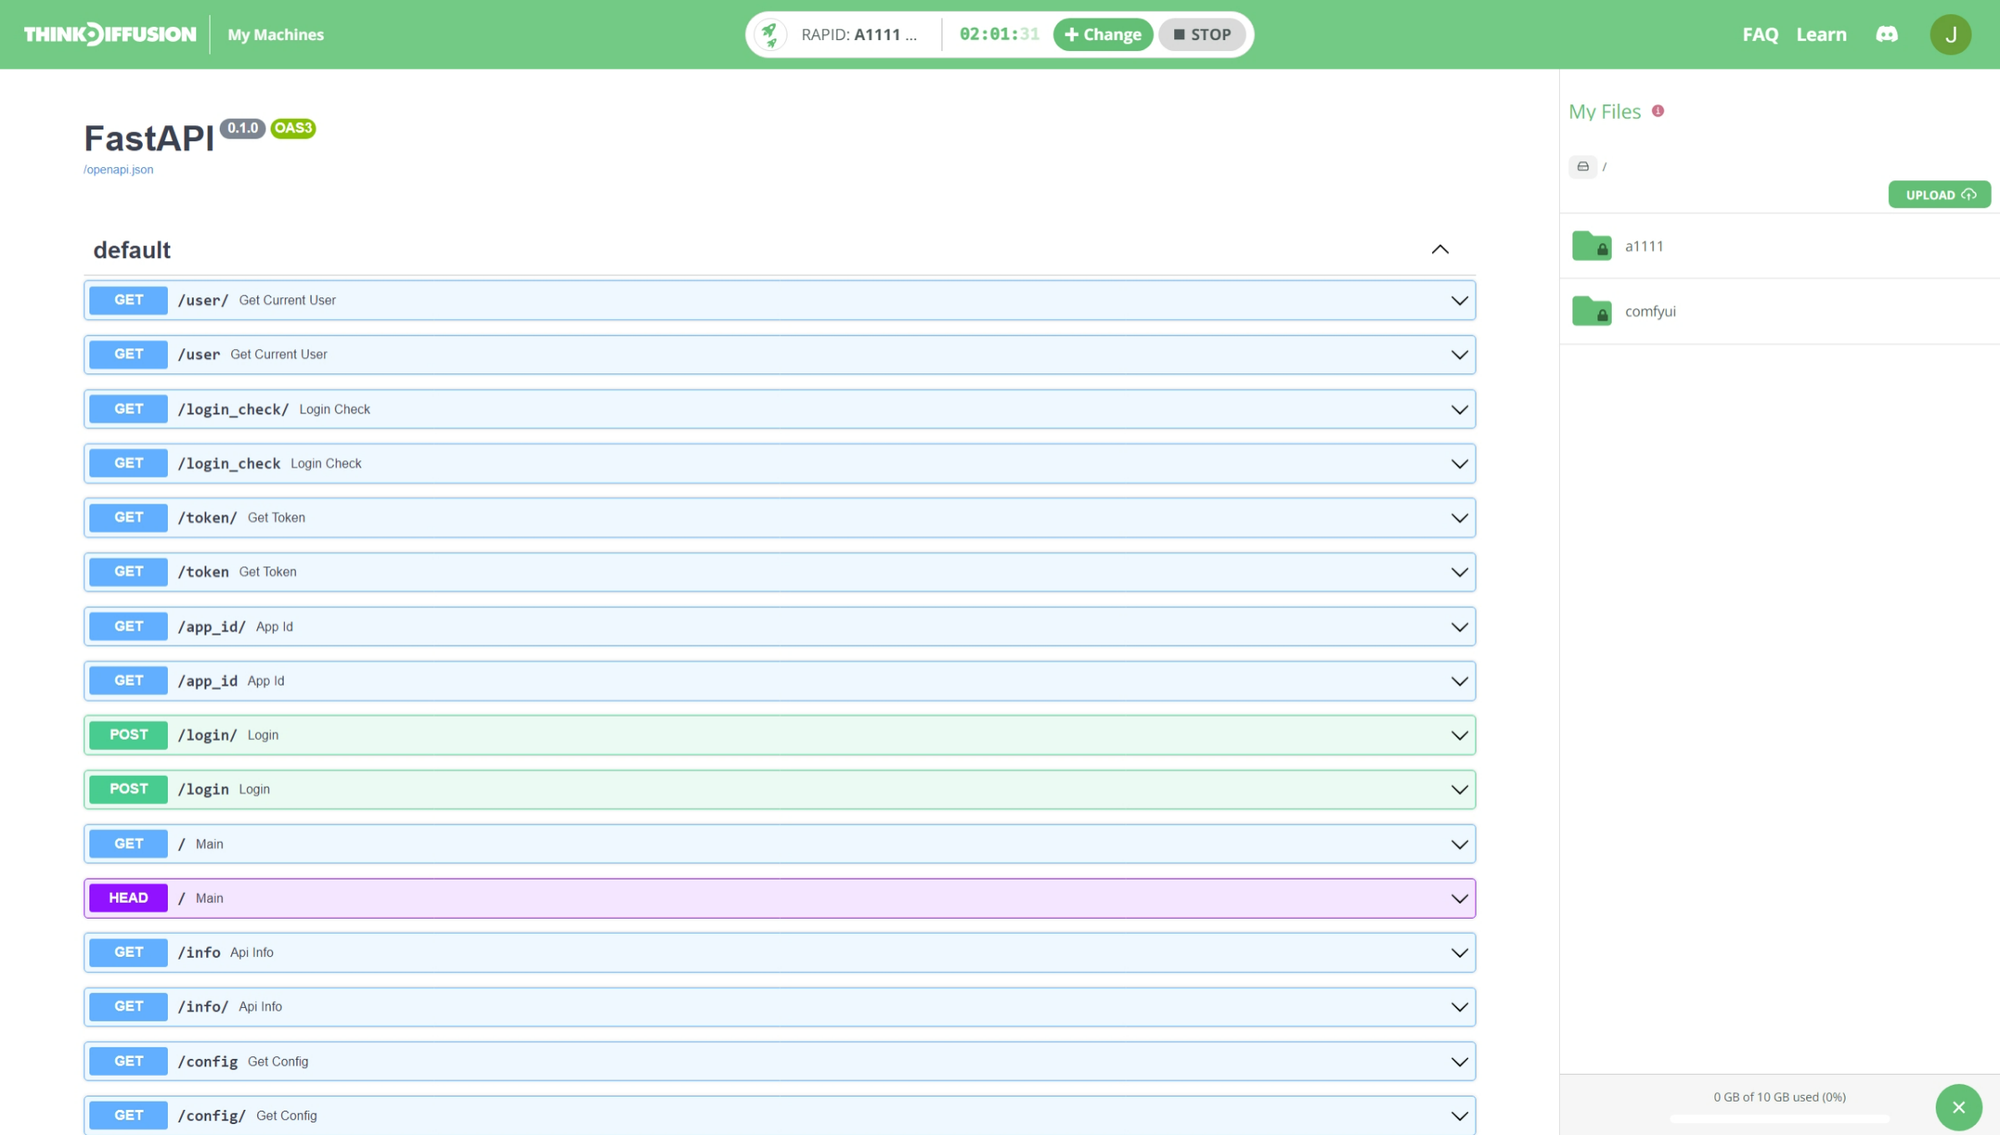
How to view and test Automatic1111 API
All Automatic1111 machines have API enabled. Follow these simple steps to view the API docs and test different API endpoints.
- After launching an A1111 machine, scroll down to the footer of the page where you find a link to the API docs page.
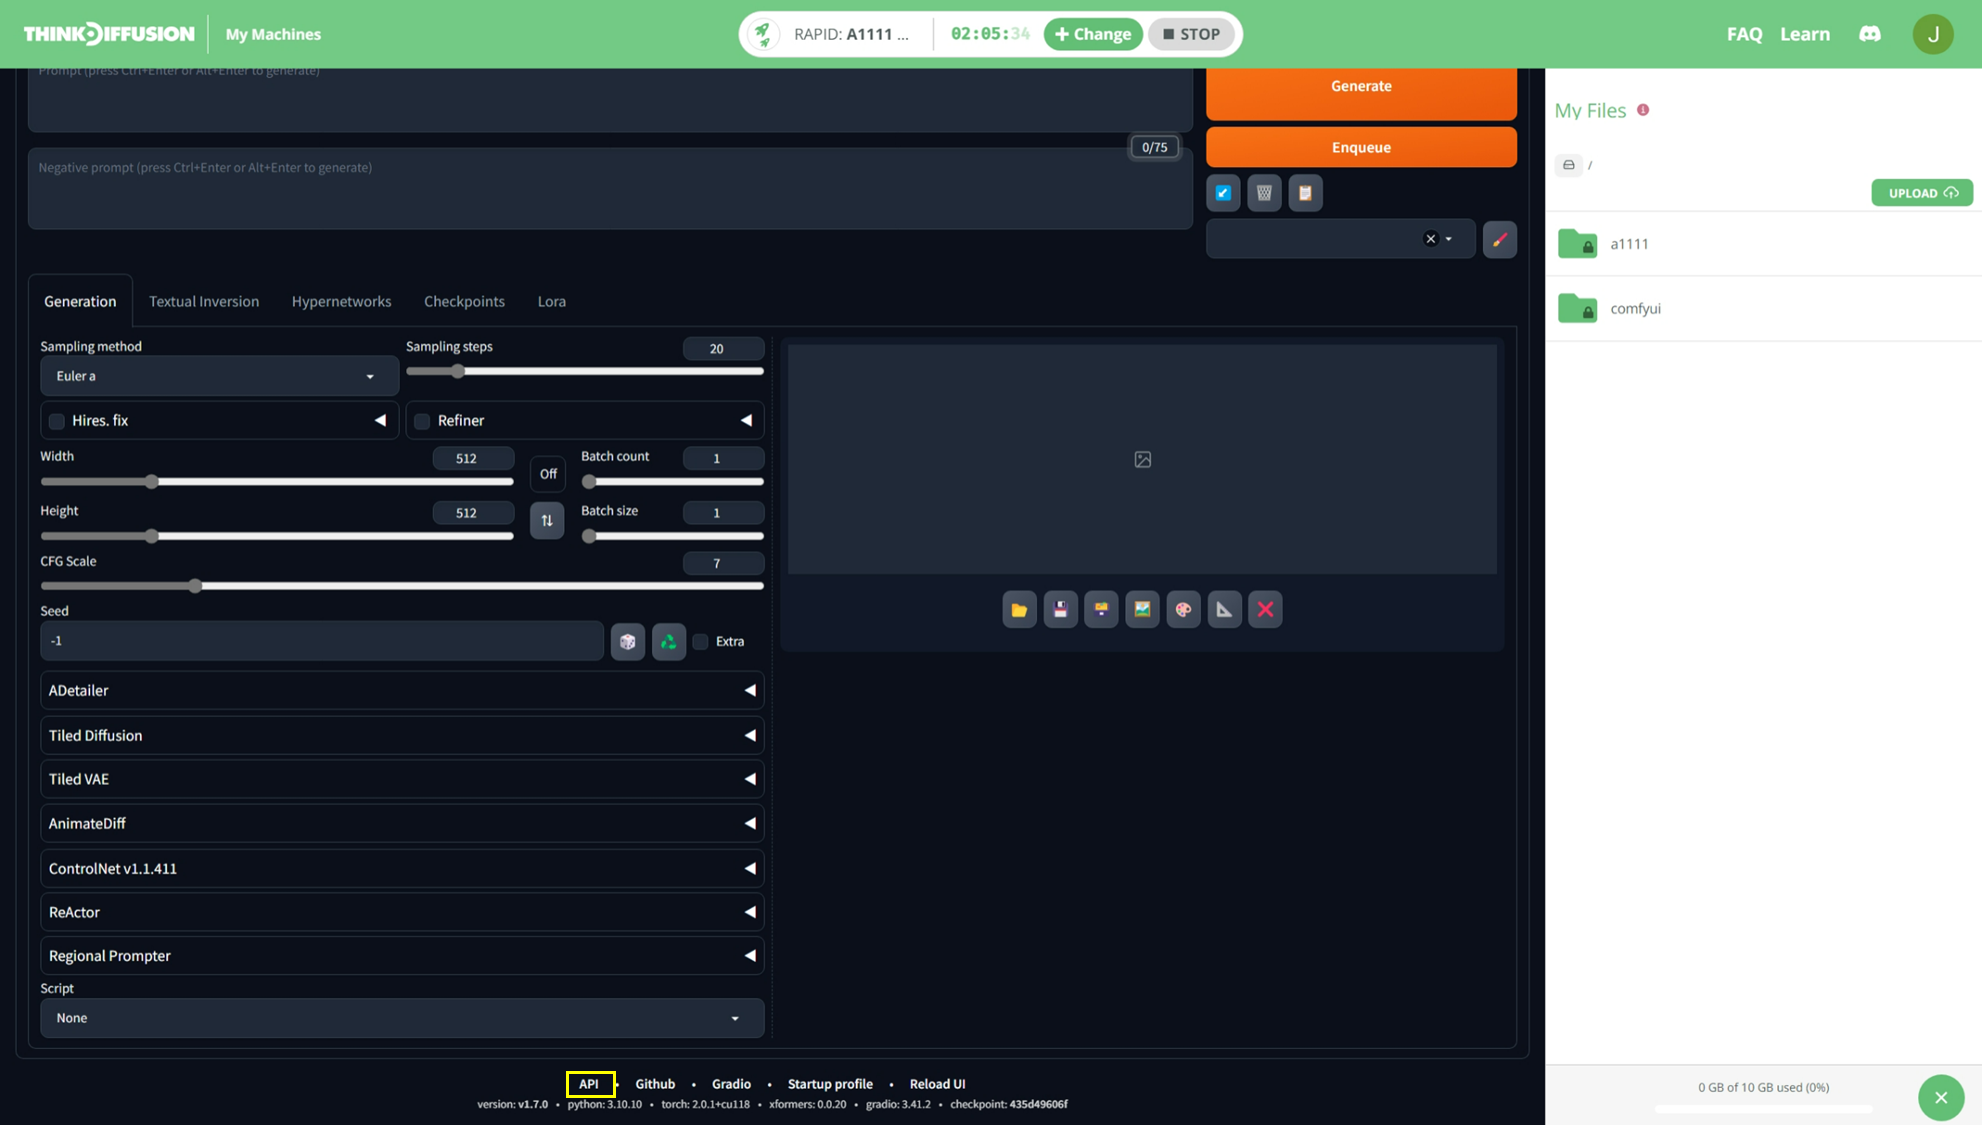
- Click on the API link to navigate to the /docs page (within in the machine iframe).
⚡️Tip: To navigate back, right click on any empty space in the iframe and select the Back.
⚡️Tip: You may optionally open the link in a new tab by right-clicking on the API link and selecting Open link in new tab
- To access your API remotely you will need the full machine URL which you can get by hovering over the API link or by copying the API link's URL and removing the /docs from the path.


How to ask us more questions
Join our Discord and ping us in the our help-desk or feature-request channel.
Or check out our extensive tutorials over at https://learn.thinkdiffusion.com/
Or simply...

Member discussion