

Edit: Thank you to everyone who's made this tutorial one of the most shared on the interwebs!
2024 Update
Edit Jan 2024: Since the original publishing of this article, a new and improved ControlNet model for QR codes was released called QRCode Monster. Both the 1.5 and XL versions are preinstalled on ThinkDiffusion.
Its use is similar to the older ControlNet models referred to below. Simply replace them with QRCode Monster where applicable.
Quick Settings for a text2image using THREE (3) ControlNets:
The settings below achieves consistent good looking QR Codes that work!
- Launch a Turbo Automatic1111 machine on ThinkDiffusion
- Select
00-TD-UltraReal.safetensorsas the base model in the model selection dropdown. This is a finetuned of Stable Diffusion 1.5 model. - In the txt2image tab, enter prompt of subject. For example: "a crochet of a super cute teddy bear"
- For negative prompt: "hands, ugly, cartoon"
- Can leave Sampling steps at 20. Resolution at 512 x 512
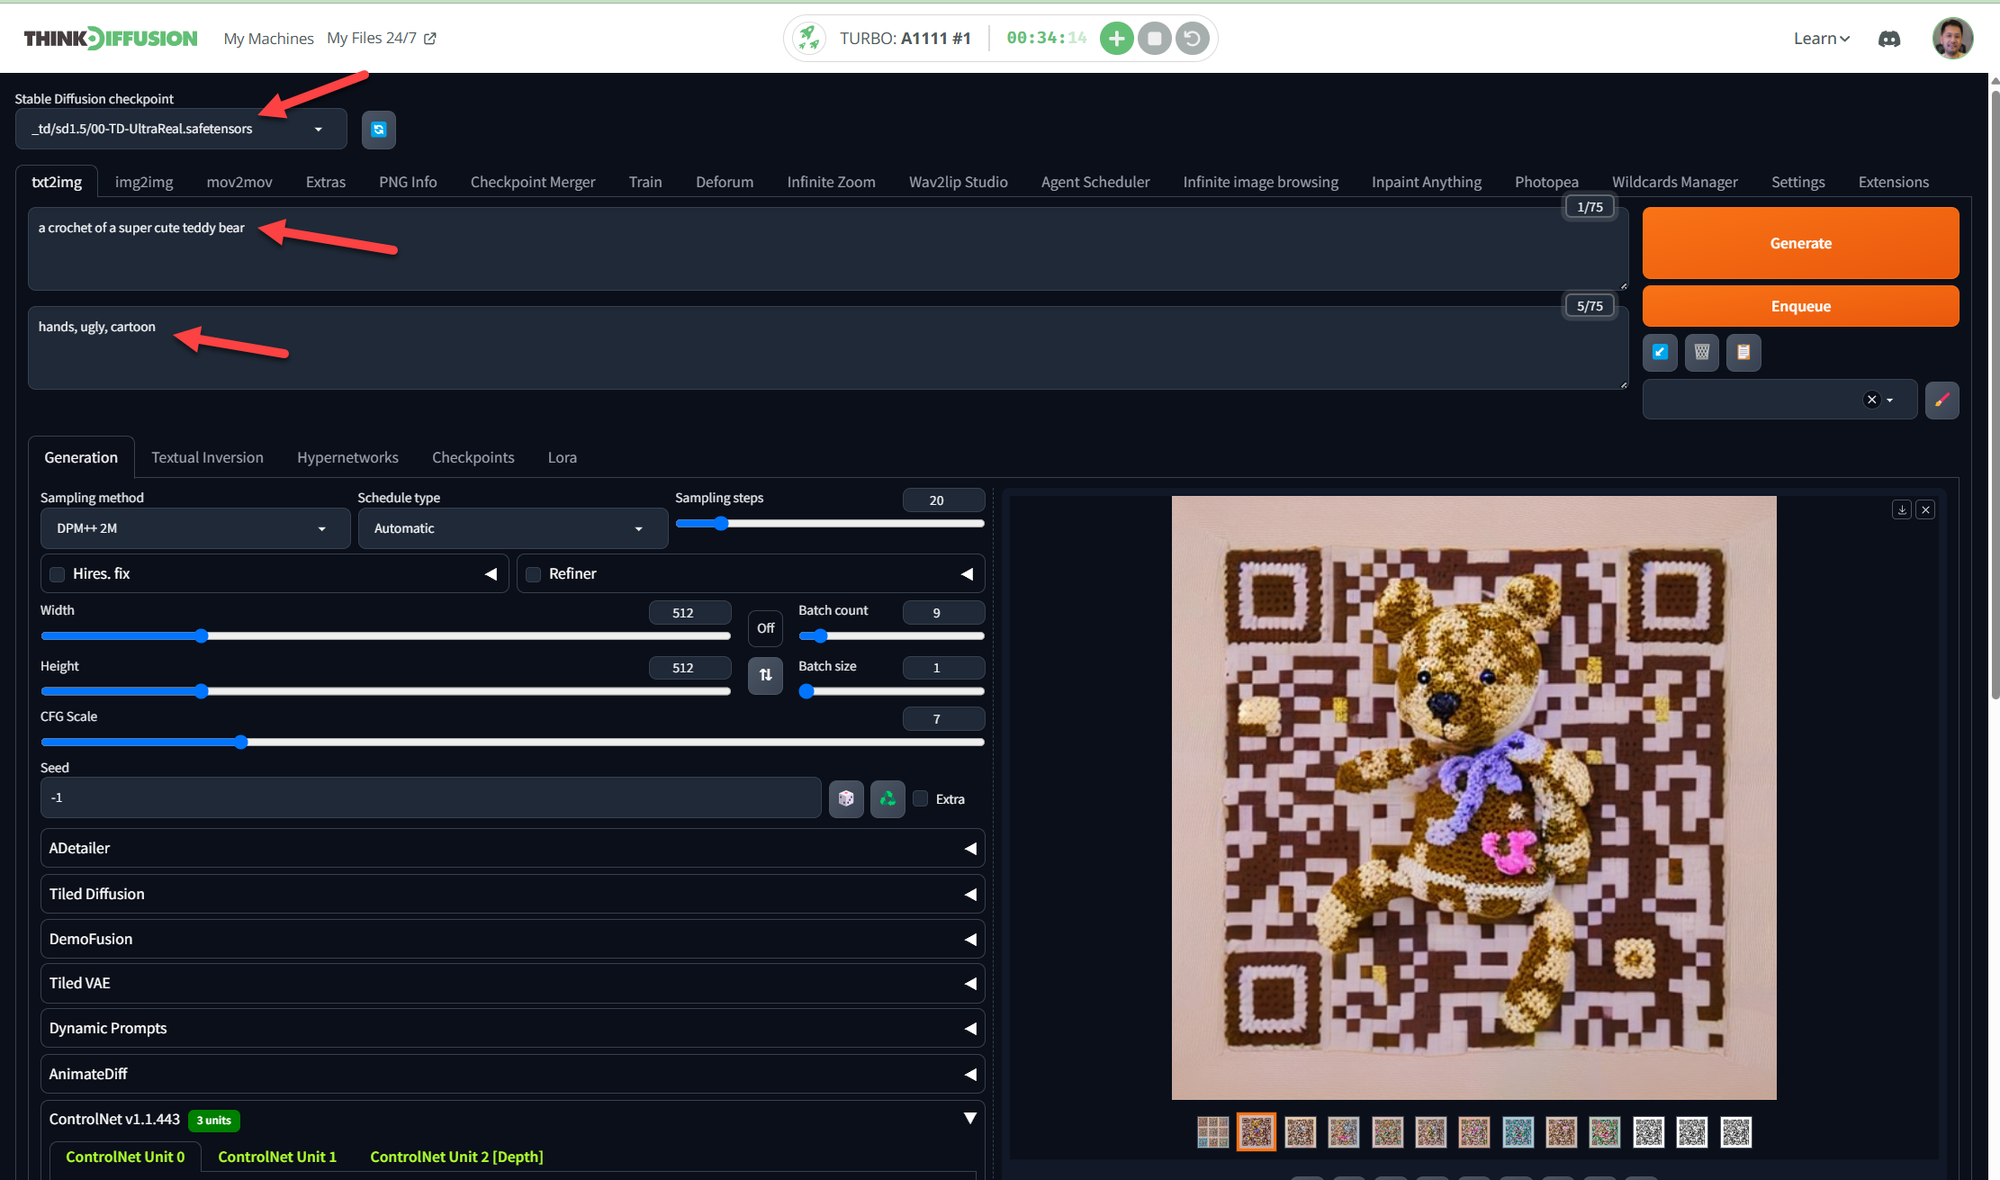
We will use THREE (3) ControlNets. Put in the settings per below and click generate!
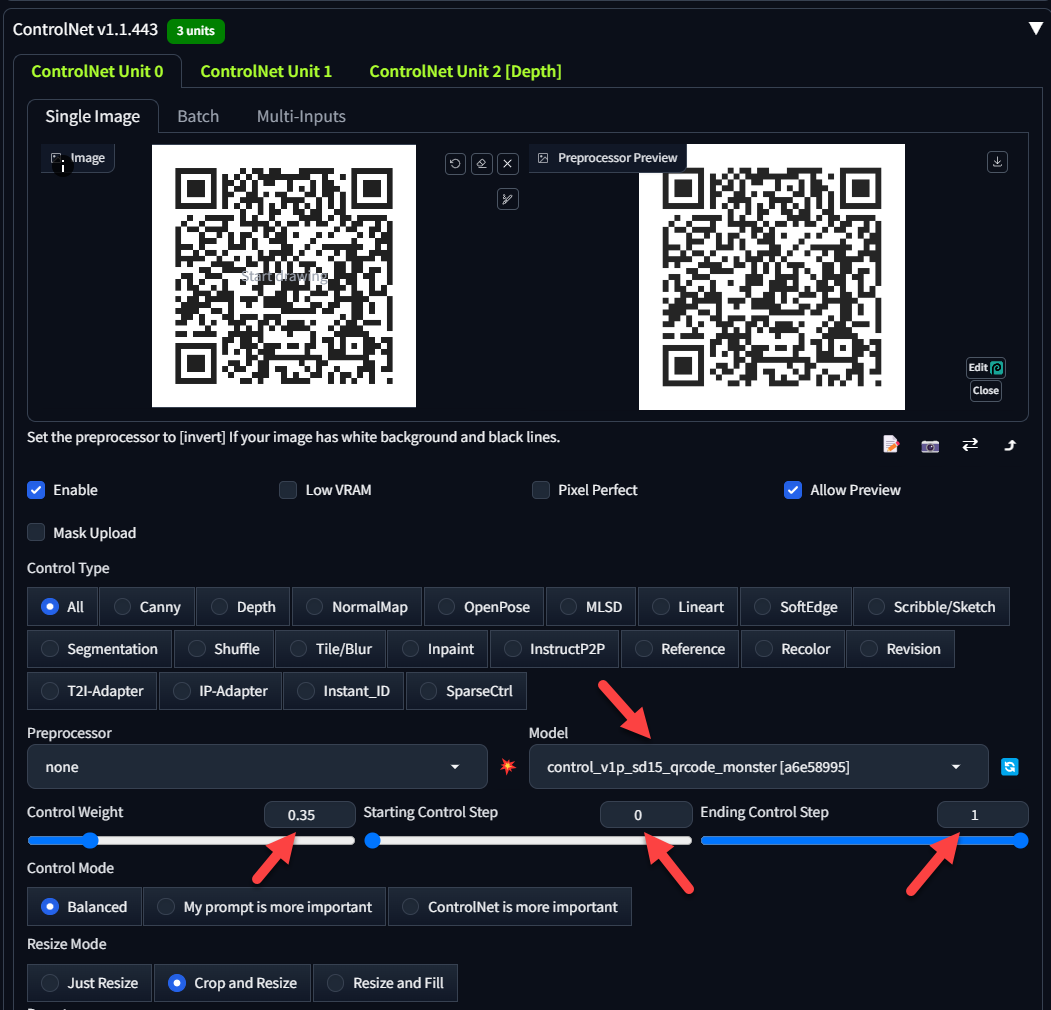
ControlNet Unit 0:
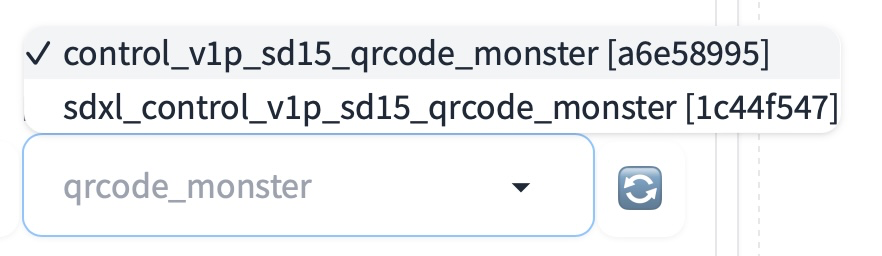
- Model:
control_v1p_sd15_qrcode_monster[a6e58995] - Control Weight: 0.35
- Starting Control Step: 0
- Ending Control Step: 1
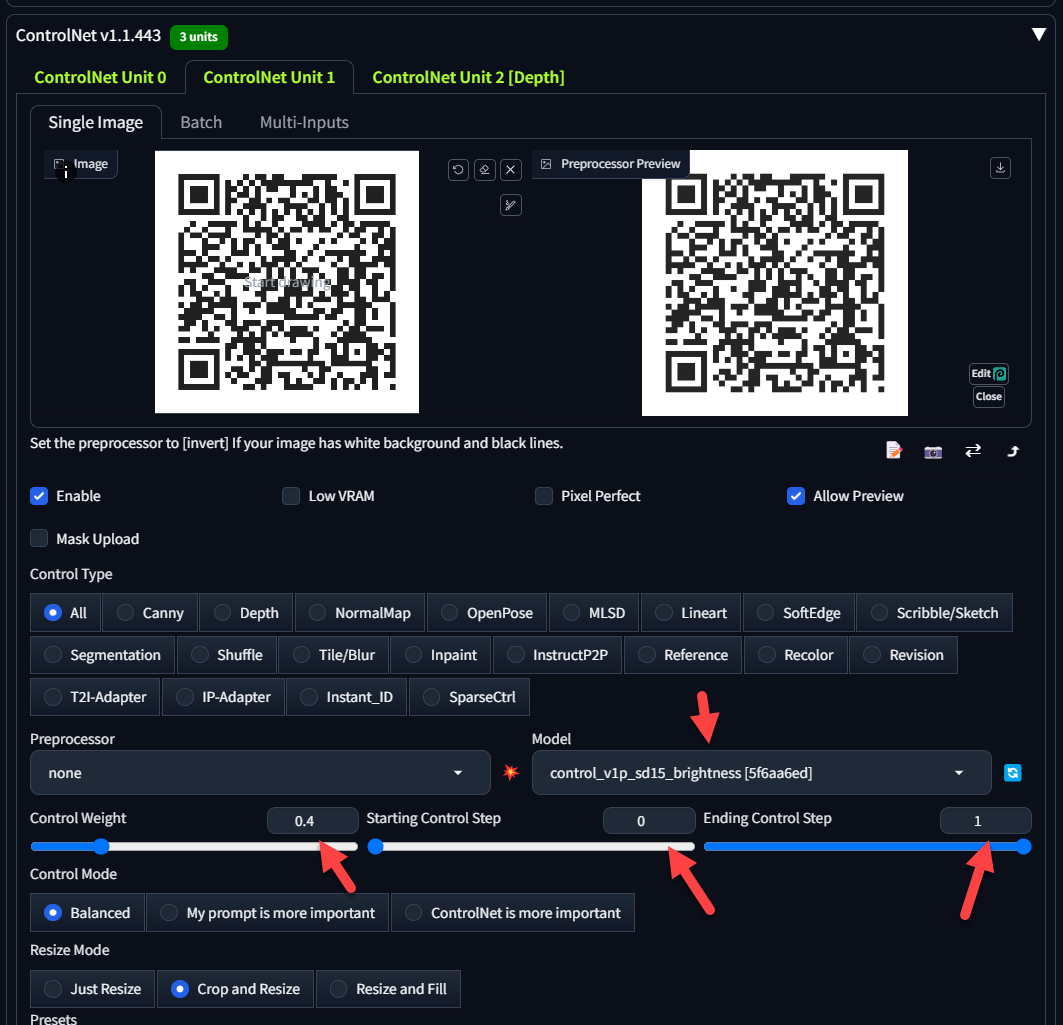
ControlNet Unit 1:
- Model:
control_v1p_sd15_brightness[5f6aa6ed] - Control Weight: 0.4
- Starting Control Step: 0
- Ending Control Step: 1
ControlNet Unit 2:
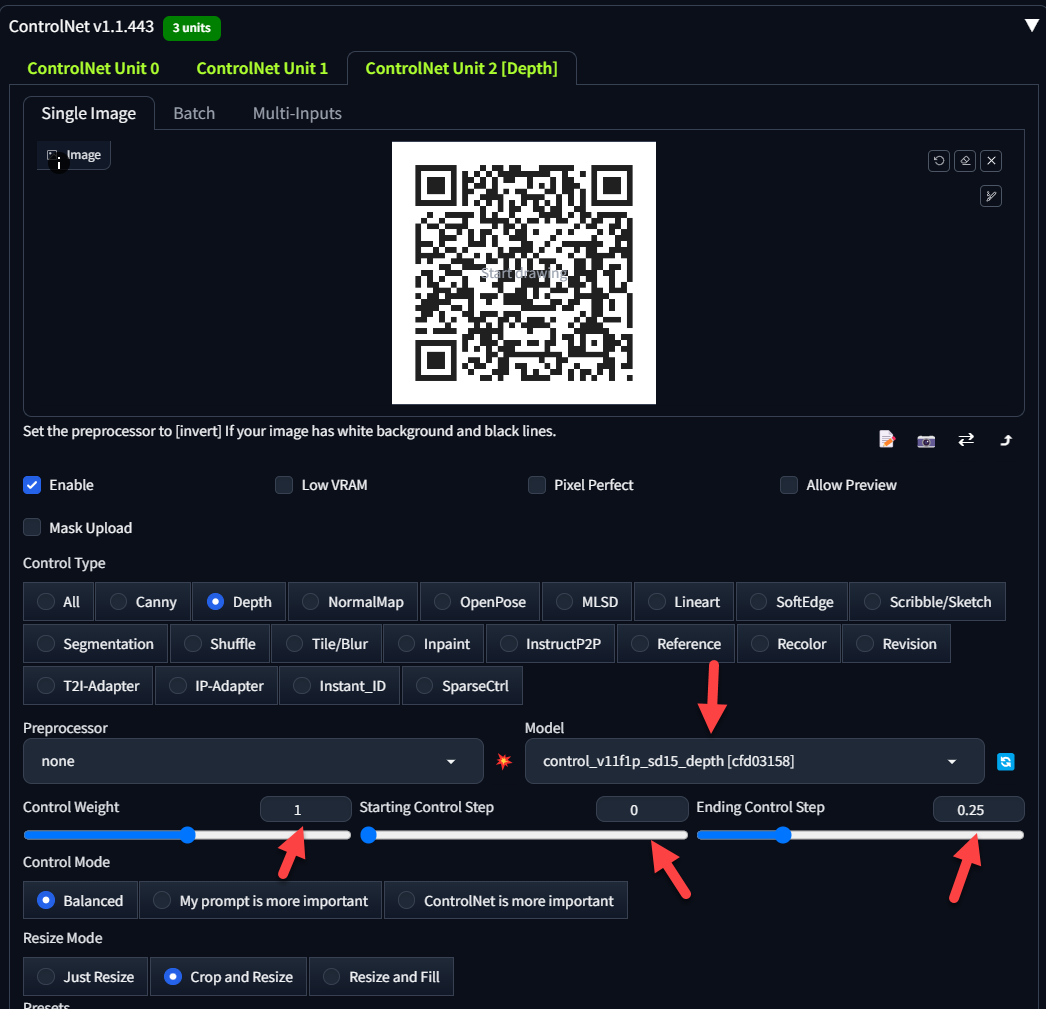
- Model:
control_v11f1p_sd15_depth[cfd03158] - Control Weight: 1
- Starting Control Step: 0
- Ending Control Step: 0.25
Now all you need to do is click "Generate" and pick your favorite QR Code!
In addition to embedding creative QR codes in imagery, QRCode monster can also be used to creatively embed shapes, characters, text and more, you can check out our post on hidden faces and text with QRCode Monster here.
Intro
QR codes seem to be the latest trend on stable diffusion, so let's dive in and see how we can create our own!
Here's a decent video tutorial if you prefer it over the detailed written tutorial below.
Making QR codes with Stable Diffusion
A super detailed tutorial with new insights from Sebastian Kampth on AI QR Codes using Stable Diffusion:
Ultimate QR Guide. What All Other Guides Miss. - Sebastian Kamph
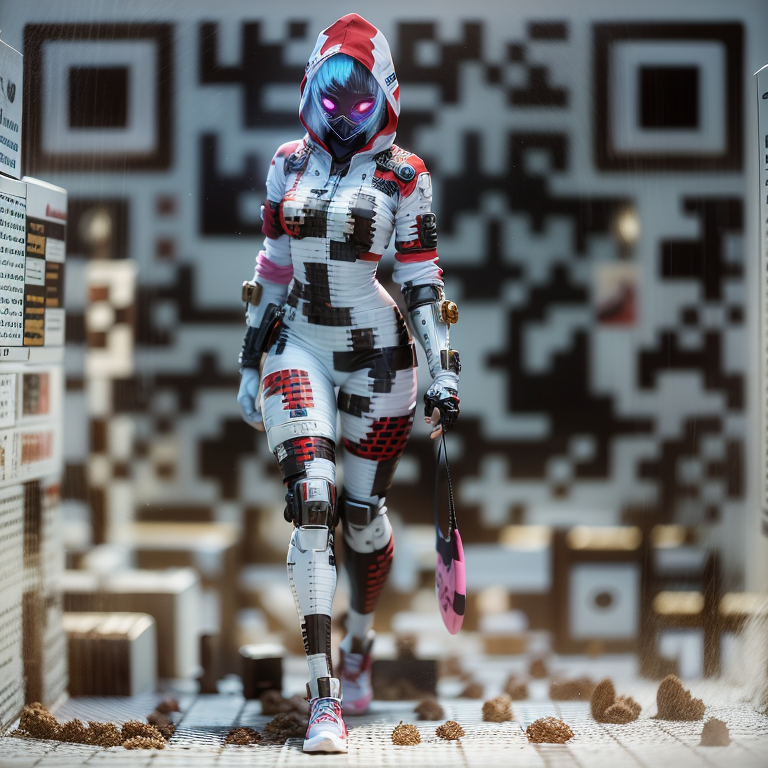
Workflow 1: Best for full pose characters (Img2Img)
Step 1. Create Normal QR Code
- Firstly, we need to create a QR code. You can create one here for free at https://keremerkan.net/qr-code-and-2d-code-generator/
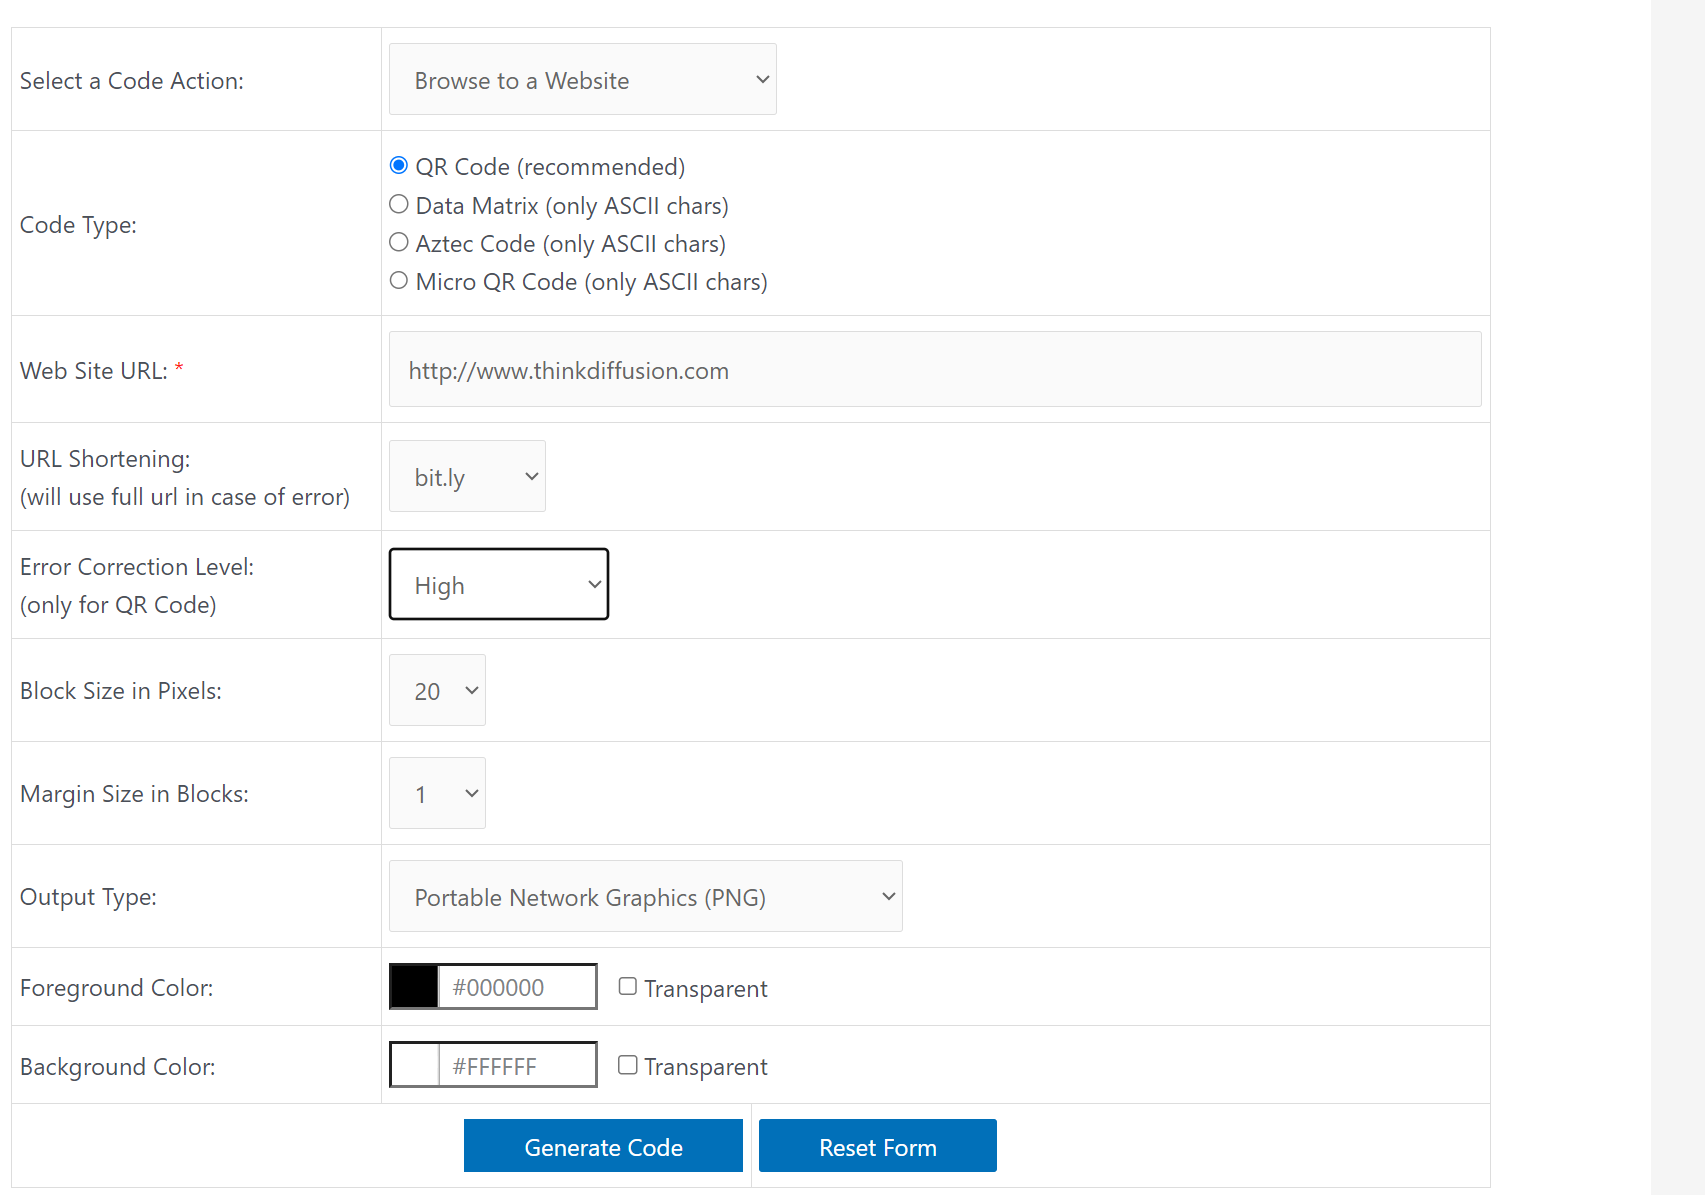
- Enter your URL. It helps to use URL shortening.
- Set the error correction level to
Highsince we are going to be blending the QR Code with our own image. - Margin Size in Blocks: My personal preference is to set this to
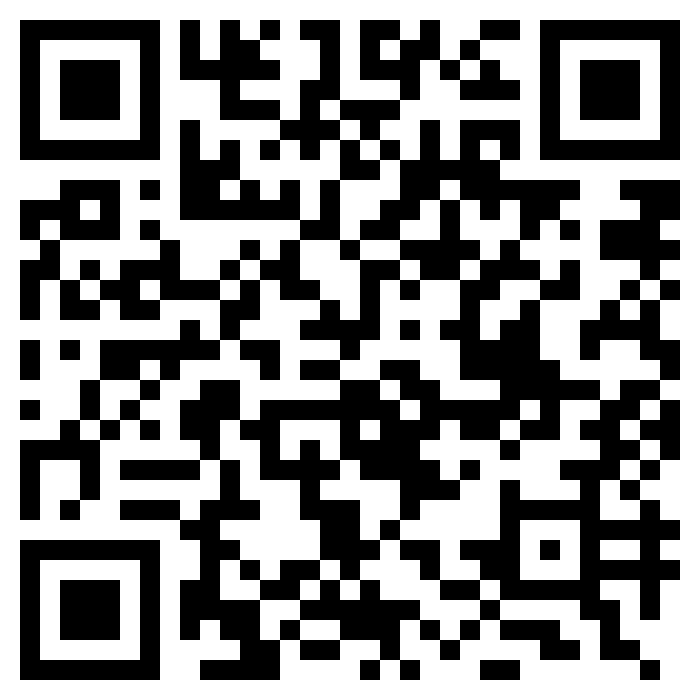
4so there's some padding around the QR Code. - We can then generate a QR code and save it to your local pc.
Step 2: Create Art for Combining with the QR Code
We now generate an image from the txt2Img tab within Automatic1111.
If you don't have Stable Diffusion installed locally, you can head over to ThinkDiffusion to follow along. Simply select A1111 and launch a machine to get started.
(The screenshots below are from Automatic1111 or A1111 for short, it's the de facto UI for Stable Diffusion)
Alrighty, let's do it!
- (1) The model is revAnimated_v122
- (2) Sampling method is DPM++ 2S a Karras
- (3) Sampling steps is 20
- (4) Resolution 768 x 768
- (5) CFG scale 11
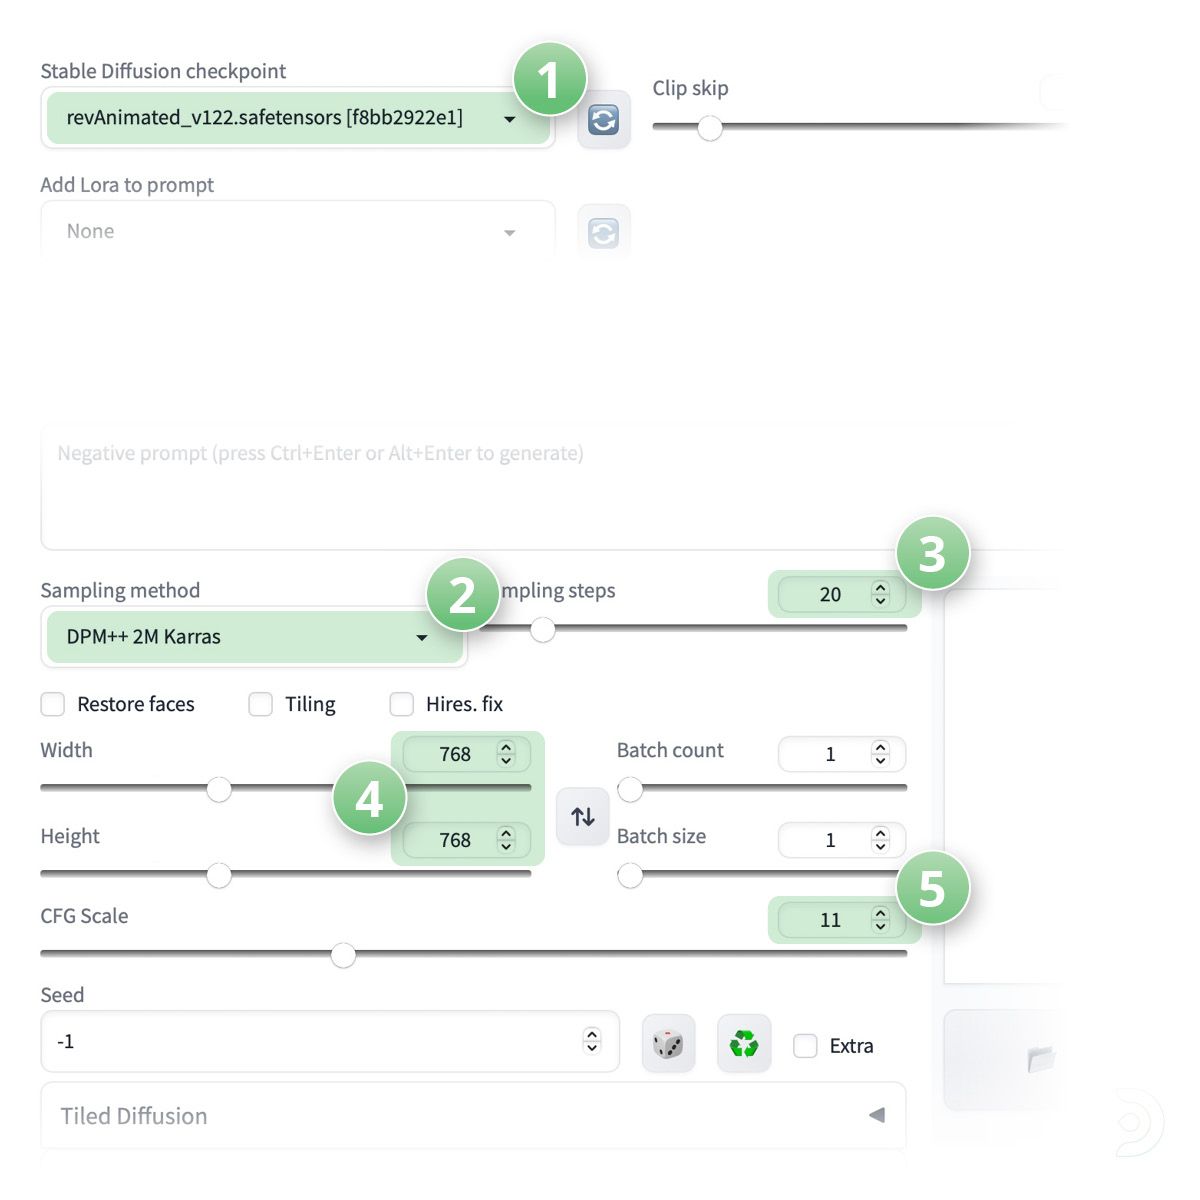
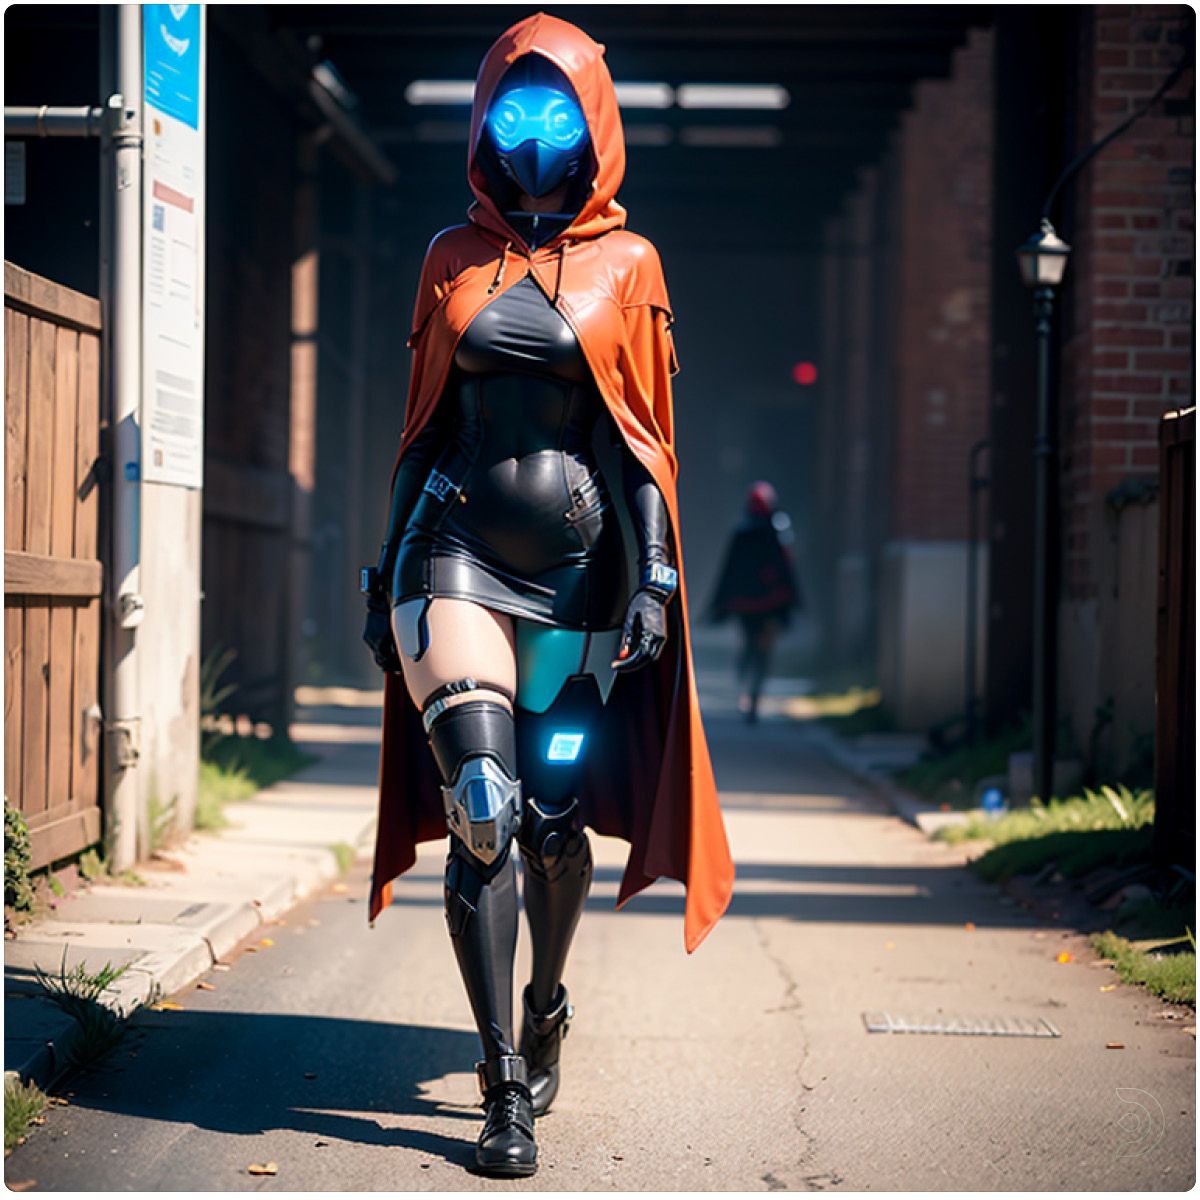
- For the positive prompts, because we are using ControlNet_OpenPose_Full, it is best to include 'full body' in the positive prompts as we are mimicking the stance of our image. You can even change the resolution to width 512 and height 768 to make it a portrait, so that it interferes less with our QR code
Positive Prompts:
futobot, cyborg, ((masterpiece),(best quality),(ultra-detailed), (full body:1.2), 1 female, solo, hood up, upper body, mask, 1 girl, female focus, black gloves, cloak, long sleeves
Negative Prompts:
paintings, sketches, (worst quality:2), (low quality:2), (normal quality:2), lowres, normal quality, ((monochrome)), ((grayscale)), skin spots, acnes, skin blemishes, age spot, glans, nsfw, nipples, (((necklace))), (worst quality, low quality:1.2), watermark, username, signature, text, multiple breasts, lowres, bad anatomy, bad hands, text, error, missing fingers, extra digit, fewer digits, cropped, worst quality, low quality, normal quality, jpeg artifacts, signature, watermark, username, blurry, bad feet, single color, ((((ugly)))), (((duplicate))), ((morbid)), ((mutilated)), (((tranny))), (((trans))), (((trannsexual))), (hermaphrodite), extra fingers, mutated hands, ((poorly drawn hands)), ((poorly drawn face)), (((mutation))), (((deformed))), ((ugly)), blurry, ((bad anatomy)), (((bad proportions))), ((extra limbs)), (((disfigured))), (bad anatomy), gross proportions, (malformed limbs), ((missing arms)), (missing legs), (((extra arms))), (((extra legs))), mutated hands,(fused fingers), (too many fingers), (((long neck))), (bad body perspect:1.1)
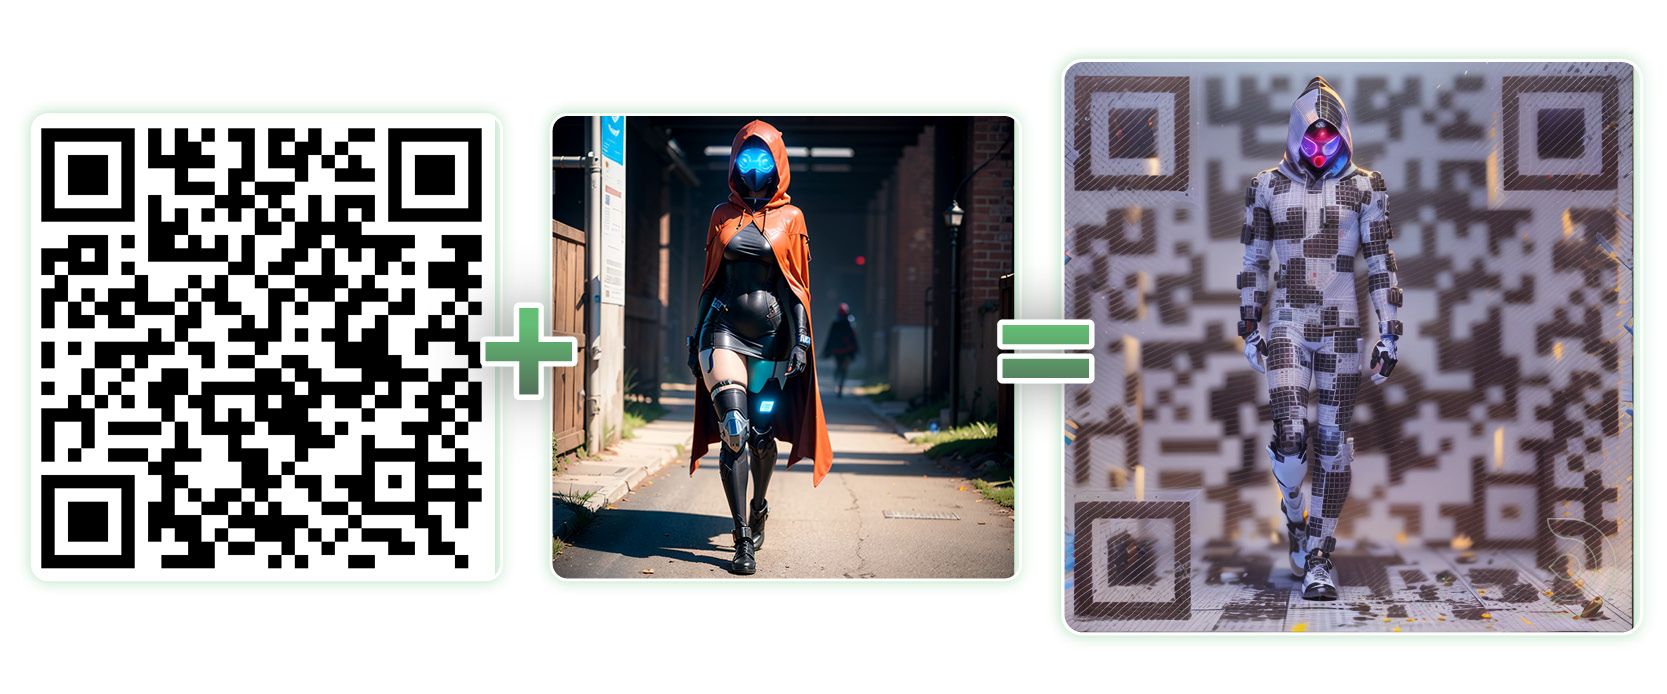
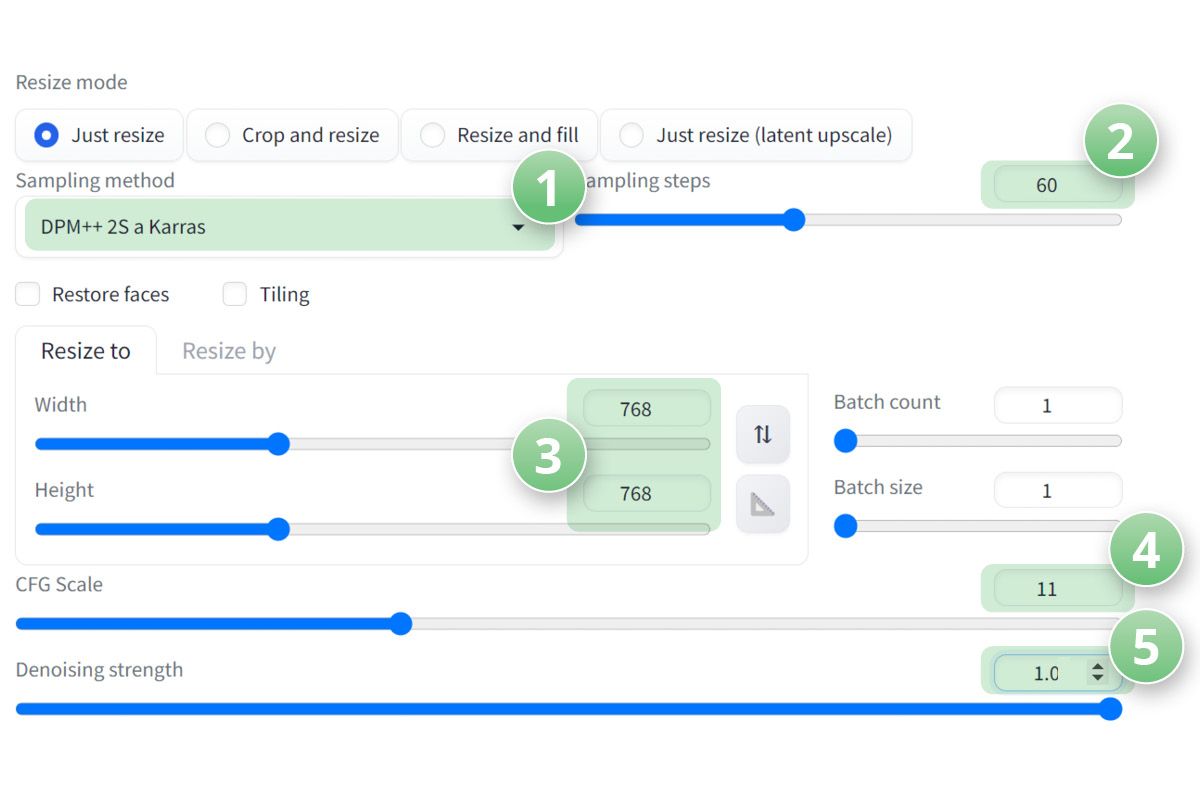
Step 3: Combine the Image with the QR Code
- We can then send this to the img2img tab, or upload your image to the img2img tab if you already have one you want to use. We can enter the same positive and negative prompts.
- IMPORTANT: You have to enter prompts within the img2img tab for this to work

- (1) We can then select the sampling method as DPM++ 2S a Karras,
- (2) Sampling steps 20
- (3) A resolution of 768 x 768
- (4) A CFG Scale of 11
- (5) And a Denoising strength as 1.0
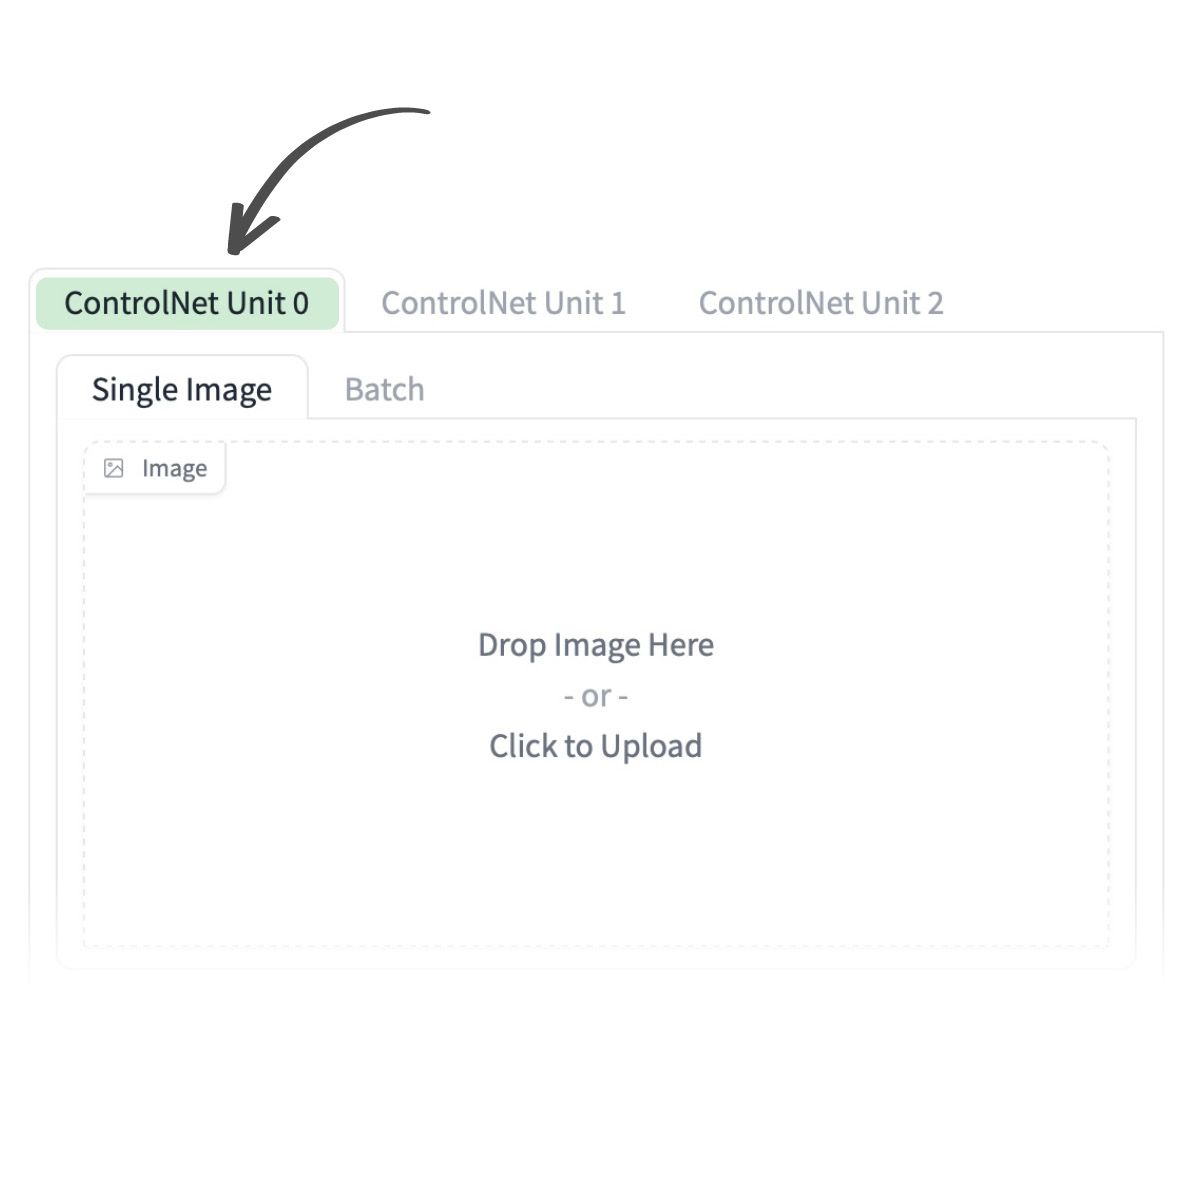
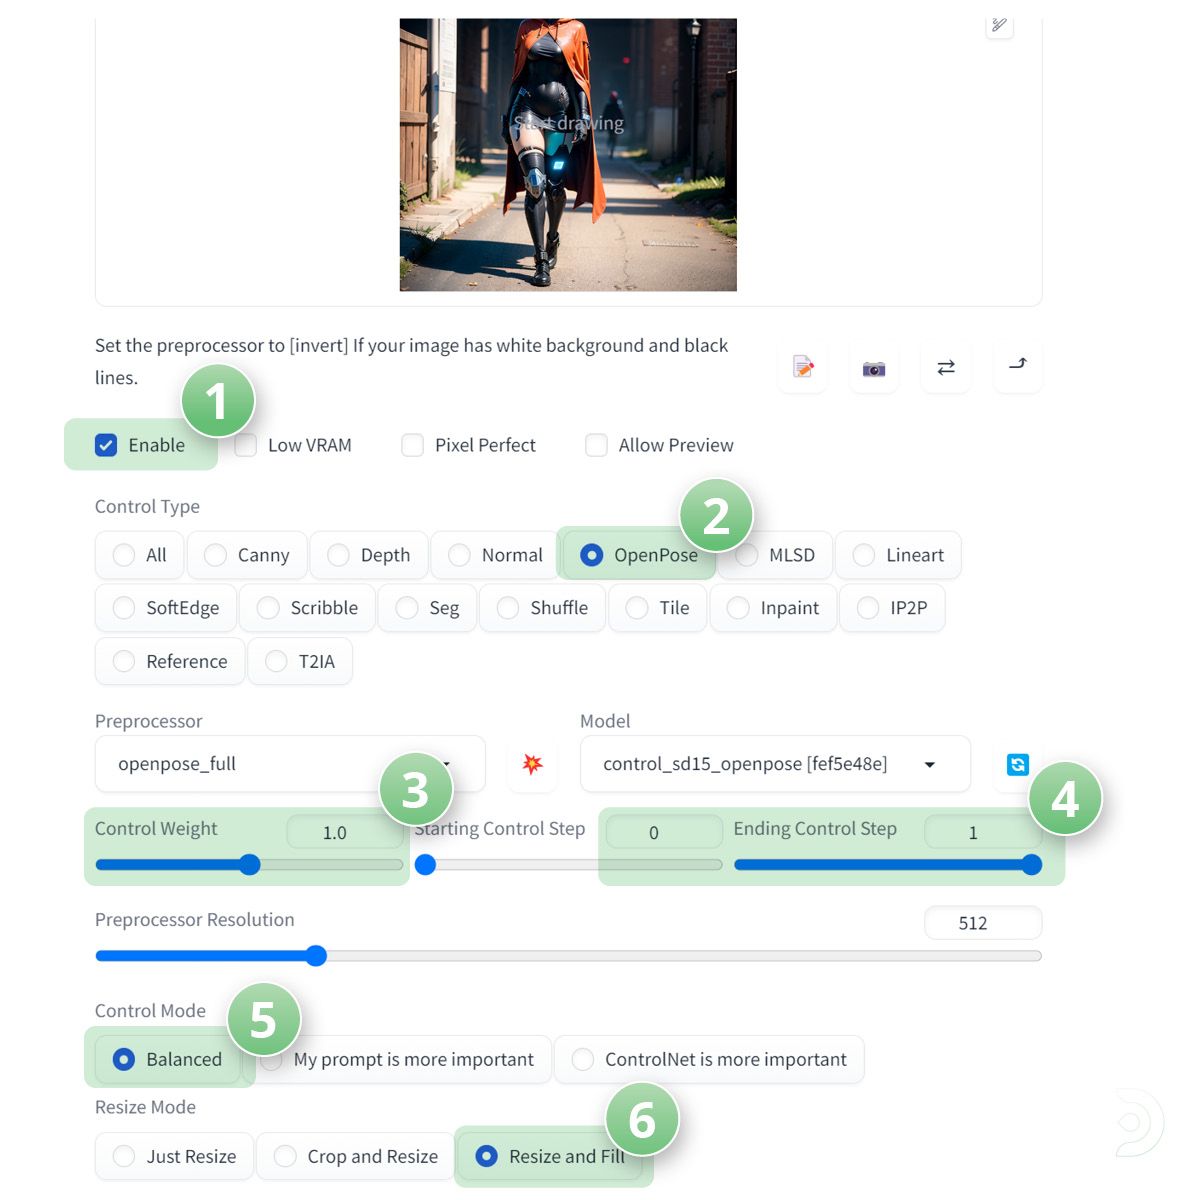
- We then need to go into ControlNet for it to do its magic! For ControlNet Unit 0, we need to upload the image again that was generated in the txt2img tab or your own image if you already have one.
- (1) Make sure to tick the checkbox to Enable ControlNet within ControlNet Unit 0
- (2) Select OpenPose as the Control Type, openpose_full as the pre-processor and control_sd15_openpose as the ControlNet model
- (3) We can leave the Control Weight at 1 as we are going to inform controlnet that our QR code should be weighted heavier
- (4) We can leave the the Starting Control Step at 0 and the Ending Control Step at 1 as we want our image to be generated from the initial start.
- (5) Select Balanced as the Control Mode
- (6) And Resize and Fill for the Resize Mode.
- We now need to go into the controlNet unit 1 tab (If you don't see this then you need to go into settings > controlNet and change the slider to show more than 1 controlNet tab

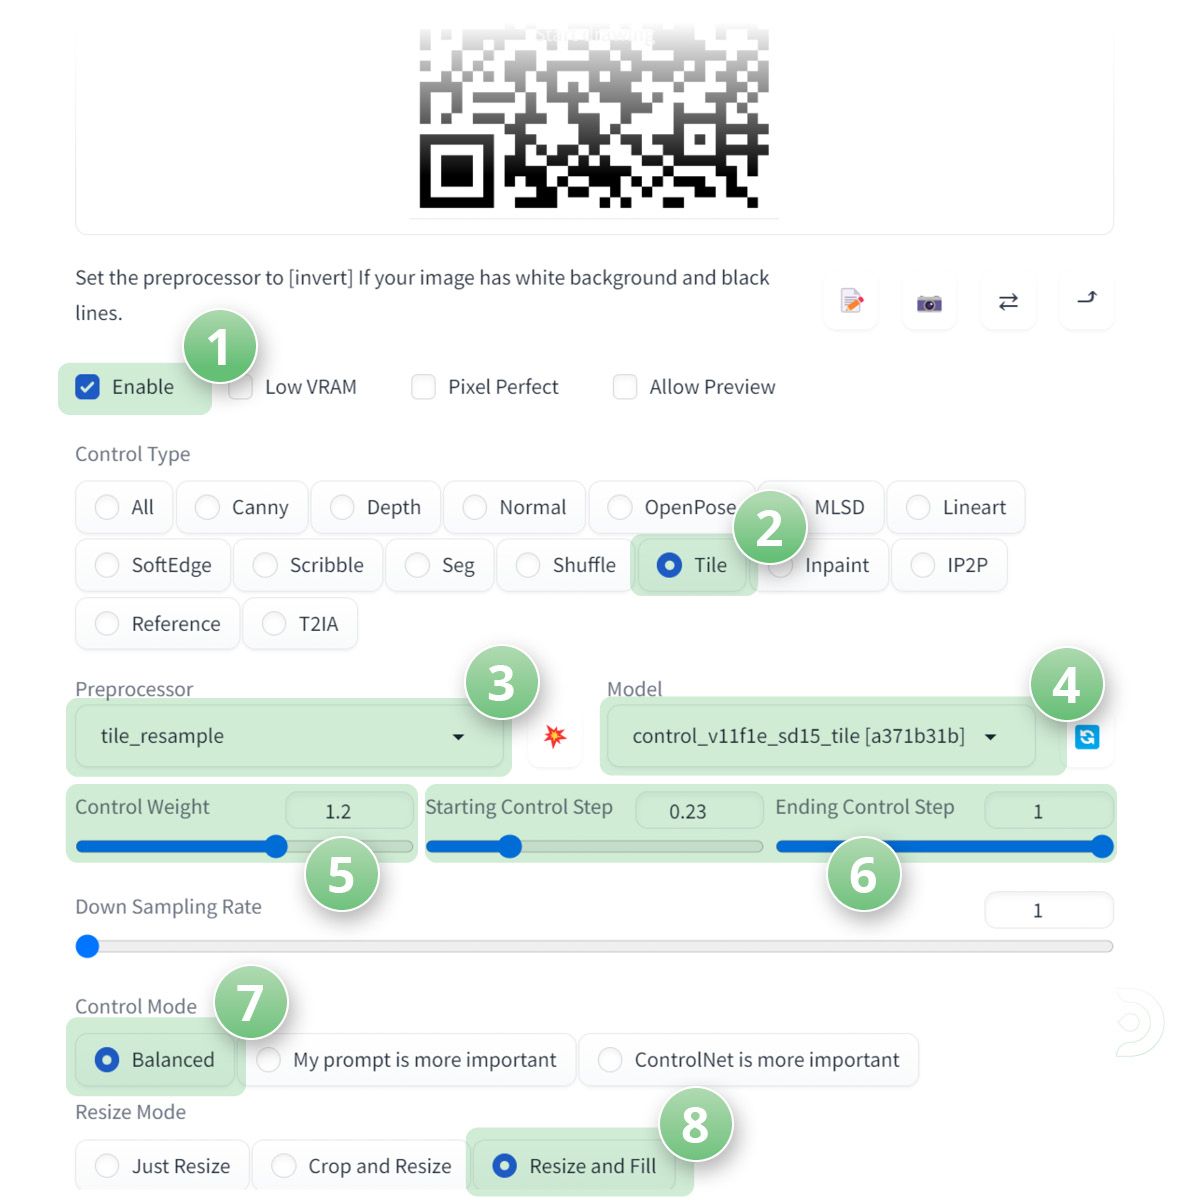
- We can then upload our QR code to the controlNet Unit1 tab
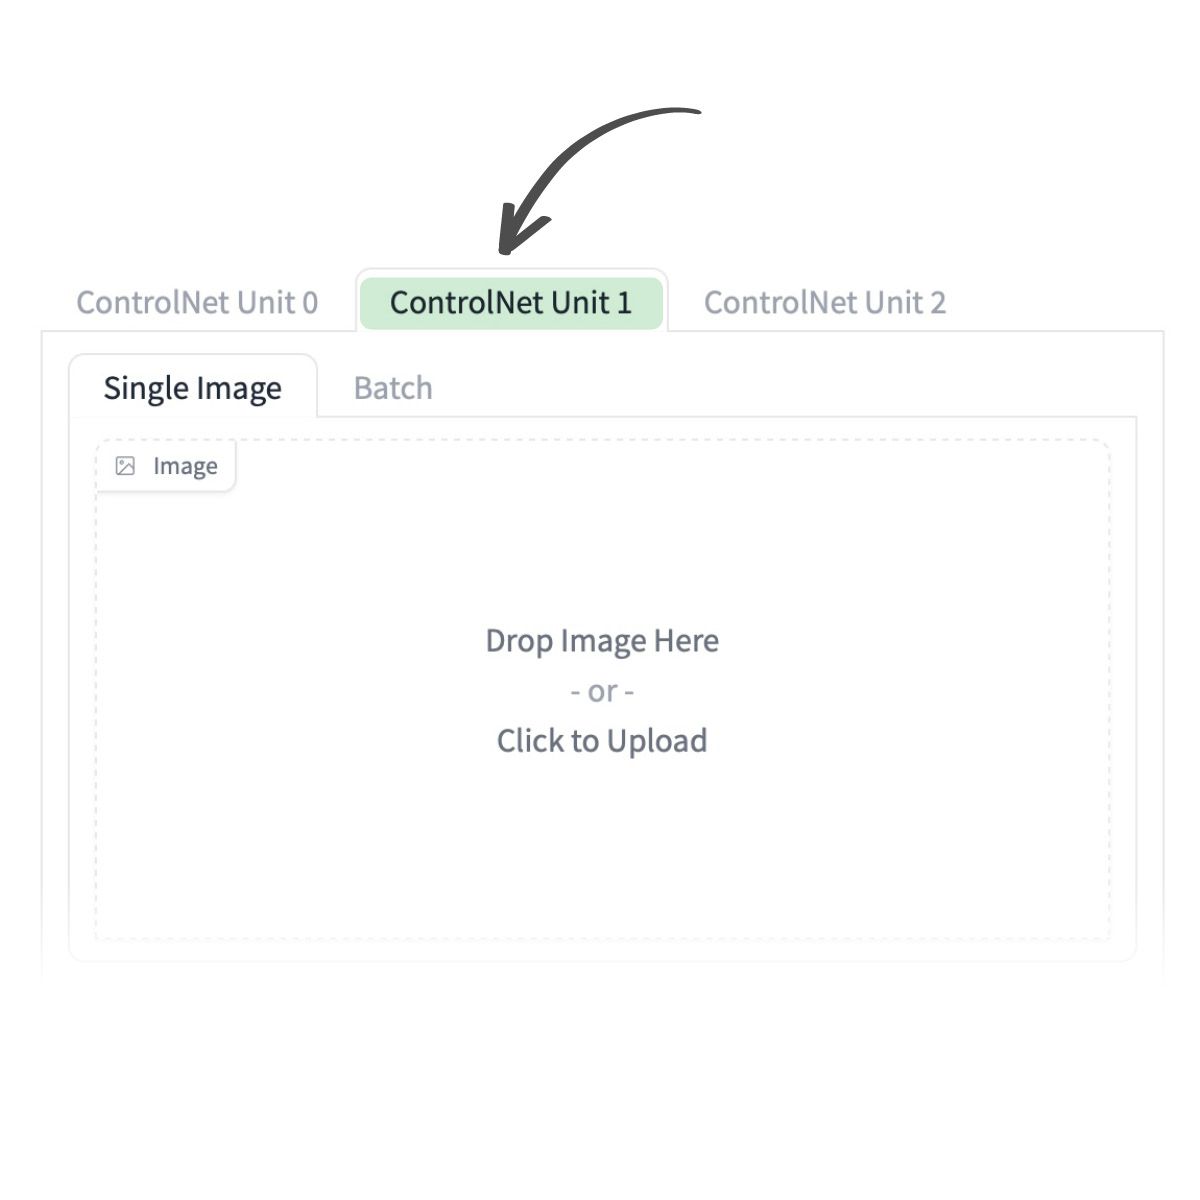
- (1) Ensure we click enable to make sure ControlNet is activated
- (2) Select tile as the Control Type,
- (3) tile_resample as the pre-processor
- (4) control_v11f1e_sd15_tile as the controlNet model (You may have a different version of the controlNet tile model)
- (5) Set the control weight to 1.2 to inform control net that our QR code is slightly more important than our image!
- (6) Set the starting control step to 0.23 and the ending control step to 0.64 This ensures that our image will start rendering before the QR code is rendered. It's more aesthetically pleasing on the eye this way!
- (7) Set the control mode to balanced
- (8) and the resize mode to Resize and fill
Step 4: High five!
Congrats, we can now click generate and we should have our QR code blended with our image!
Workflow 2: A wider array of possibilities (Txt2Img)
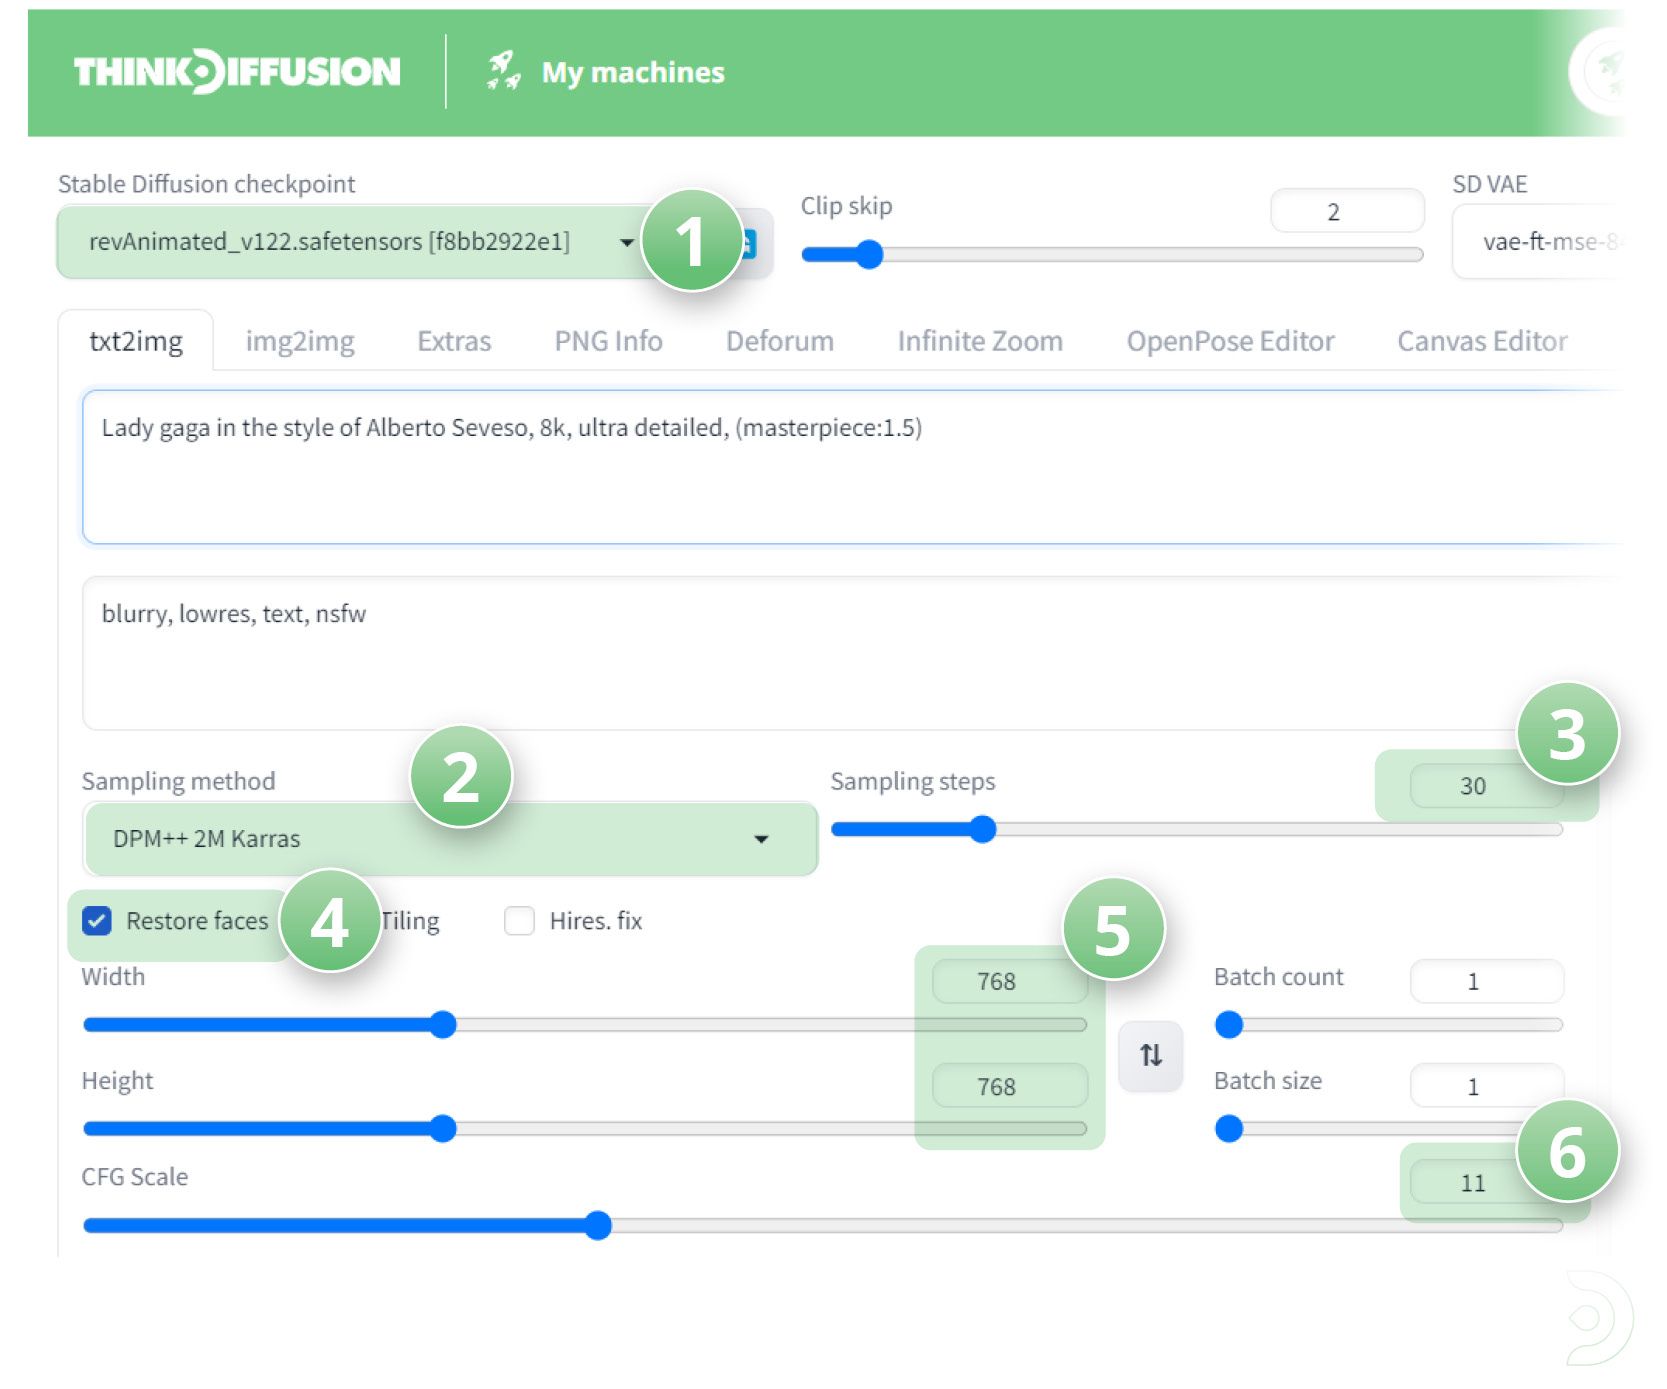
Step 1: Create our prompts
- We can start with entering our positive and negative prompts
Positive Prompts: Lady gaga in the style of Alberto Seveso, 8k, ultra detailed, (masterpiece:1.5)
Negative Prompts: blurry, lowres, text, nsfw
- (1) Set the stable diffusion checkpoint to revAnimated
- (2) the sampling method as DPM++ 2M Karras
- (3) sampling steps to 30
- (4) enable restore faces ✅
- (5) set the resolution to 768 x 768
- (6) and a CFG scale of 11
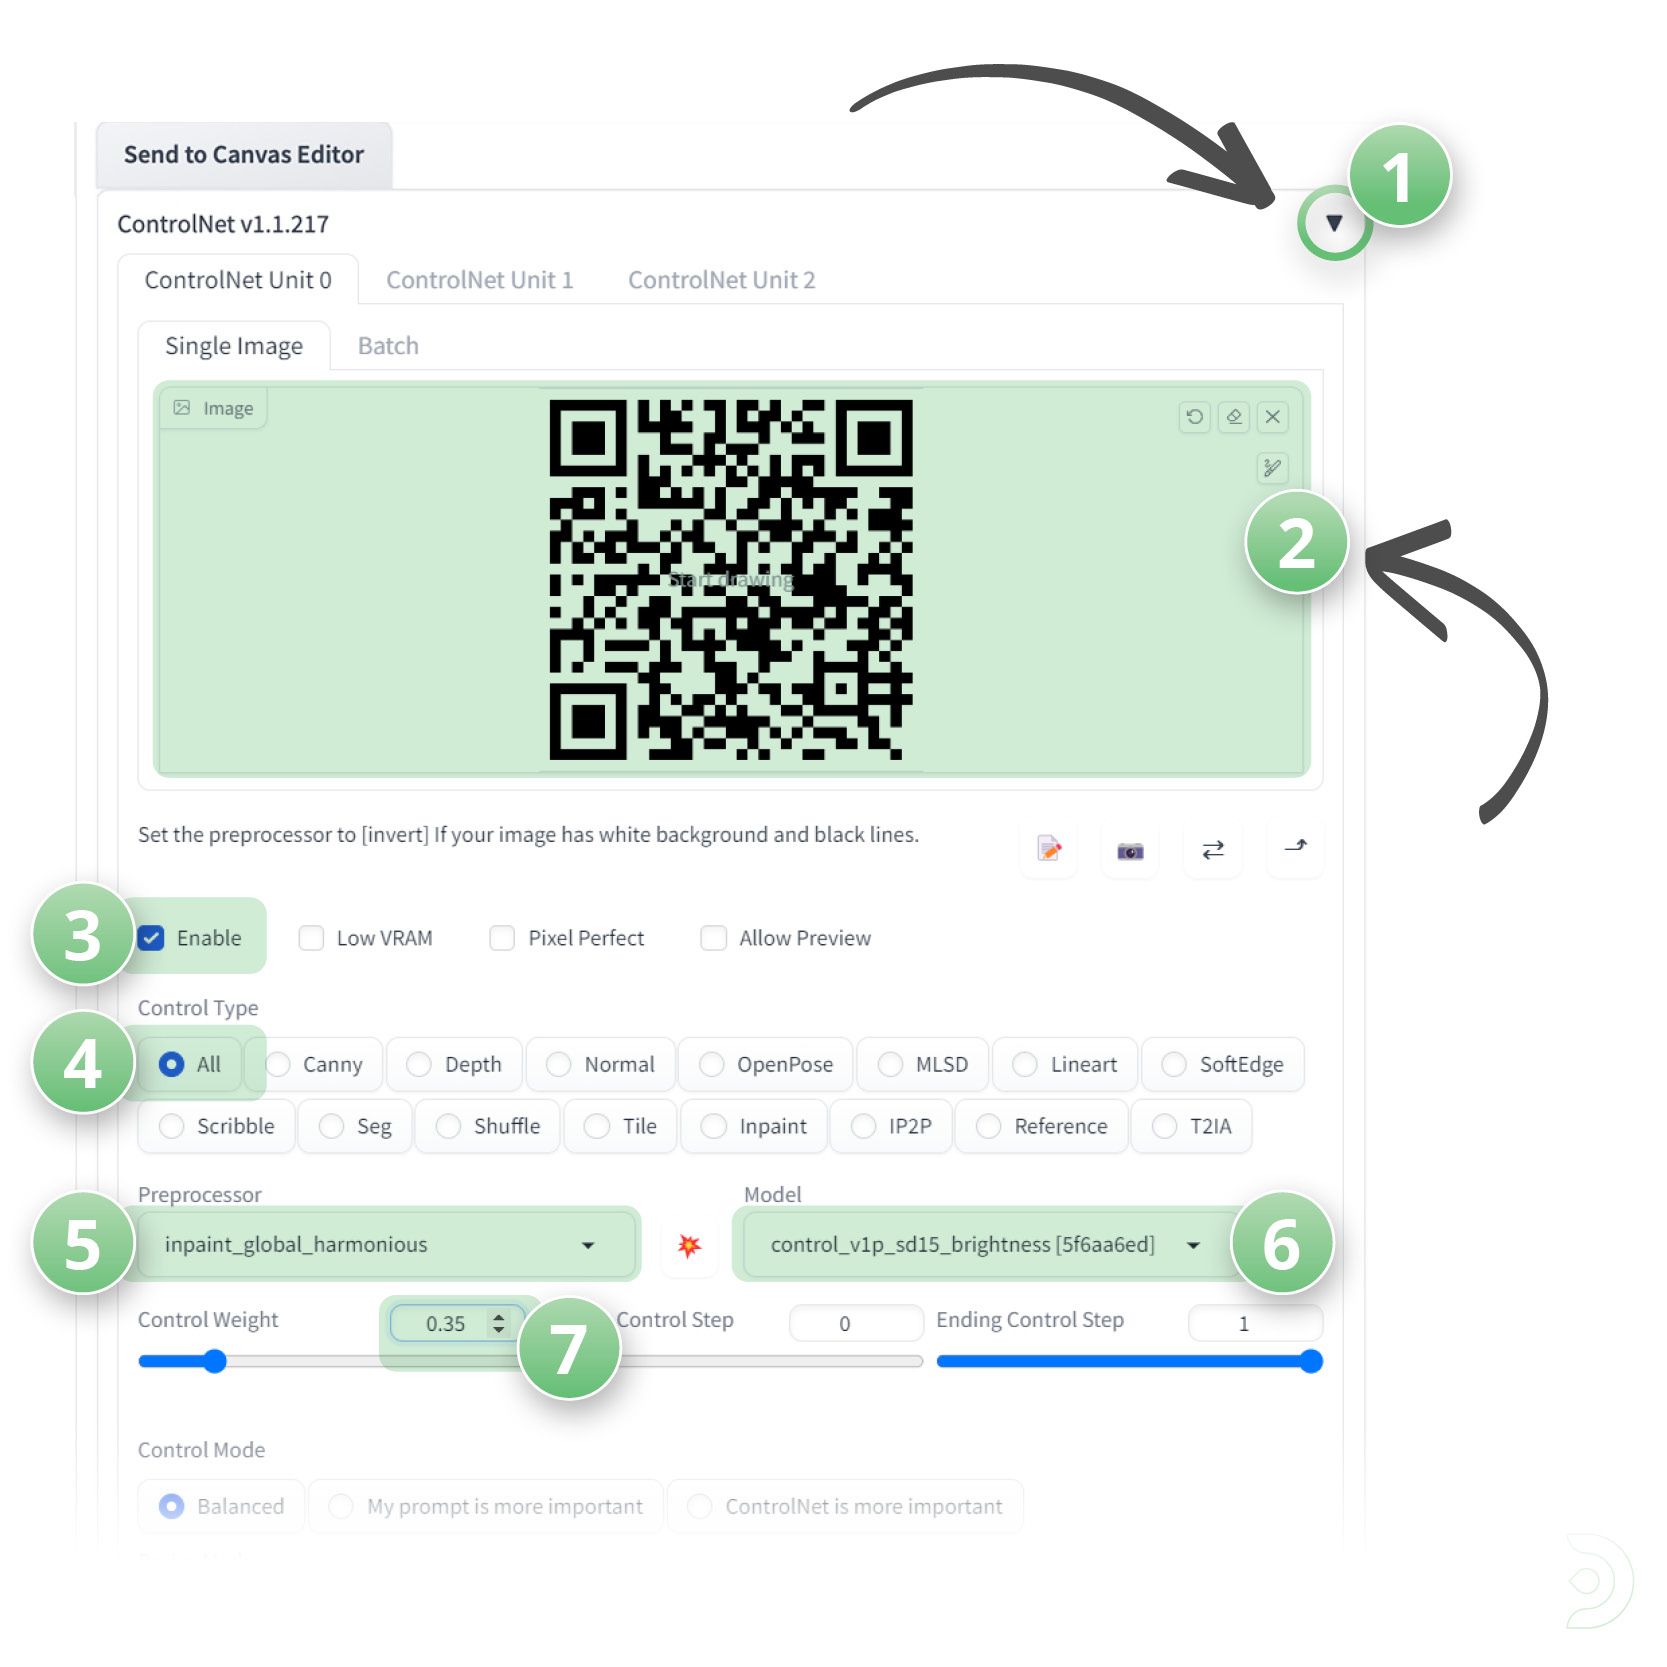
Step 2: ControlNet Unit 0
- (1) Click the ControlNet dropdown
- (2) and upload our qr code.
- (3) Click Enable to ensure that ControlNet is activated ✅
- (4) Set the Control Type to be All
- (5) the Preprocessor to be inpaint_global_harmonious
- (6) and the ControlNet model to be control_v1p_sd15_brightness
- (7) Set the Control weight to be 0.35
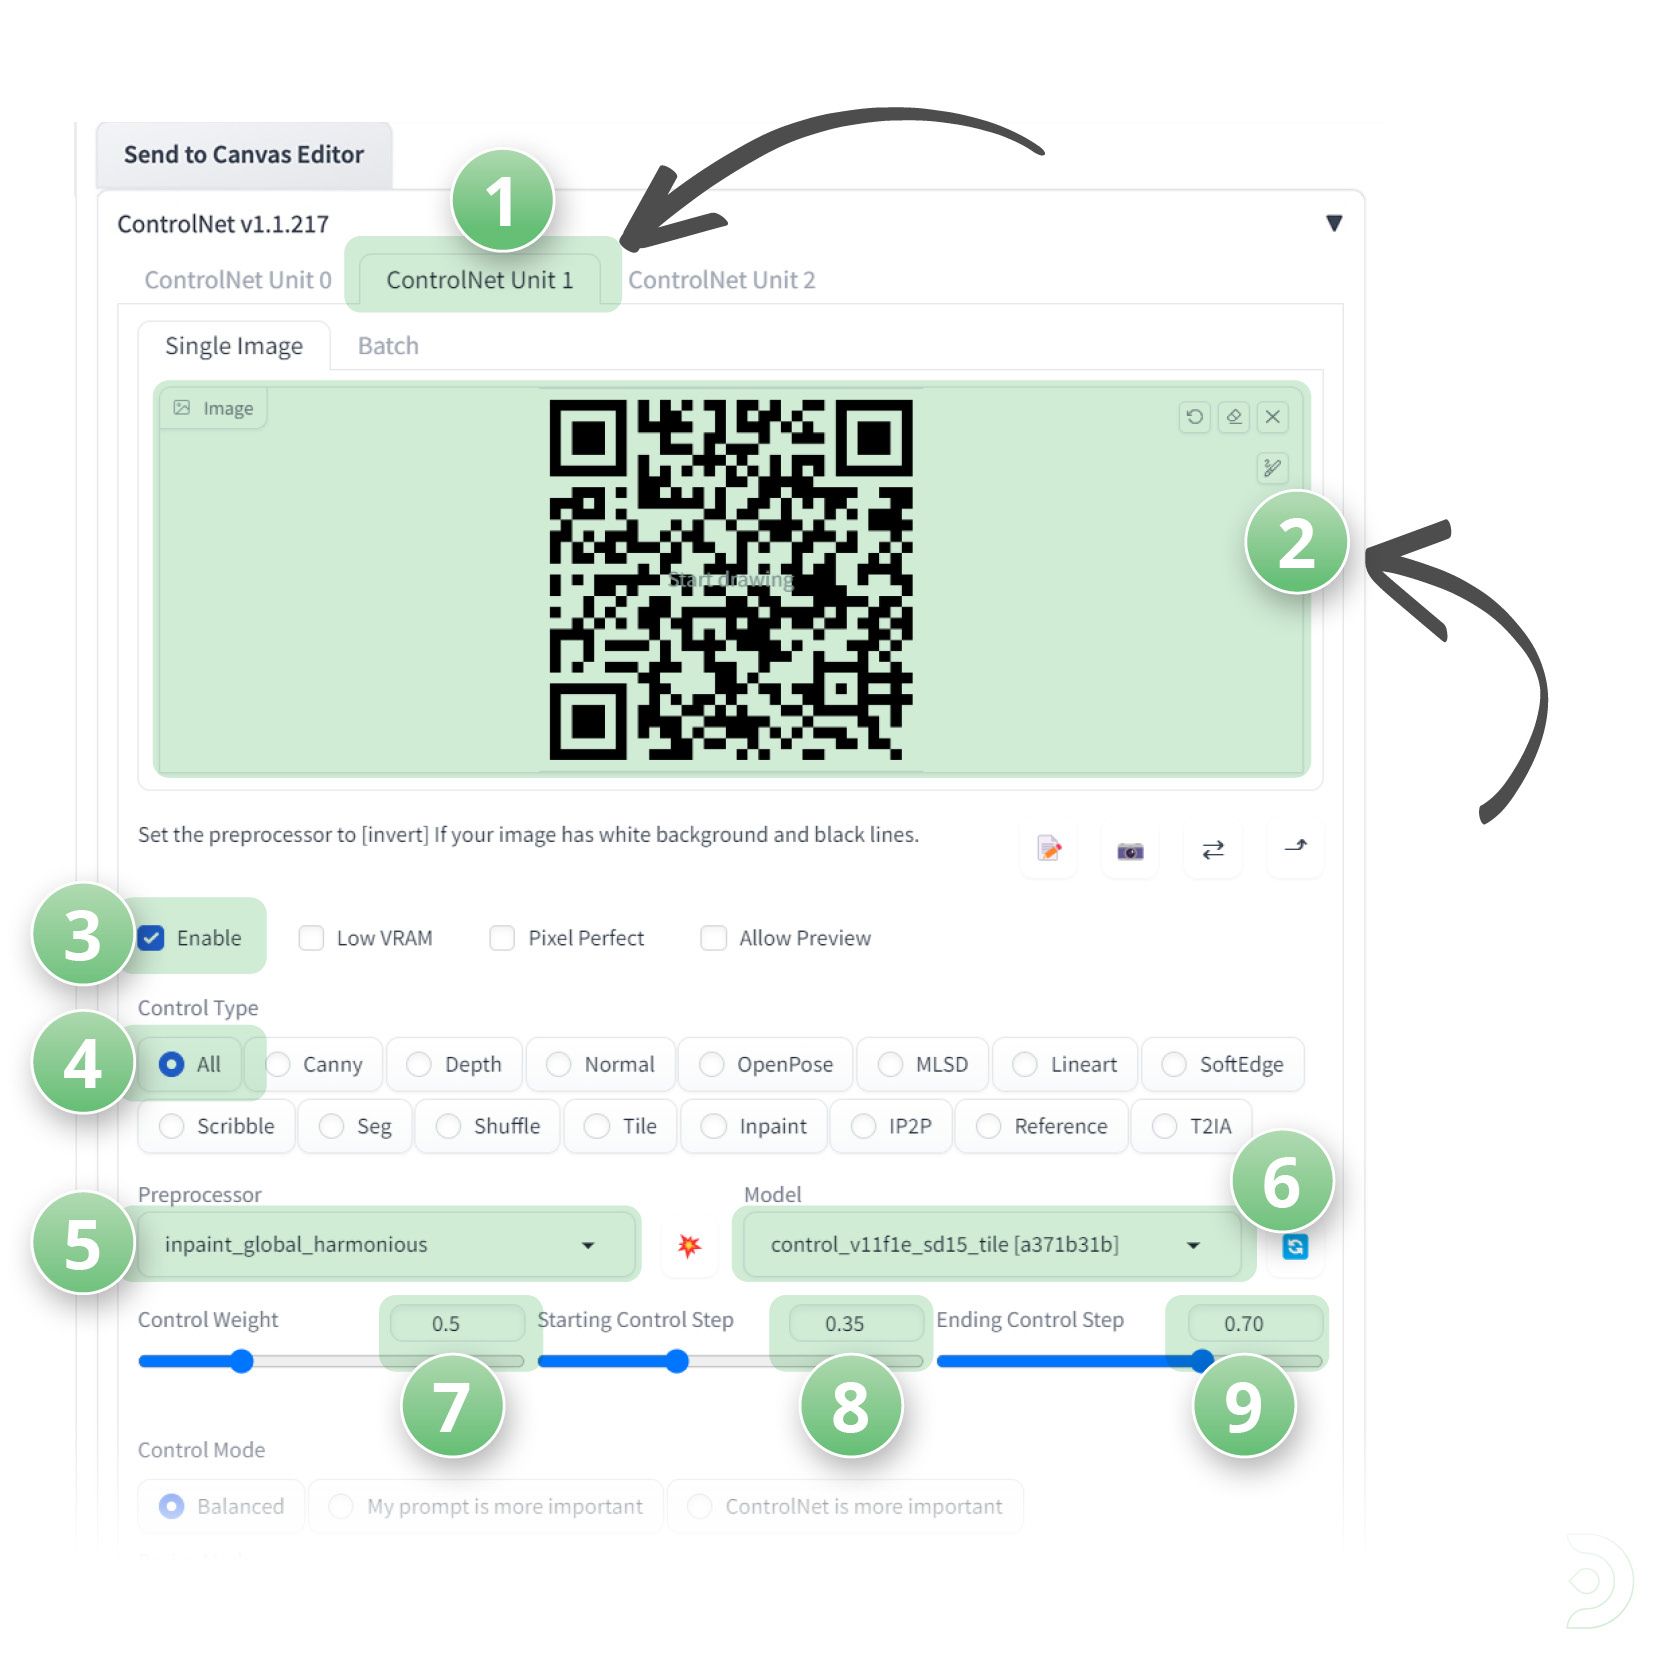
Step 3: ControlNet Unit 1
- (1) Click over to the ControlNet Unit 1 Tab
- (2) Within ControlNet Unit 1 we want to upload our qr code again
- (3) Click Enable to ensure that ControlNet is activated ✅
- (4) Set the Control Type to All
- (5) the Preprocessor to inpaint_global_harmonious
- (6) and the ControlNet model to control_v11f1e_sd15_tile
- (7) Set the Control Weight to 0.5
- (8) the starting Control Step to 0.35
- (9) and the ending control step to 0.70
Step 4: High Five!
- Click generate...!
Other examples using the same txt2Img workflow
Lion
Positive Prompts: Full Photo shot of a lion, Yoji Shinkawa style, Jean-baptiste Monge, general plan, central composition, entirely on a sheet, Ink painting, expressive painting, watercolor, bold brushstrokes, Concept art, orange, (purple:1.2), gray and white, stylize, intricate detail, 8k, transparent background, (white background:1.4), 3D vector
Negative Prompts: Watermark, Text, censored, deformed, bad anatomy, disfigured

City
Positive Prompts: 8k, RAW photo, best quality, (masterpiece:1.2), (realistic, photo-realistic:1.37), octane render, ultra high res, ultra-detailed , professional lighting, photon mapping, radiosity, physically-based rendering, ue5, ((island sanctuary)), ((ancient fallen kingdom)), ((drowned city))
Negative Prompts: cartoon, painting, illustration, (worst quality, low quality, normal quality:2), nsfw
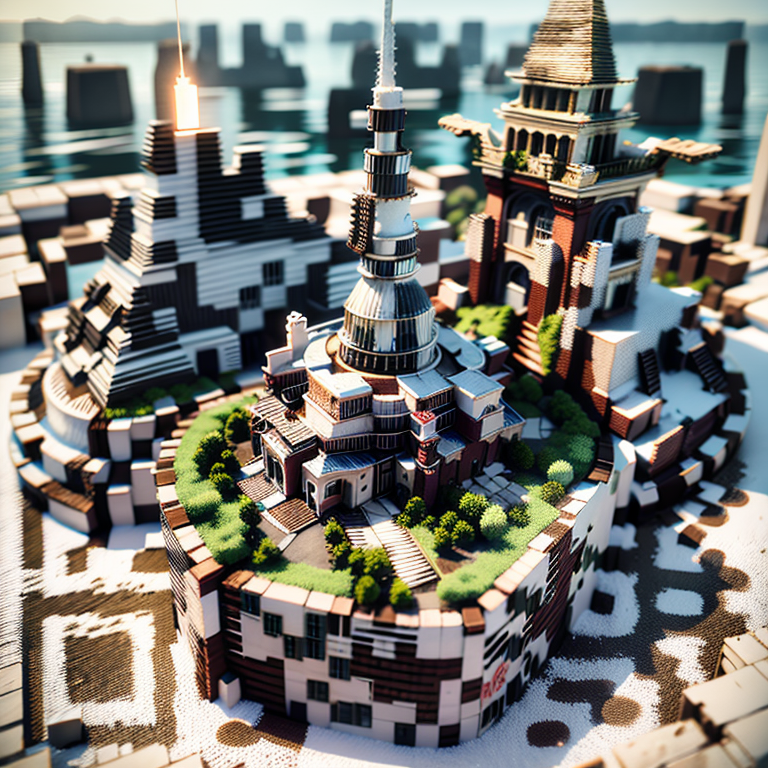
Please note that you can play around with the control weight of both images to find a happy place! Also, you can tweak the starting control step of the QR image. I find these settings tend to give a decent look but also works as a QR code. They don't always scan though, just keep generating and tweaking to get the exact outcome you desire!
If you’re having issues with installation or slow hardware, you can try any of these workflows on a more powerful GPU in your browser with ThinkDiffusion.
If you’d like to have more control over your character art in Step 2, check out my post to using OpenPose here. Happy creating!
Member discussion