
What is Face Detailer?
Creator Dr. Lt. Data, who also made the ComfyUI Manager, is responsible for its creation. A node called ComfyUI Face Detailer can recognize and improve faces with ease. Face Detailer is great for restoring characters' faces in photos, movies, and animations, and the 4x UltraSharp Model is great for upscaling their appearance even more. Image face feature restoration is the goal of the Face Detailer component, which uses a comprehensive processing pipeline for face detection and improvement of facial details as well as user-adjustable settings for targeted effects. Ideal for producing high-resolution stills and moving images, the 4x UltraSharp Model upscales photos to greatly increase resolution while maintaining clarity, enhancing details, and decreasing artifacts. When combined, these tools provide a potent arsenal for improving the visual quality of photos, movies, and animations, particularly in situations when adjustments to faces or general clarity are needed. Included in the ComfyUI Impact Pack is a collection of bespoke nodes that streamline and simplifies picture enhancement with the help of advanced tools like the Detector, Detailer, Upscaler, and Pipe.
Significant Features
Basic Auto Face Detection and Refinement
Make use of FaceDetailer for simple, automated face improvement and detection. This function uses high-resolution synthesis to revive lost details, making it ideal for repairing faces affected by low resolution. One sophisticated method for detecting faces and improving images is FaceDetailer, which combines the Detector and Detailer nodes. The mask output color-codes the regions that need improvement, making the difference between the two sides stand out.

2Pass Refine
Take a two-step method by utilizing two FaceDetailers to repair severely damaged faces. With this configuration, you can easily configure different common inputs and streamline workflow modification using FaceDetailer (pipe). While selective dilatation aids in including neighbouring regions for thorough face reconstruction, the first pass concentrates on recreating the fundamental outline with moderate settings and resolution.

Face Bbox + Person Silhouette Segmentation
When enhancing a person's face, the following combination effectively eliminates distortion caused by the backdrop. This solution uses BBoxDetectorForEach for face detection and SAMDetectorCombined for segment identification. It guarantees that the detailed enhancements will be exactly aligned with the face contours and won't affect the surrounding portions of the image.

Getting Started using ComfyUI powered by ThinkDiffusion
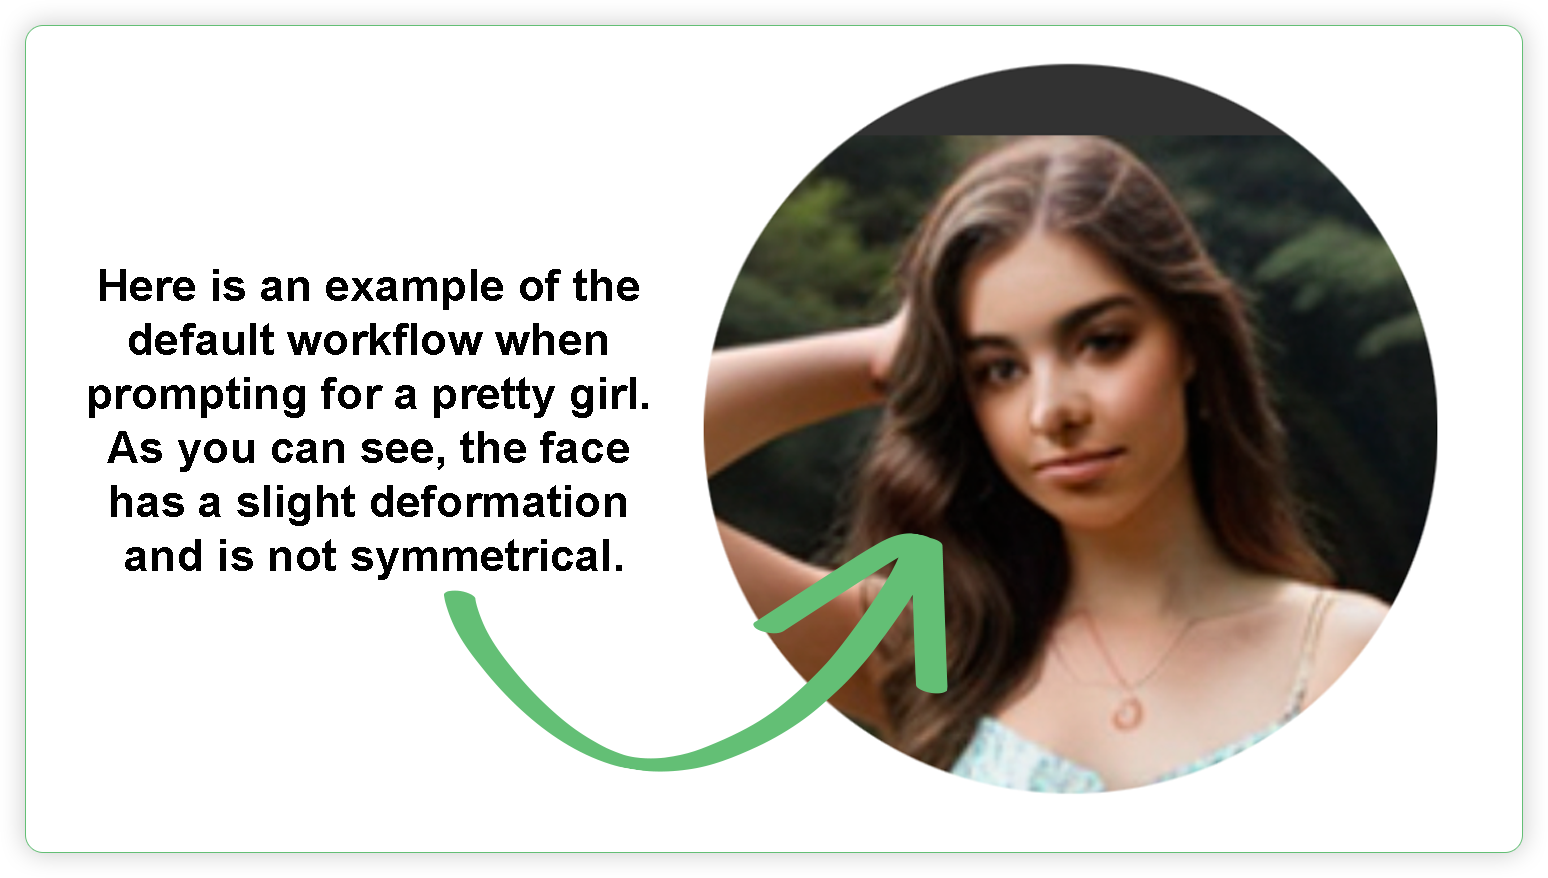
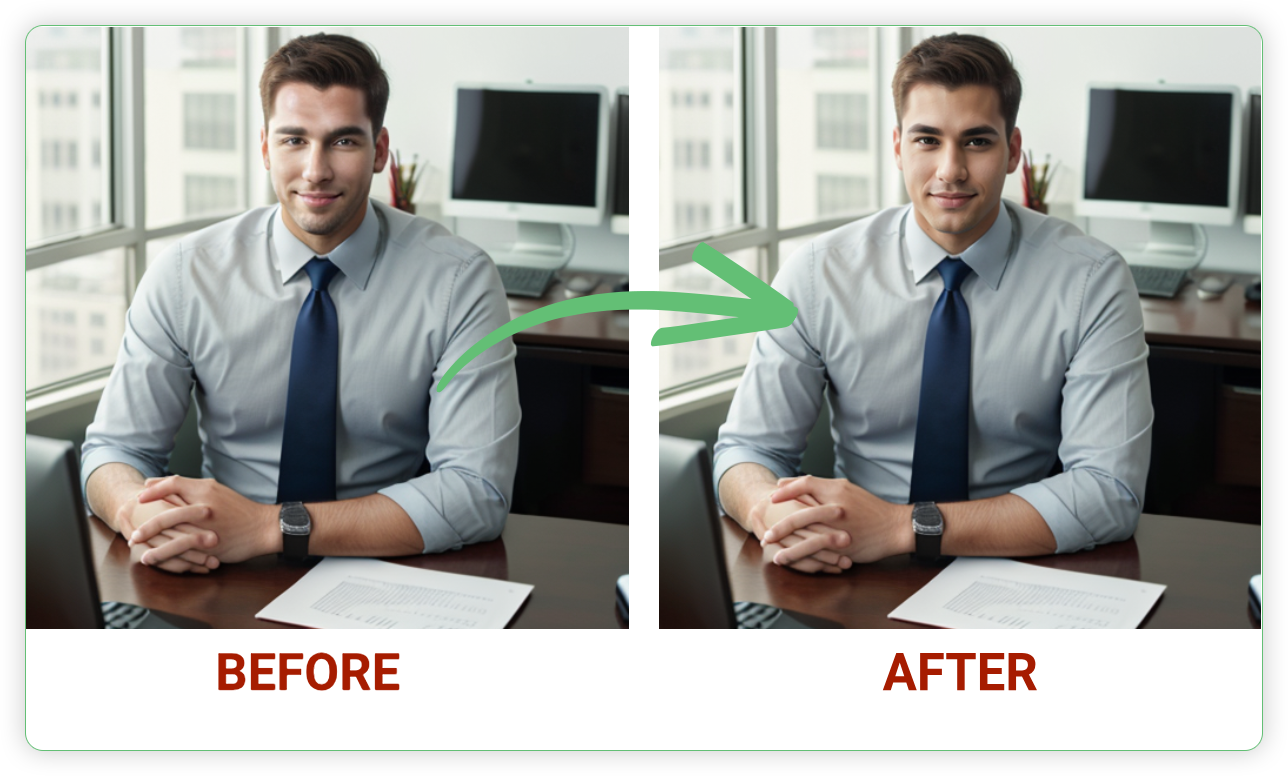
Generating an image using default workflow may lead to unexpected results such as deformities, facial artifacts and others. With the help of Face Detailer, the generated image will be fixed, fine tuned, upscaled and enhanced. Before you can work with Face Detailer, there are certain Custom Nodes and Models that need to be installed.
Face Detailer (pipe)
Download workflow here: Face Detailer Pipe only
Installation
Below are the list that needs to be installed:
- ComfyUI Impact Pack
- Ultralytics Models
- https://github.com/ultralytics/assets/releases - download the additional model yolov8m-seg.pt
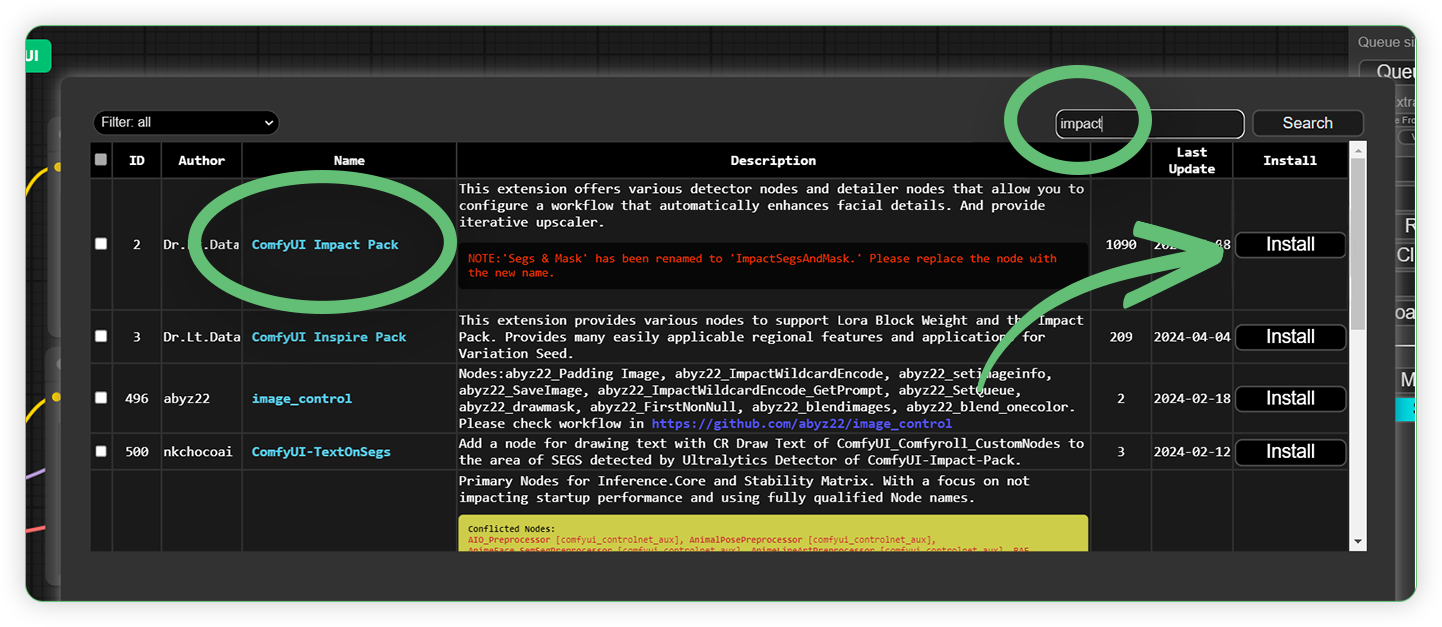
- By default, there is no Face Detailer (pipe) node in ComfyUI. All you need to do is install it using a manager. Go to the Manager at the right panel and click the Install Custom Nodes once the Manager Menu appears.

- Search the “impact” word in the search box and choose ComfyUI Impact Pack and click the Install. Face Detailer node belongs to the Impact Pack.
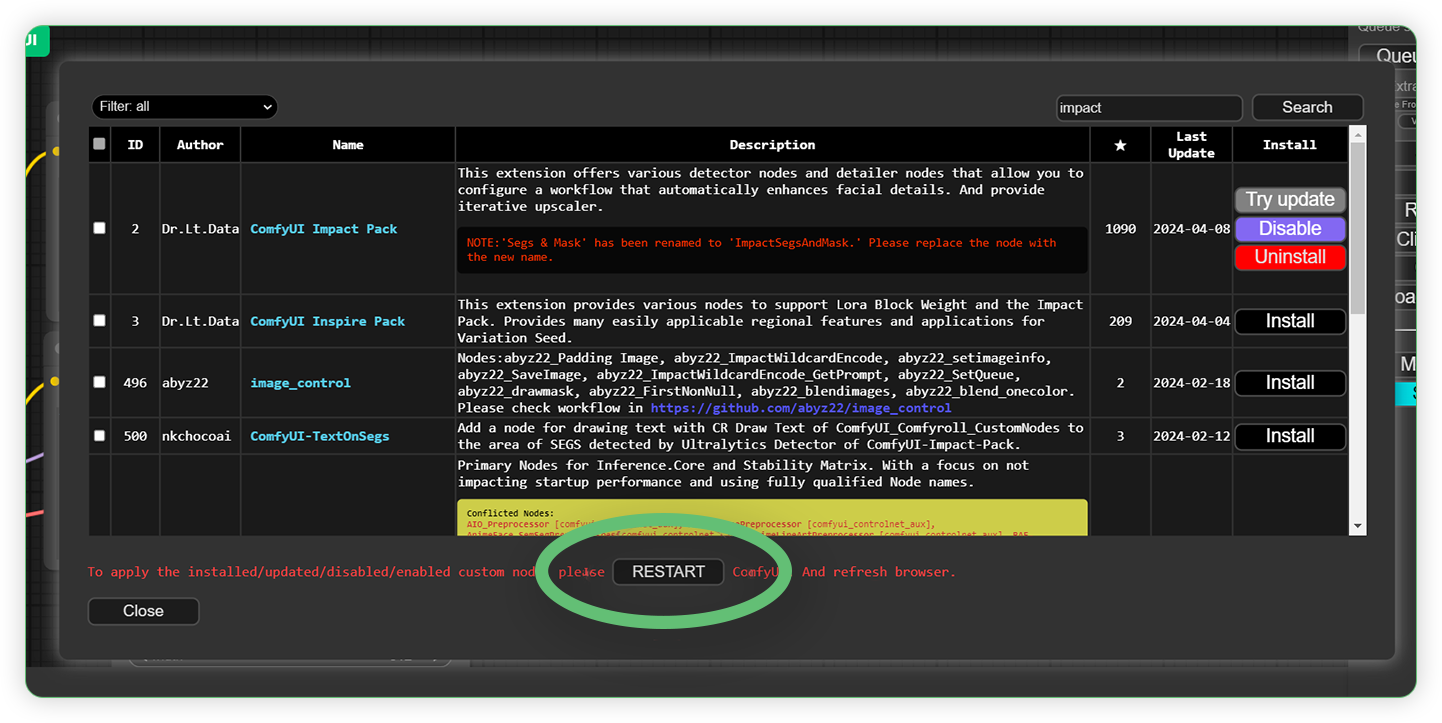
- Don’t forget to restart the ComfyUI machine for the newly installed custom node to take effect. If the node is not yet available in the node list even though the RESTART was already clicked, just click the stop button, and relaunch the machine.
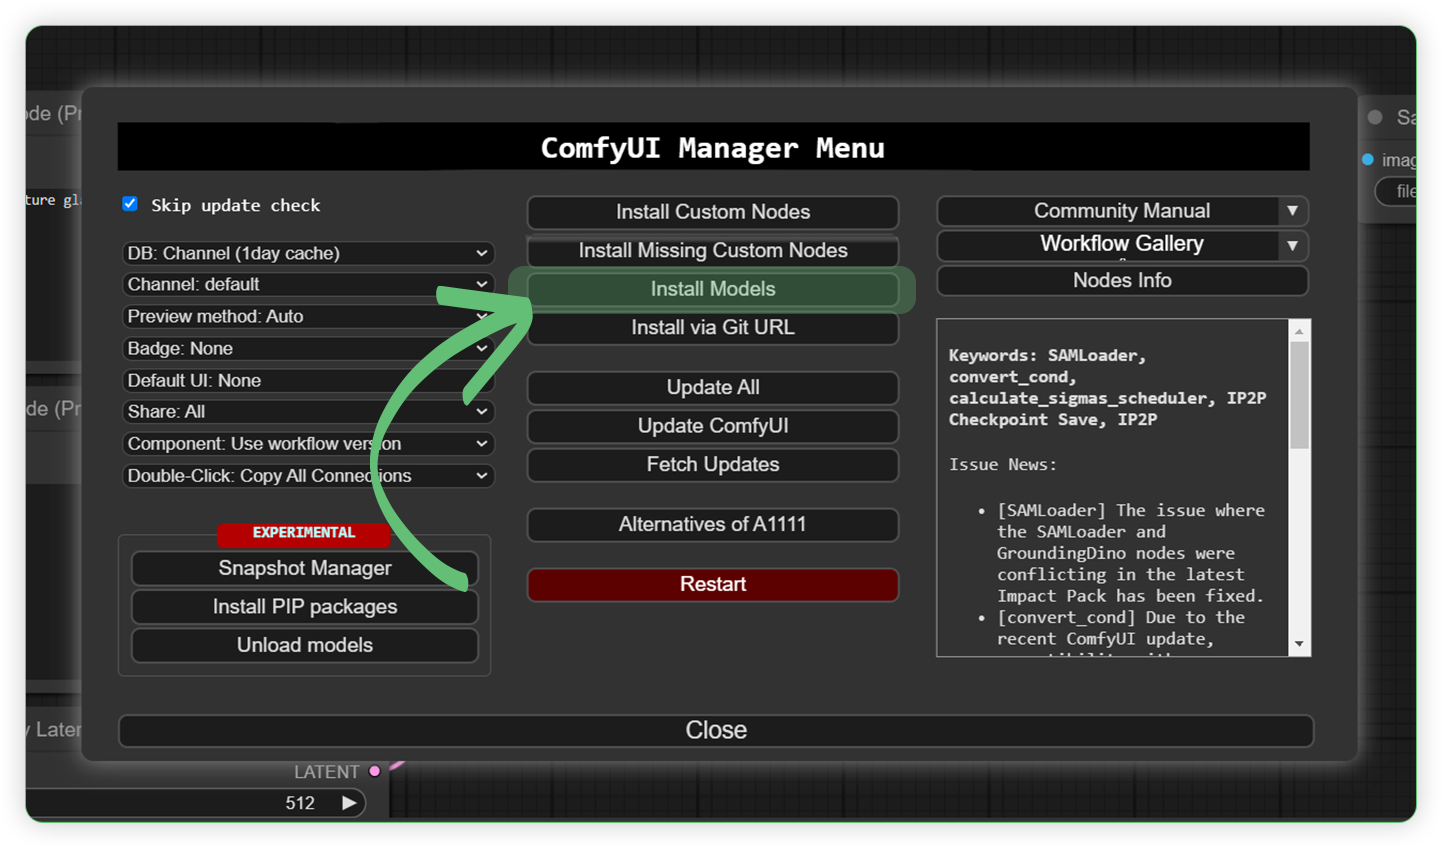
- You need to install the models too. To get them you need to go to Install Models from the Manager.
- You can add more models from the list below. Just pick an ultralytics for face and person and click the Install button.
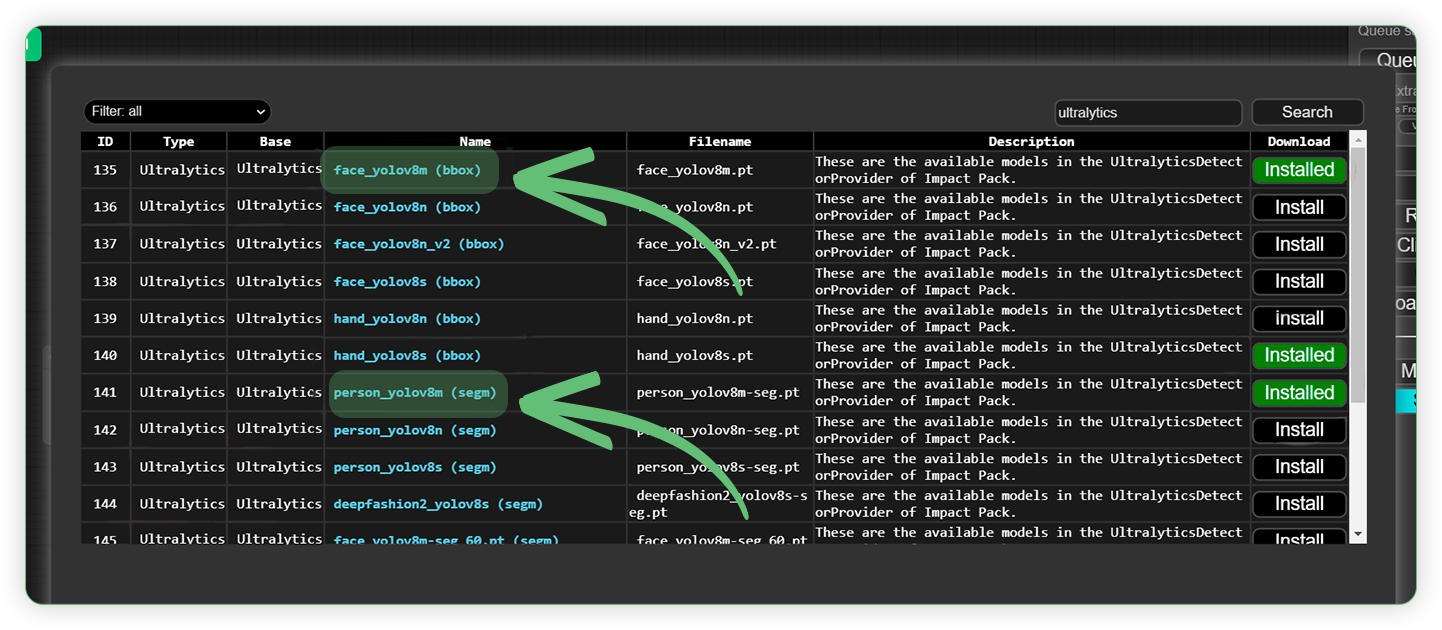
- You can see the models that were installed on the right. Don’t forget to click close and click Restart UI.

- Click Restart UI or Click the Stop and Relaunch ComfyUI machine in order for the new models to take effect.
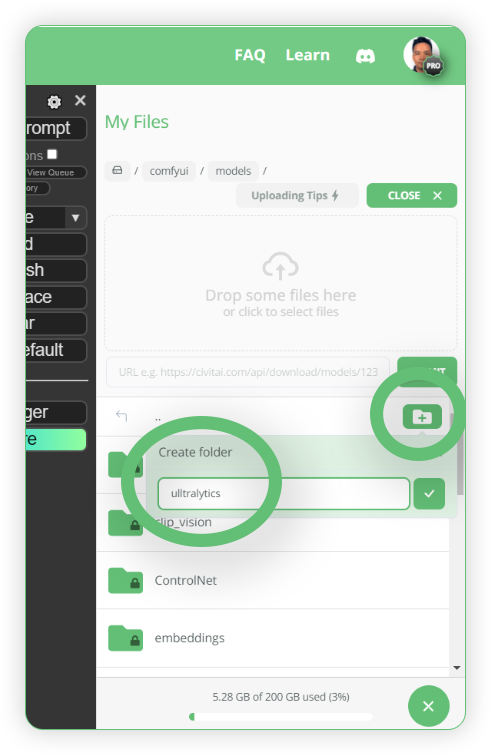
- Additional Model. You need to download the yolov8m-seg.pt from https://github.com/ultralytics/assets/releases and upload to the My Files section of ThinkDiffusion. Just click the My Files icon if the upload panel is hidden. Navigate to the comfyui/models/ultralytics/segm/ folder and upload the file in the segm folder. If the folder is not available, just create the required folder to set up the directory correctly. Restart the ComfyUI machine for newly uploaded model to take effect.
How does it work?
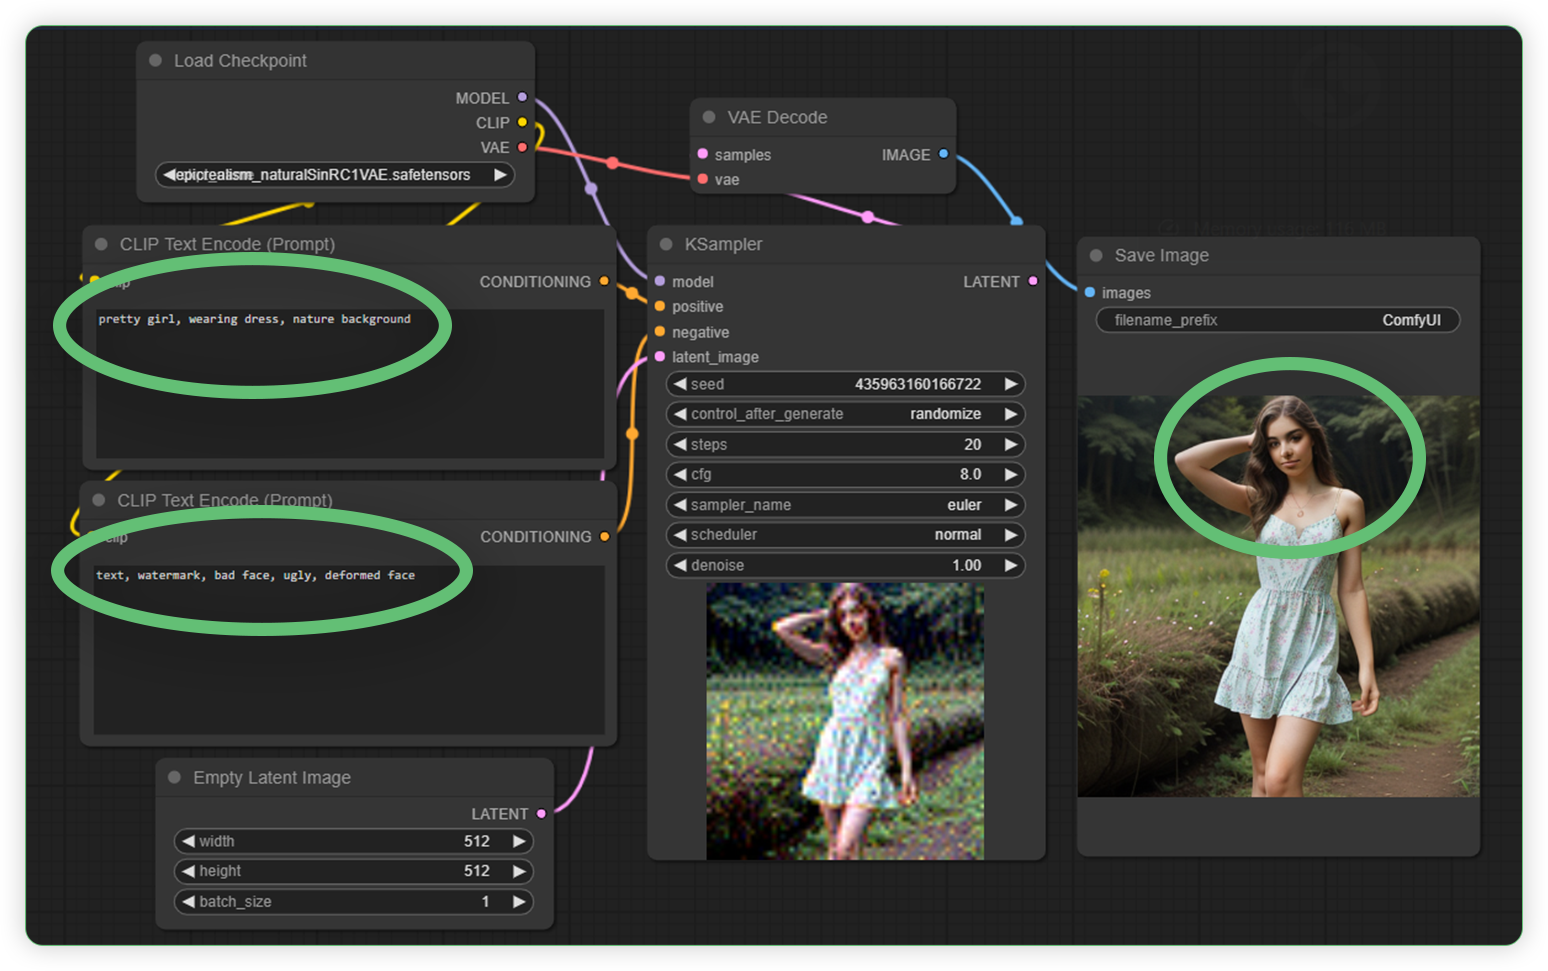
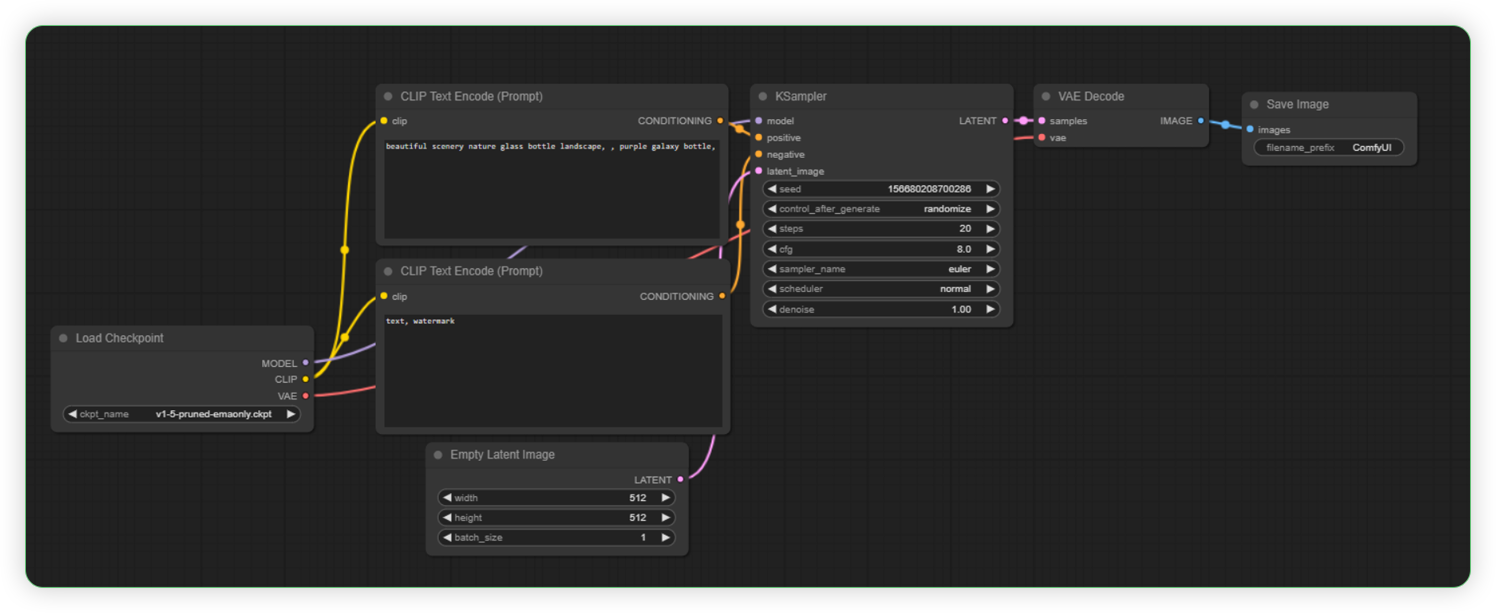
- You can now launch an instance of ComfyUI, and you will see the default workflow.

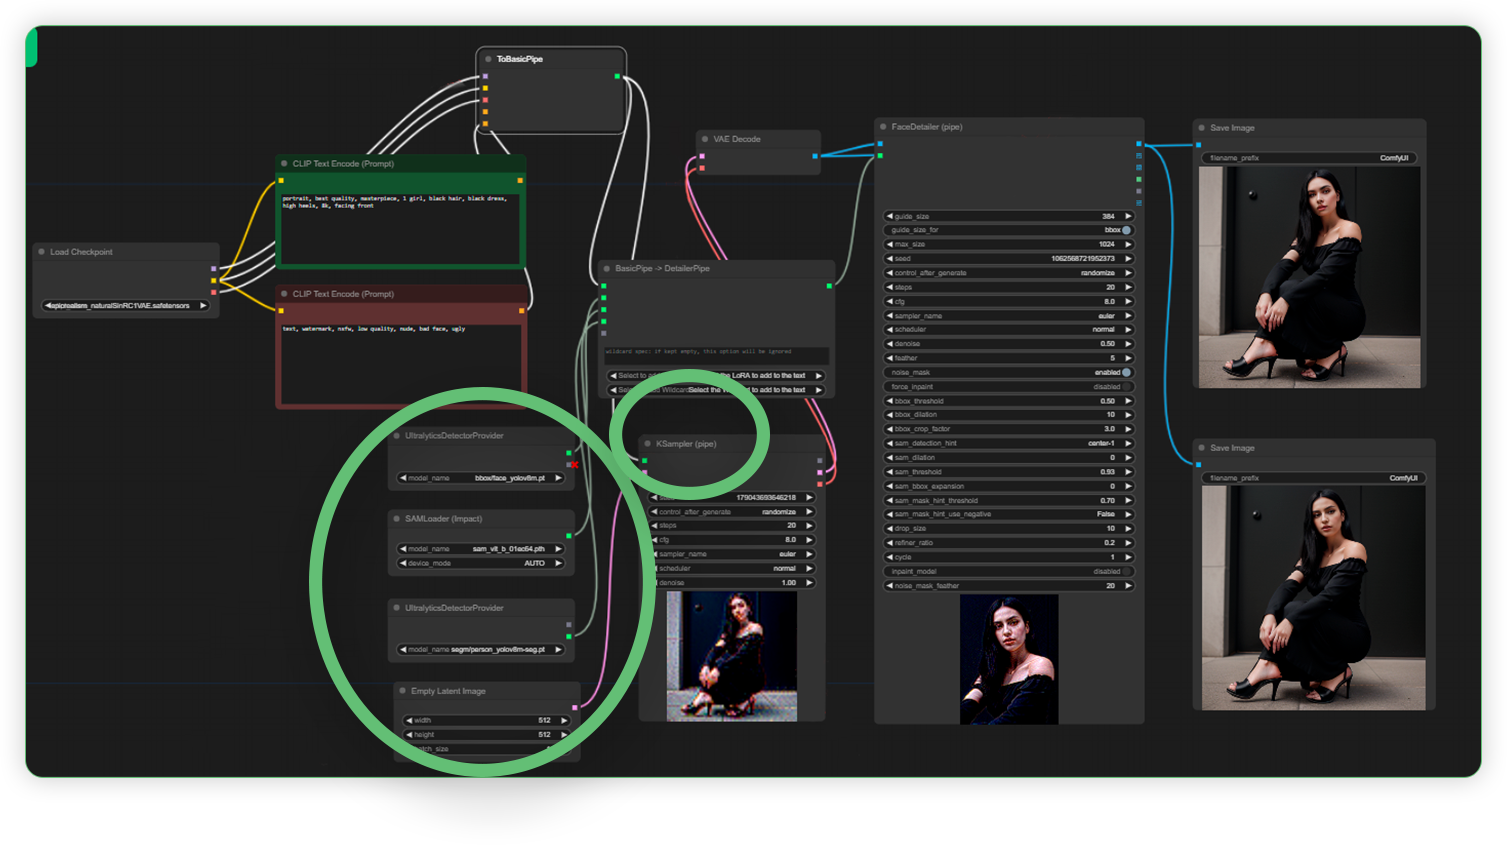
2. The nodes below are from the Impact Pack which are useful for the Face Detailer (pipe).
- ToBasicPipe
- BasicPipe -> DetailerPipe
- UltralyticsDetectorProvider
- KSampler (pipe)
- FaceDetailer (pipe)
- SAMLoader (Impact)
- This is an arrangement of the Impact Pack nodes for the face detailer (pipe). Observe the placement and connect them according to the input and output names. Read the bulleted info before running the prompt.
- Take note that the KSampler was replaced by a new node named KSampler (Pipe).
- Use the base model Epic Realism which is good for generating images of realistic people.
- Use the face_yolov8m.pt for UltralyticsDetectorProvider node. BBOX_DETECTOR
- Use the person_yolov8m-seg.pt for UltralyticsDetectorProvider node. SEGM_DETECTOR
- Use the sam_vit_b_01ec64.pth for SAM Loader node.
- The Output

Face Detailer + Ultimate SD Upscale
Download workflow here: Face Detailer with Upscale
Installation
Below are the list that needs to be installed:
- ComfyUI Impact Pack
- Ultimate SD Upscale
- https://openmodeldb.info/ - download the following upscale model: 4x_foolhardy_Remacri.pth, 4x-ClearRealityV1.pth, 4xNomos8HAT-L_otf.pth or you can choose any you like.
- By default, there is no Face Detailer node in ComfyUI. All you need to do is to follow the installation Step 1 , 2, 3 here for ComfyUI Impact Pack.
- For Ultimate SD Upscale custom node, follow the process below:
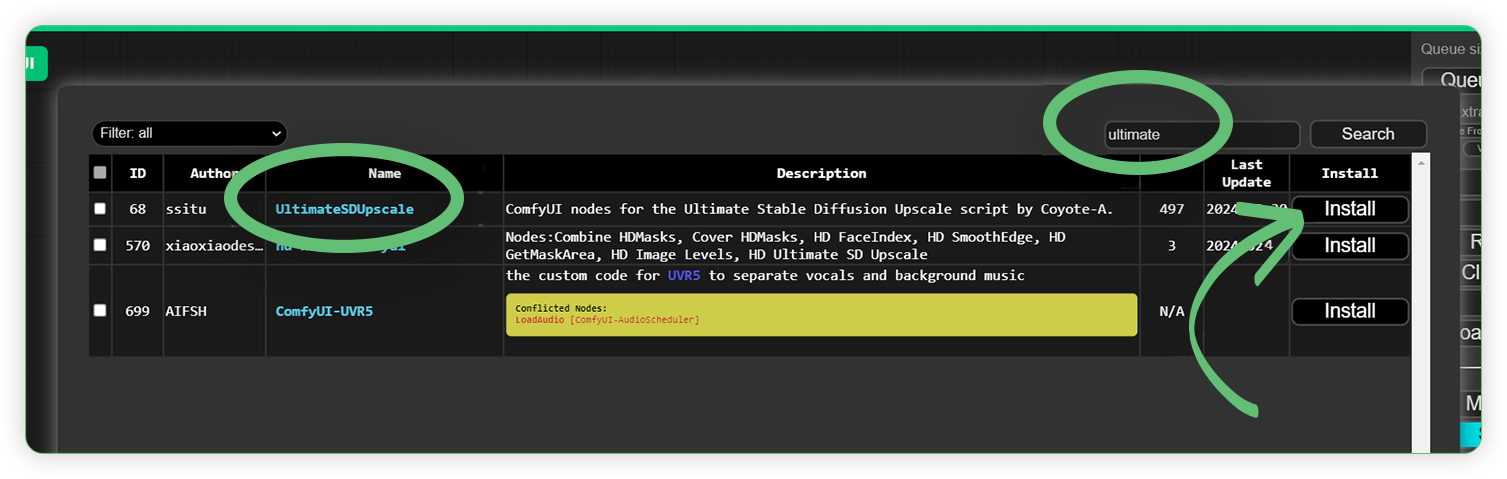
- Search for Ultimate in the search box, choose the UltimateSDUpscale and click Install.
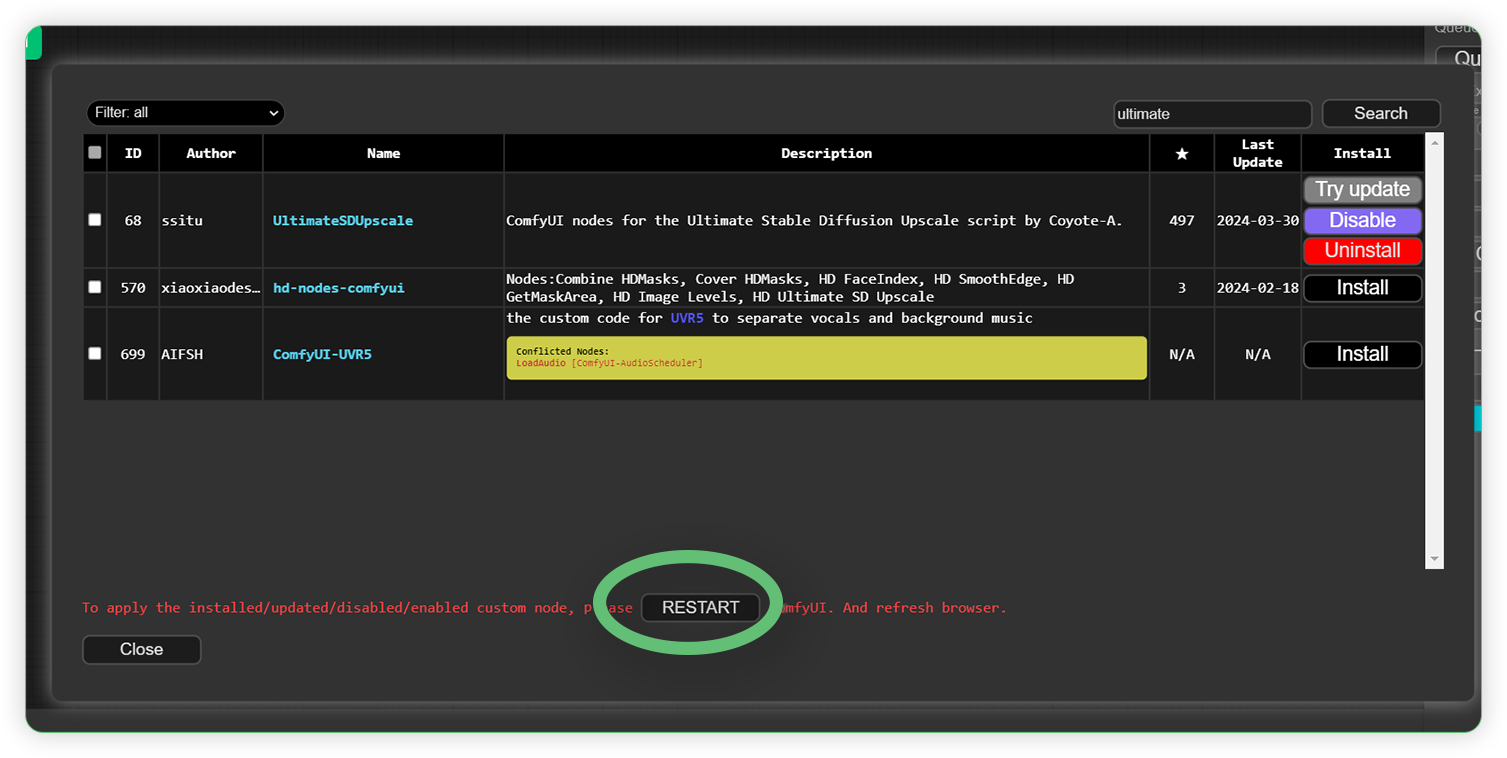
- Don’t forget to restart the ComfyUI machine for the newly installed custom node to take effect. If the node is not yet available in the node list even though the RESTART was already clicked, just click the stop button, and relaunch the machine.
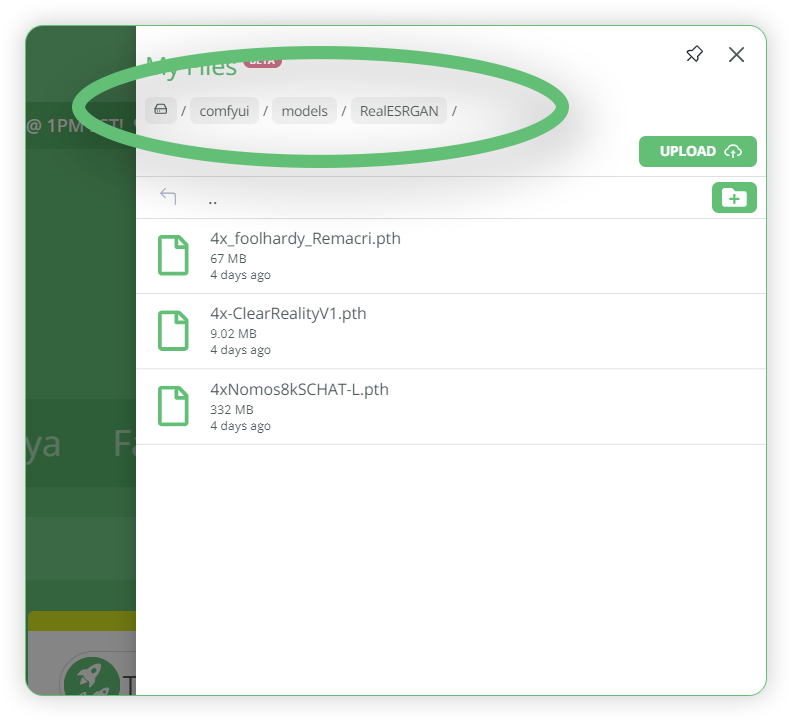
- To use the downloaded Upscale model files, upload them to ThinkDiffusion as you can see in the right panel. Just click the My Files icon if the upload panel is hidden. Navigate to the comfyui/models/RealESRGAN directory and upload the file in the RealESRGAN folder. If the folder is not available, just create the required folder to set up the directory correctly. Restart the ComfyUI machine for the newly uploaded model to take effect.
How does it work?
- You can now launch an instance of ComfyUI, and you will see the default workflow.

- The nodes below are from the Impact Pack which are useful for the Face Detailer.
- FaceDetailer
- Load Upscale Model
- UltralyticsDetectorProvider
- Ultimate SD Upscale
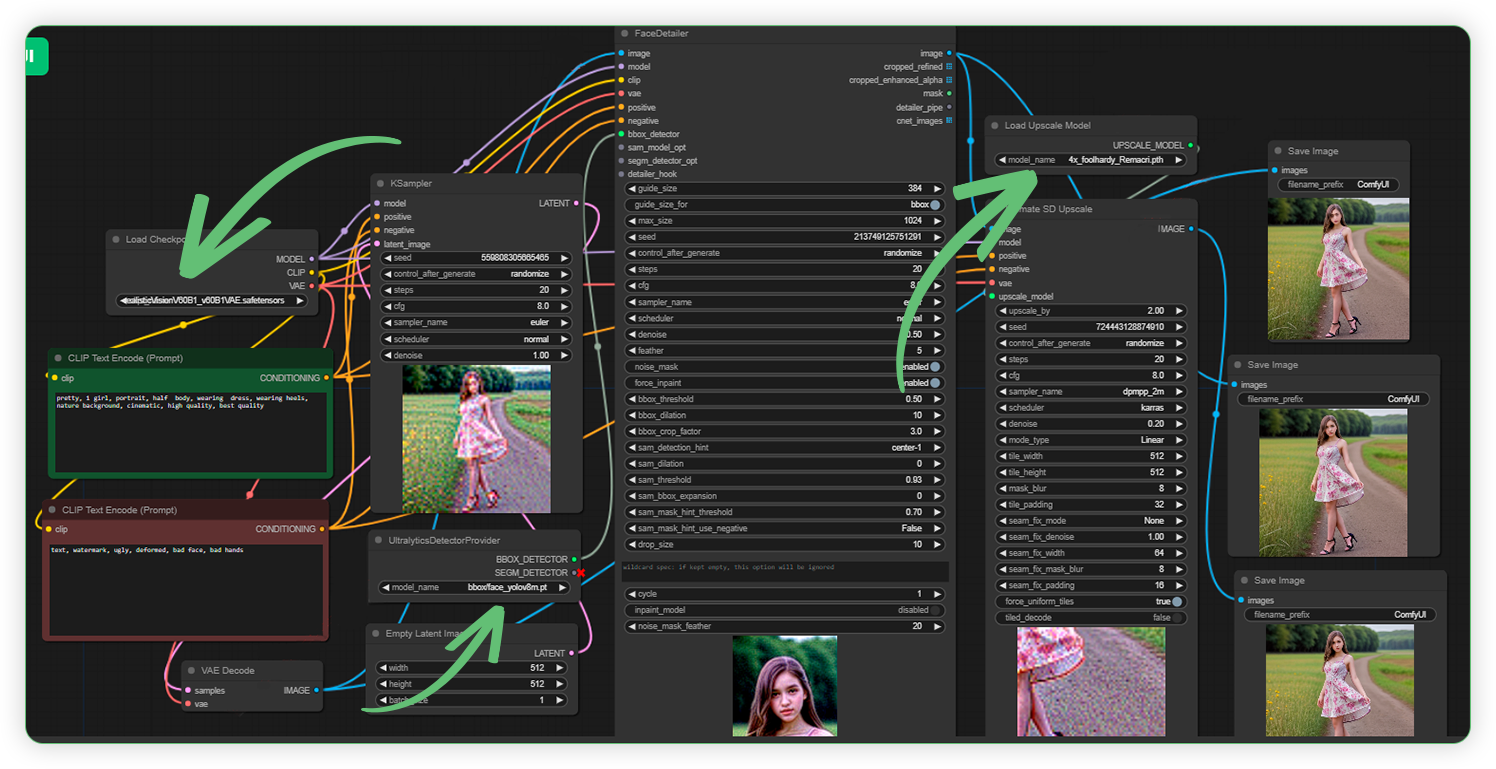
- Put the required nodes according to the image below. Rearrange your workflow depends on your comfortability. There are only 4 nodes added in the default workflow. Read the bulleted info before running the prompt.
- Use the Realistic Vision as the base model or you can use any available realistic base model.
- Use the face_yolov8m.pt as the bbox_detector.
- Use the foolhardy_Remacri.pth as the upscale model.
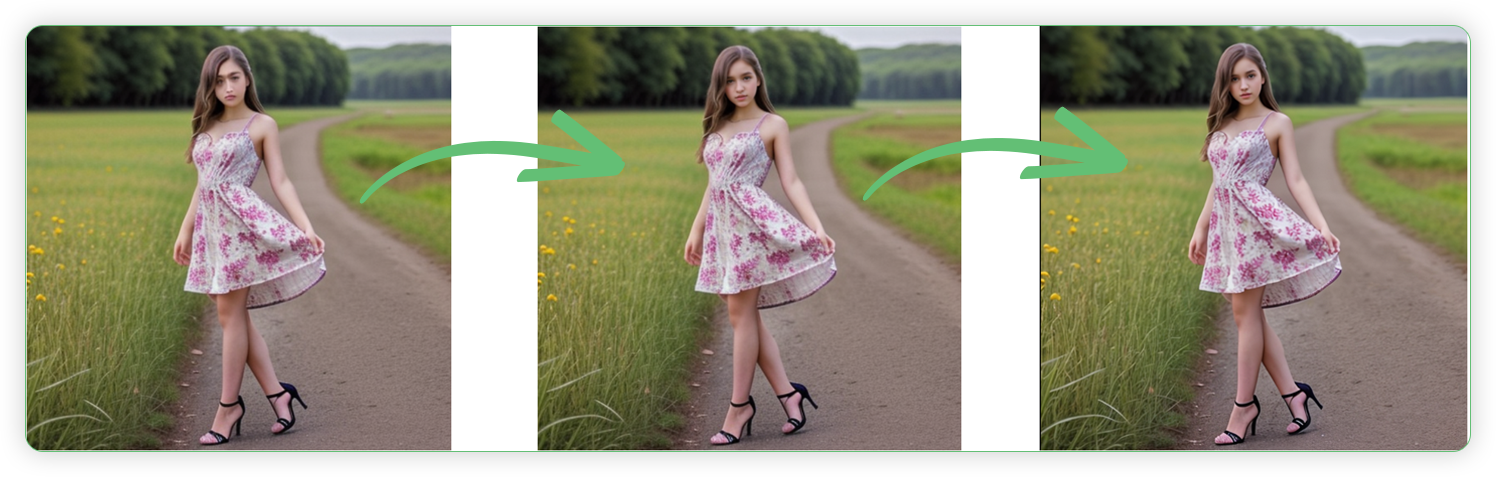
- See the output.
Face Detailer (Double Pass)
Download workflow here: Face Detailer Double Pass
Installation
Below are the list that needs to be installed:
- ComfyUI Impact Pack
- Ultralytics Models
- By default, there is no Face Detailer node in ComfyUI. All you need to do is to follow Steps 1, 2 and 3 above.
- In order on how to download the ultralytics models, just follow Steps 4, 5, 6, 7 and 8 above.
How Does It Work?
- You can now launch an instance of ComfyUI, and you will see the default workflow.
- The nodes below are from the Impact Pack which are useful for the Face Detailer (Double Pass).
- FaceDetailer
- FaceDetailer (pipe)
- UltralyticsDetectorProvider
- SAMLoader (Impact)
- Set up the required nodes according to the workflow below. There are only 4 nodes added in the default workflow. Read the bulleted info before running the prompt.
- Use the Epic Photogasm as the base model or you can use any available realistic base model.
- Use the face_yolov8m.pt as the bbox_detector.
- Use the sam_vit_b_01ec64.pth as the SAM_Model.
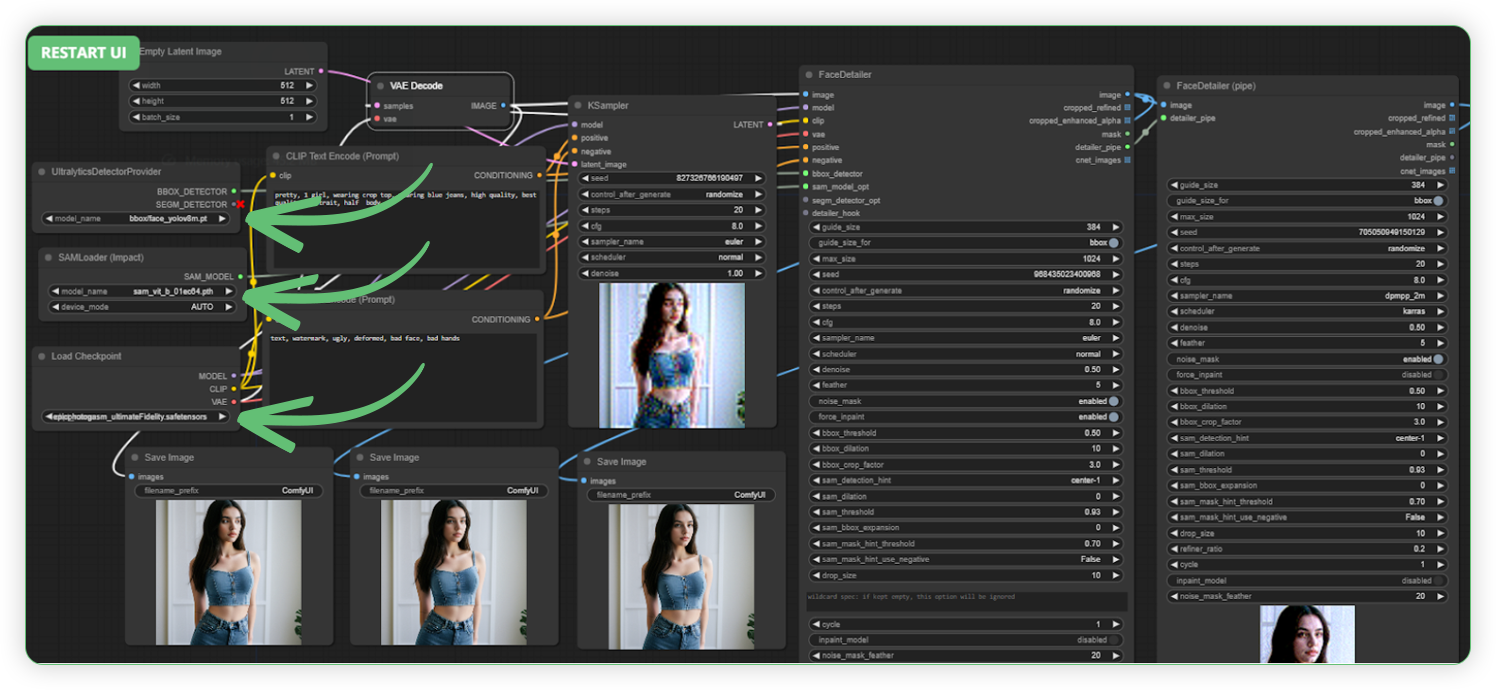
- Here is an example of another generation using the same workflow.

Summary
ComfyUI enthusiasts use the Face Detailer as an essential node. There is a good comparison between the three tested workflows for face detailers, and you can decide which workflow you prefer. Face Detailer without a pipe is a basic workflow to start with, but the problem is that the output is not being upscaled. While the workflow with Face Detailer (pipe) generates a better output and is more detailed than an ordinary one. Having a workflow with an upscale model works great too. If you can create a workflow with a pipe and an ultimate SD upscaler, the output is far superior.
Pretty Comfy, Right?
Any of our workflows including the above can run on a local version of SD but if you’re having issues with installation or slow hardware, you can try any of these workflows on a more powerful GPU in your browser with ThinkDiffusion.

If you’d like a way to make someone un-comfy perhaps by making the lips of their face move with a different dialogue, check out my post using Wav2Lip.
Most importantly, y'all have fun out there getting Comfy with Stable Diffusion and let us know what you're making!
Member discussion