

Prompt: A woman in casual attire strolls across a vast, sunlit expanse of dry land under a brilliant blue sky. Her relaxed outfit flutters gently in the warm breeze as she walks, surrounded by green grass and distant hills. The scene is rendered in a whimsical, soft Ghibli art style, with vibrant colors and a peaceful, dreamy atmosphere.
What is Video Style Transfer?
Style transfer lets you apply the visual characteristics of one image (like a painting style) to another image or video. Unlike basic filters, AI-powered style transfer analyzes both the content and artistic elements, creating results that look like they were created in that style from scratch.
With Wan 2.1, you can transform ordinary videos into ones that appear hand-painted, animated, or rendered in specific artistic styles while maintaining the original movement and content.
What You'll Learn
In this guide, you'll learn how to use Wan 2.1 to apply artistic styles to your videos. We'll cover:
- Setting up the necessary tools and models
- Creating a style reference image
- Applying that style to your video
- Practical tips for getting better results
Why Style Transfer is Important
Prompt: A car speeds along a wide highway beneath a sky streaked with thin, wispy clouds. The landscape stretches out on either side, open and inviting. The scene is depicted in a bold, vibrant Pop Art style, with exaggerated colors, dynamic lines, and a sense of energetic motion.
Style transfer is important in video generation because it allows creators to transform ordinary videos into visually stunning and unique works of art by applying different artistic styles or effects.
- Deeper analysis: Unlike simple filters, AI style transfer analyzes both content and style elements
- Frame consistency: The AI maintains consistency across video frames, preventing flickering
- Artistic adaptation: The style adapts to the specific content of each frame rather than applying a uniform effect
How to run Wan 2.1 Video2Video Style Transfer
Installation Guide
No installs. No downloads. Run ComfyUI workflows in the Cloud.
👉🏼 Download and Set Up the Workflow
Download the workflow file and drag & drop it into your ComfyUI window.
👉🏼 Install Required Custom Nodes
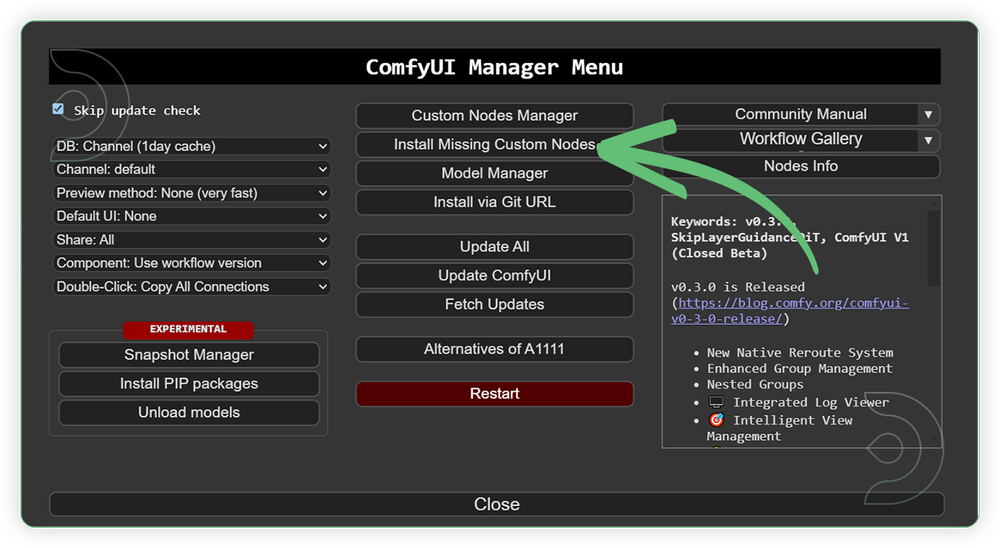
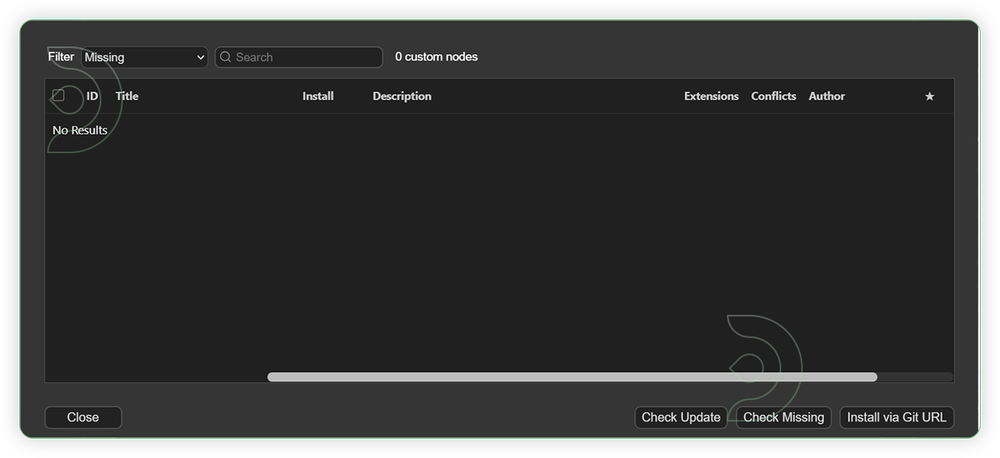
If you see red nodes in your workflow, you need to install missing custom nodes:
- Go to ComfyUI Manager
- Click "Install Missing Custom Nodes"
- Select and install all missing nodes from the list
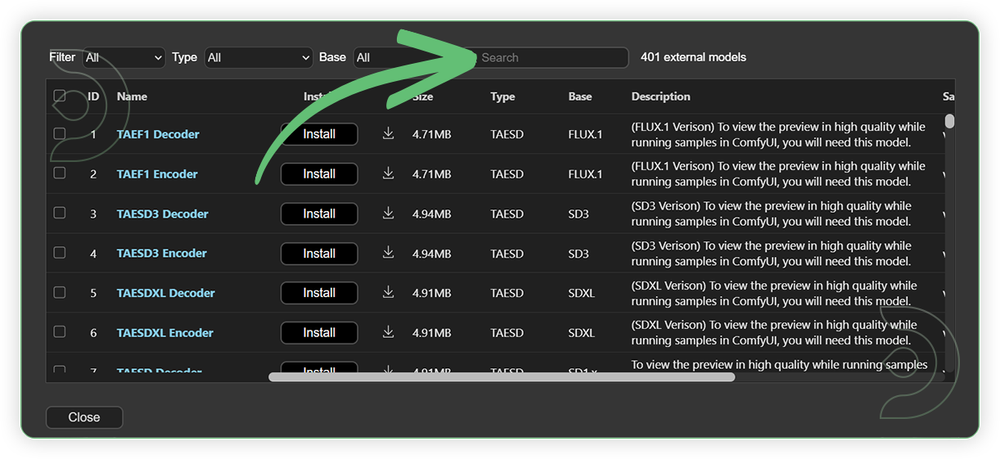
👉🏼 Download Required Models
For this guide you'll need 9 recommended models to be downloaded.
2. clip_l.safetensors (Preloaded on TD)
3. t5xxl_fp8_e4m3fn.safetensors (Preloaded on TD)
4. ae.sft (Preloaded on TD)
5. open-clip-xlm-roberta-large-vit-huge-14_fp16.safetensors
6. Wan2.1-Fun-Control-14B_fp8_e4m3fn.safetensors
7. Wan2_1_VAE_bf16.safetensors
8. umt5-xxl-enc-bf16.safetensors
9. flux-depth-controlnet-v3.safetensors
- Go to ComfyUI Manager > Click Model Manager

- Search for the models above and when you find the exact model that you're looking for, click install and make sure to press refresh when you are finished.
Model Path Source
Some of my models may not be available in the model manager. Use the model path source instead if you prefer to install the models using model's link address and paste into ThinkDiffusion MyFiles using upload URL.
| Model Name | Model Link Address | ThinkDiffusion Upload Directory |
|---|---|---|
flux1-dev-fp8.safetensors (Preloaded on TD) |
.../comfyui/models/diffusion_models/ |
|
| clip_l.safetensors (Preloaded on TD) | .../comfyui/models/clip/ |
|
| t5xxl_fp8_e4m3fn.safetensors (Preloaded on TD) | .../comfyui/models/clip/ |
|
| ae.sft (Preloaded on TD) | .../comfyui/models/vae/ |
|
| open-clip-xlm-roberta-large-vit-huge-14_fp16.safetensors | .../comfyui/models/clip_vision/ |
|
| Wan2.1-Fun-Control-14B_fp8_e4m3fn.safetensors | .../comfyui/models/diffusion_models/ |
|
| Wan2_1_VAE_bf16.safetensors | .../comfyui/models/vae/ |
|
| umt5-xxl-enc-bf16.safetensors | .../comfyui/models/text_encoders/ |
|
| flux-depth-controlnet-v3.safetensors | .../comfyui/models/xlabs/controlnets/ |
Step-by-step Workflow Guide
This workflow was pretty easy to set up and runs well from the default settings.
The process has two main stages:
- Creating a style reference image
- Applying that style to your video
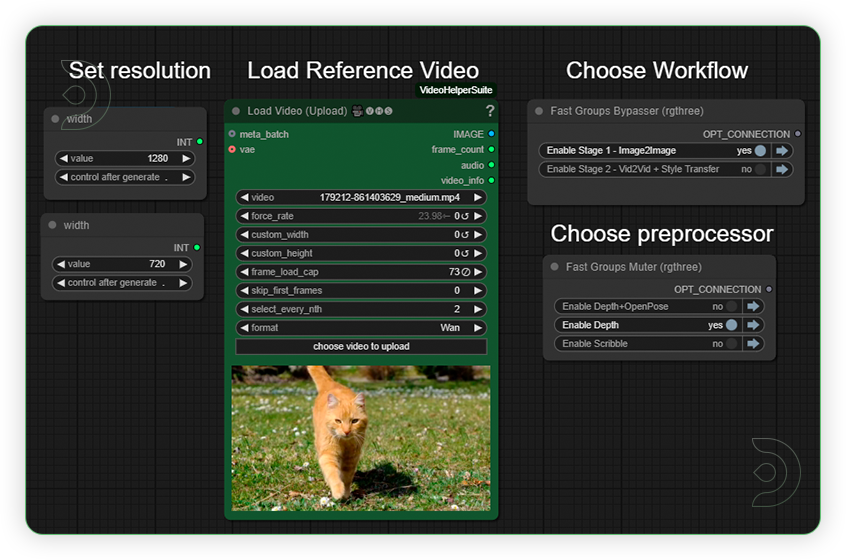
Pre-Stage: Load Your Video
| Step | Recommended Nodes |
|---|---|
| Load a Video Set resolution up to 1280x720. Set the frame load cap up to 73. Select first the Stage 1 workflow to get the Style and Stage 2 for Video2Video with application of Style to video. For videos with human set the preprocessor with Depth+OpenPose and non-human video use the depth and scribble |
 |
Stage 1: Create Style Reference Image
| Step | Recommended Nodes |
|---|---|
| 1. Auto Input First Frame The workflow automatically uses the first frame from your pre-stage input video. |
 |
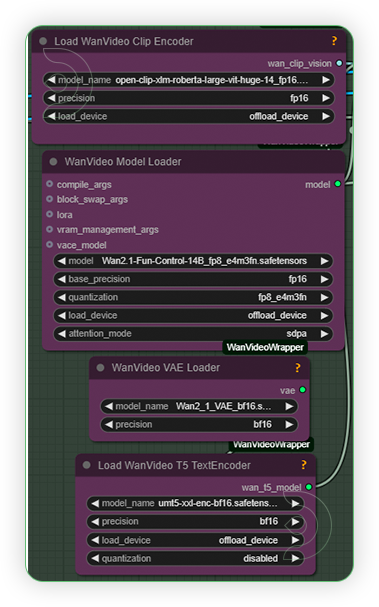
| 2. Set Models Configure the models as shown on the image. |
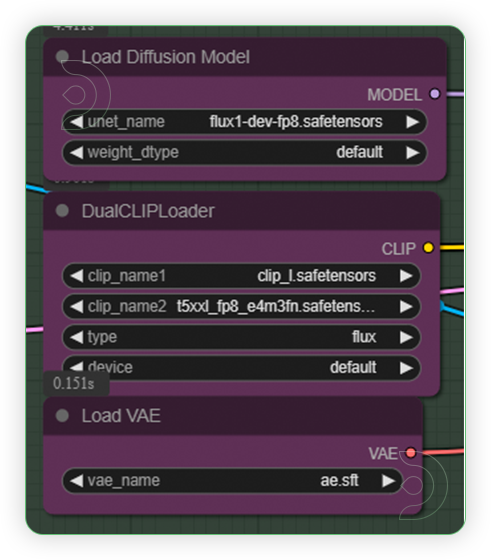 |
| 3. Write Prompt Create a detailed prompt describing how you want the styled image to look. |
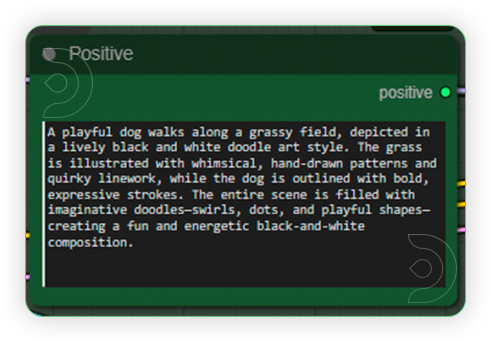 |
| 4. Configure Controlnet Set the controlnet settings as seen on the image. Be aware of controlnet model the version 3, be sure use to that. |
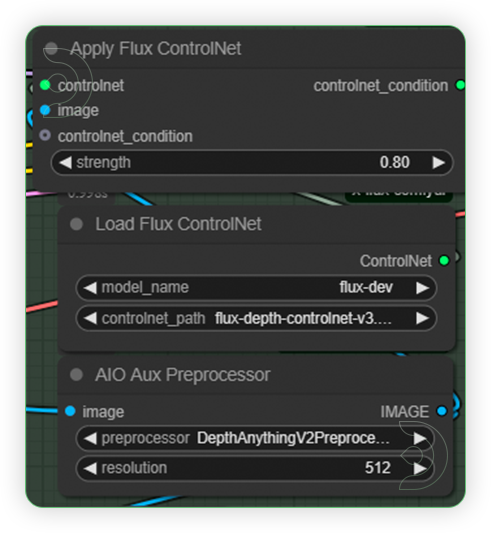 |
| 5. Check Sampling Settings Set the settings as seen on the image. If you want different style, set the control after generate as Randomize. |
 |
| 6. Generate and Save Output Save your styled image or copy to clipspace. |
 |
Stage 2: Apply Style to Video
| Step | Recommended Nodes |
|---|---|
| 1. Input Reference Image Load the image you created in Stage 1. |
 |
| 2. Set Models Configure the models as shown on the image. |
 |
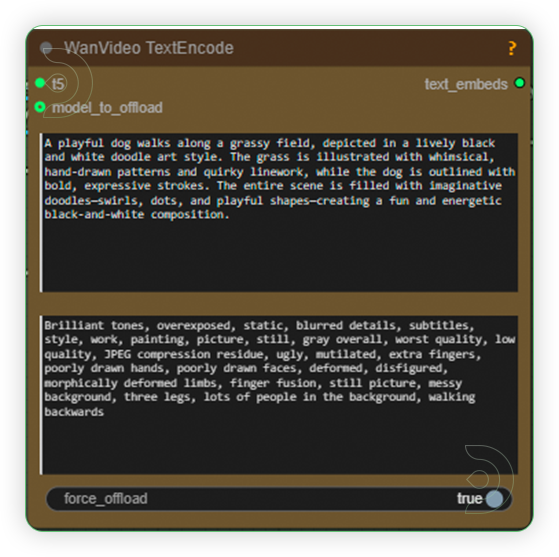
| 3. Write a Prompt Write a prompt and it is recommended to use the prompt same as the prompt used in the Stage 1. Use only the 1st text box. The second serves as the negative prompt. |
 |
| 4. Check Sampling Settings Set the settings as seen on the image. |
 |
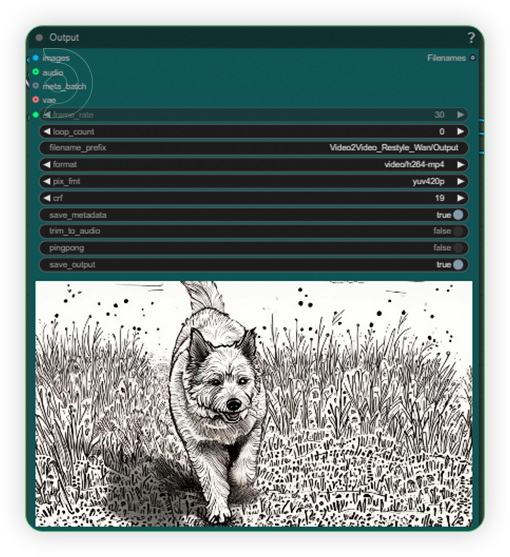
| 5. Check Output |
 |
Examples
1st is the style that we want to use for
2nd is the original video
3rd is the generated video where the style is applied
Prompt: A sweet couple holds hands and runs joyfully along the beach, the girl clutching a billowing smoke grenade that releases swirling, vibrant colors into the air. Behind them, the sky and sea are alive with dynamic, swirling brushstrokes and bold, contrasting colors reminiscent of Van Gogh’s Starry Night. The scene is rendered in a Post-Impressionist art style, with expressive movement, thick impasto textures, and luminous, dreamlike blues and yellows that capture both the energy of the moment and the emotional intensity of the landscape.
Prompt: Four robots dance energetically on a futuristic platform in a sci-fi city. The background is dark, filled with neon-lit skyscrapers, glowing blue and purple lights, and digital billboards. The robots are painted in bright, vivid colors—such as white, yellow, orange, and green—making them stand out boldly against the shadowy cityscape. The scene is illustrated in a sharp, futuristic sci-fi art style, ensuring the robots are highly visible and eye-catching.
Prompt: A woman walks confidently with city buildings rising behind her, their windows reflecting the afternoon sun. The scene is illustrated in a dreamy watercolor style, with soft brushstrokes, gentle color gradients, and a slightly blurred, ethereal atmosphere.
Prompt: An old woman plays a mechanical violin, her fingers expertly gliding over glowing strings. Neon lights and towering skyscrapers of a bustling cyberpunk city illuminate the background, casting vibrant reflections on rain-slicked streets. The scene is rendered in a futuristic cyberpunk art style, with sharp contrasts, electric colors, and intricate technological details woven into both her instrument and the urban landscape.
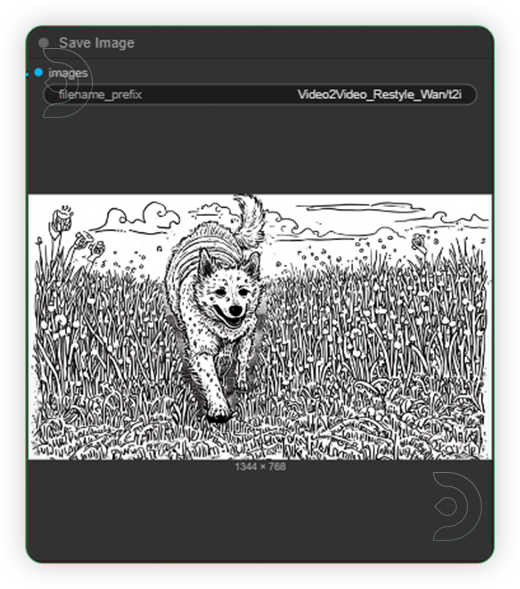
Prompt: A playful dog walks along a grassy field, depicted in a lively black and white doodle art style. The grass is illustrated with whimsical, hand-drawn patterns and quirky linework, while the dog is outlined with bold, expressive strokes. The entire scene is filled with imaginative doodles—swirls, dots, and playful shapes—creating a fun and energetic black-and-white composition.
Troubleshooting Common Issues
- Red nodes appearing: Install missing custom nodes through ComfyUI Manager
- "CUDA out of memory" error: Try reducing video resolution or frame count
- Inconsistent style: Make sure you're using the same prompt in both stages
- Slow processing: This is normal - high-quality video processing is resource-intensive
If you’re having issues with installation or slow hardware, you can try any of these workflows on a more powerful GPU in your browser with ThinkDiffusion.
No installs. No downloads. Run ComfyUI workflows in the Cloud.
If you're interested in exploring more AI video capabilities, check out our guide on Wan 2.1 Image2Video generation.
Member discussion