
LAST UPDATED: August 6, 2024
Introduction
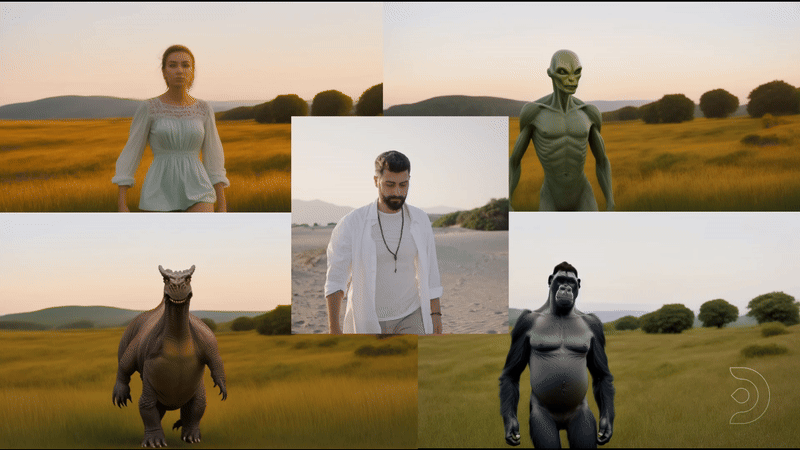
This RAVE workflow in combination with AnimateDiff allows you to change a main subject character into something completely different. It is a powerful workflow that let's your imagination run wild.
RAVE, is a zero-shot video editing approach that harnesses pre-trained text-to-image diffusion models without additional training. RAVE takes an input video and a text prompt to generate high-quality videos while retaining the original motion and semantic structure. It employs an innovative noise shuffling strategy that utilizes spatio-temporal interactions between frames, resulting in temporally consistent videos faster than current methods. Moreover, it demonstrates efficiency in memory requirements, enabling it to handle longer videos.
Below is an example of what can be achieved with this ComfyUI RAVE workflow.
Pretty cool right?! Let's get everything set up so you can make these animations too.
Transform Characters with Stable Diffusion Webinar ft. Sebastian Kamph
Transform Video Characters with Stable Diffusion
How to install & set up this ComfyUI RAVE workflow with AnimateDiff
The following is a zip of the files you will need to follow this tutorial:
Load your workflow JSON file
Load the following workflow into ComfyUI (also provided in the tutorial zip file).
TIP: If you are using ThinkDiffusion, it is recommended to use the TURBO machine for this workflow as it is quite demanding on the GPU.
Set up custom nodes
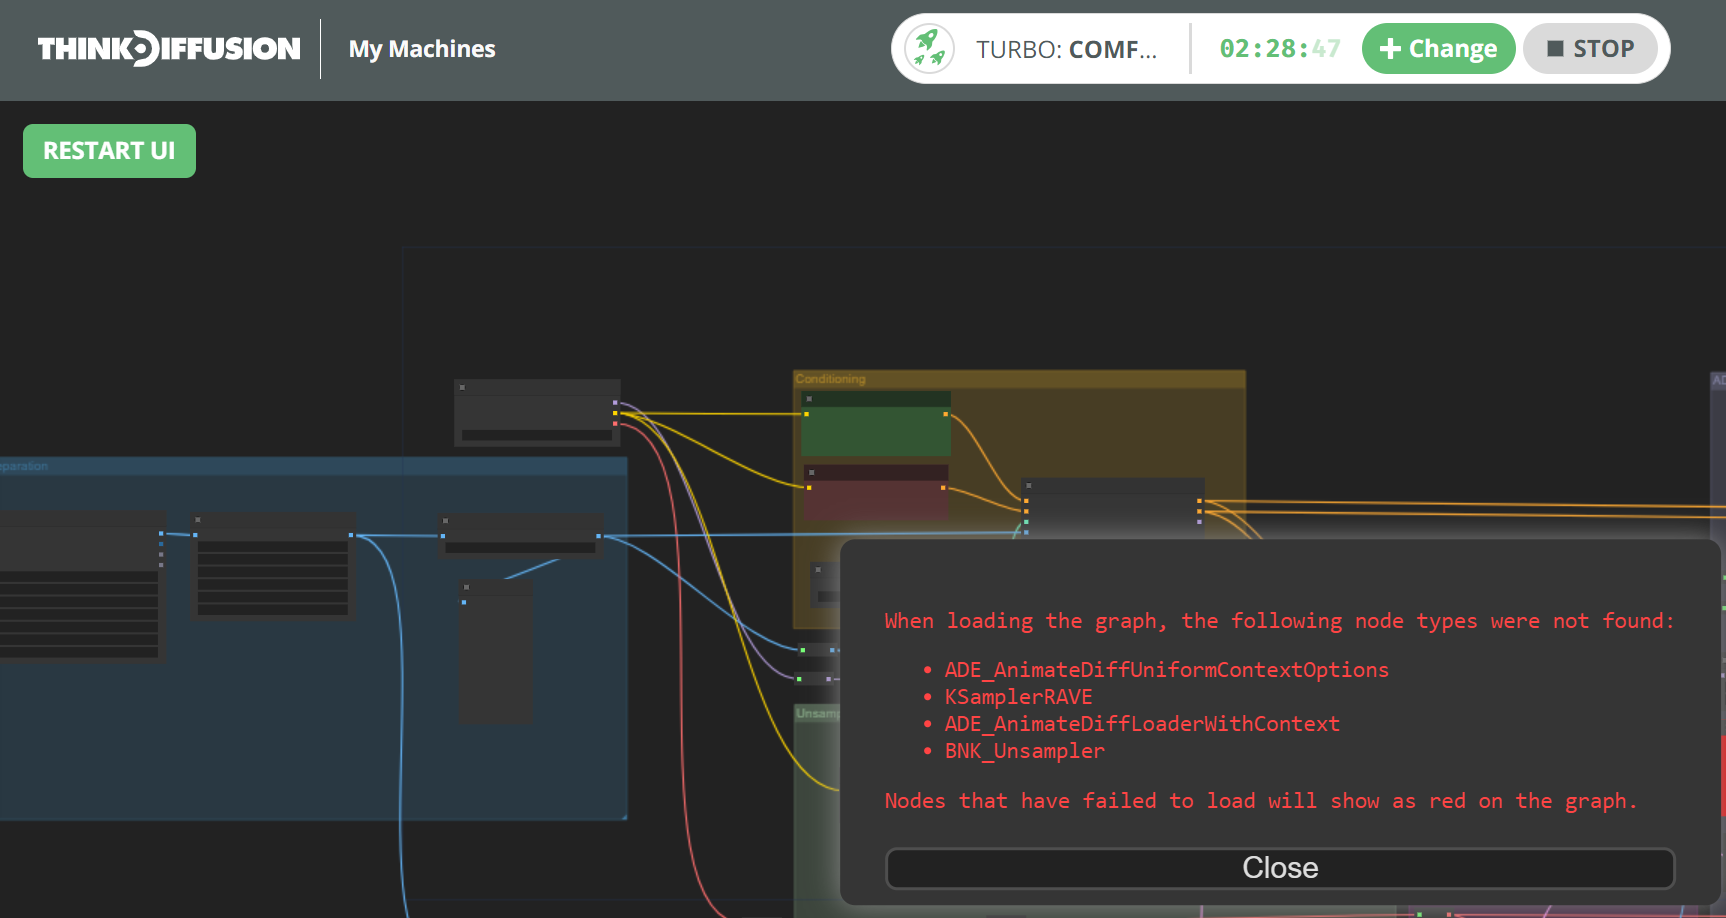
Once you load the workflow, you may have some missing nodes.
In my case when I loaded this workflow, the following custom nodes were missing:
- ADE_AnimateDiffUniformContextOptions
- KSamplerRAVE
- ADE_AnimateDiffLoaderWithContext
- BNK_Unsampler
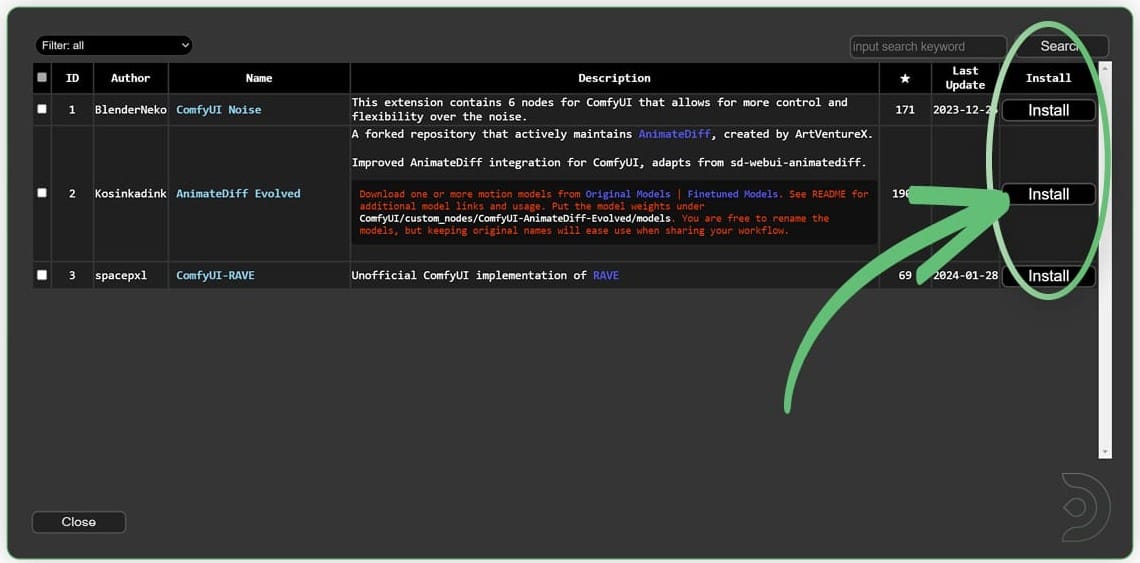
To fix this, go to the ComfyUI Manager and click on Install Missing Custom Nodes.
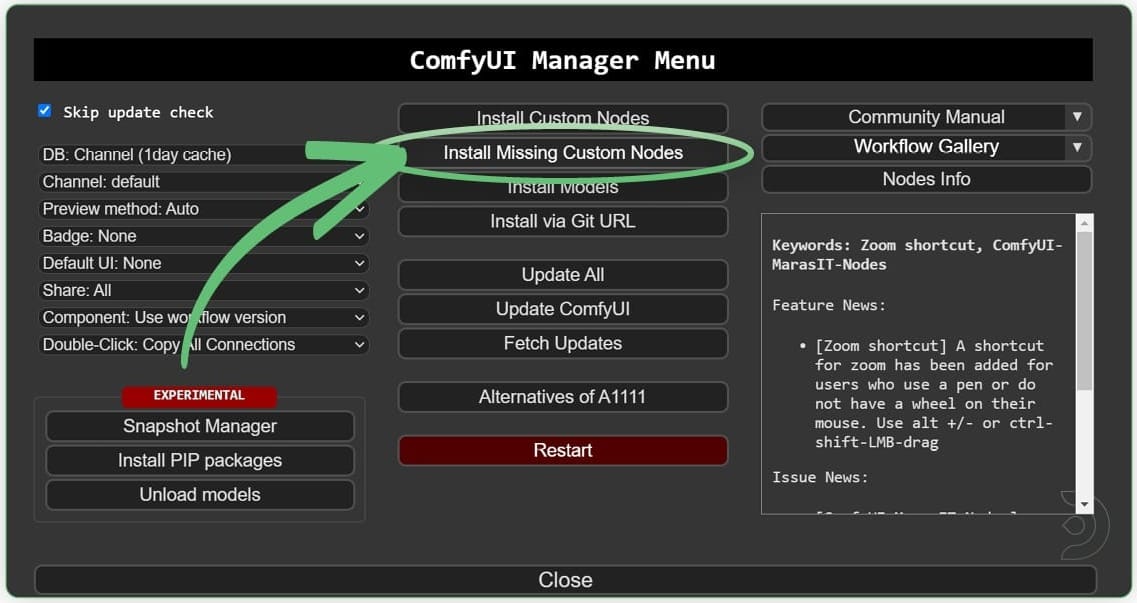
Install each of the missing custom node. Once done, RESTART Comfy UI and REFRESH the browser as instructed by ComfyUI.
TIP: To install all the nodes at once, select/check the first entry in the list which will enable the select all checkbox at the top. Select all, then click any of the Install buttons, and ComfyUI will install all the selected nodes.
Once ComfyUI is restarted and the browser is refreshed, we can now see that we do not have any missing custom nodes.
TIP: If using ThinkDiffusion and the nodes are still showing up red, close down your instance of ComfyUI and launch a new machine so that all the newly installed custom nodes are properly loaded at startup.
Download required AnimateDiff models
We now need to download 4 model files, 3 of which can be done using ComfyUI Manager.
TIP: Whenever loading models, it's best to install from the ComfyUI Manager > Install Models table which installs it the correct folder for you.
Install 3 models using ComfyUI Manager
TIP: Use the filename to search for the model (see screenshots).
- Install the Loose ControlNet model using ComfyUI Manager.
Filename:control_boxdepth_LooseControlfp16.safetensors
Comfy will save the model to/comfyui/models/controlnet/

- Install the AnimateDiff Adapter LoRA model using ComfyUI Manager.
Filename:v3_sd15_adapter.ckpt
Comfy will save the model to/comfyui/models/loras/SD1.5/animatediff

- Install the AnimateDiff Motion Model model using ComfyUI Manager.
Filename:v3_sd15_mm.ckpt
Comfy will save the model to/comfyui/models/animatediff_models

Upload 1 model directly to folder by URL
- Upload the AnimateDiff ControlNet model
Filename:controlnet_checkpoint.ckpt
Save Path:/comfyui/models/controlnetfolder- Go to the
/comfyui/models/controlnetfolder - Click the
Uploadbutton and enter the following URL in theURLbox:
https://huggingface.co/crishhh/animatediff_controlnet/resolve/main/controlnet_checkpoint.ckpt?download=true - Click the
SUBMITbutton to upload.
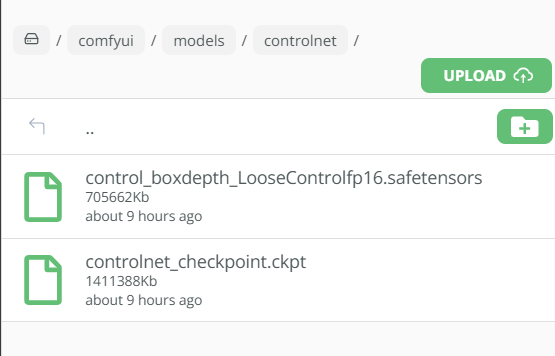
- Go to the
TIP: Click ComfyUI's Refresh button to have your newly installed/uploaded models appear in their respective nodes' dropdown menus.
Let's get creating!
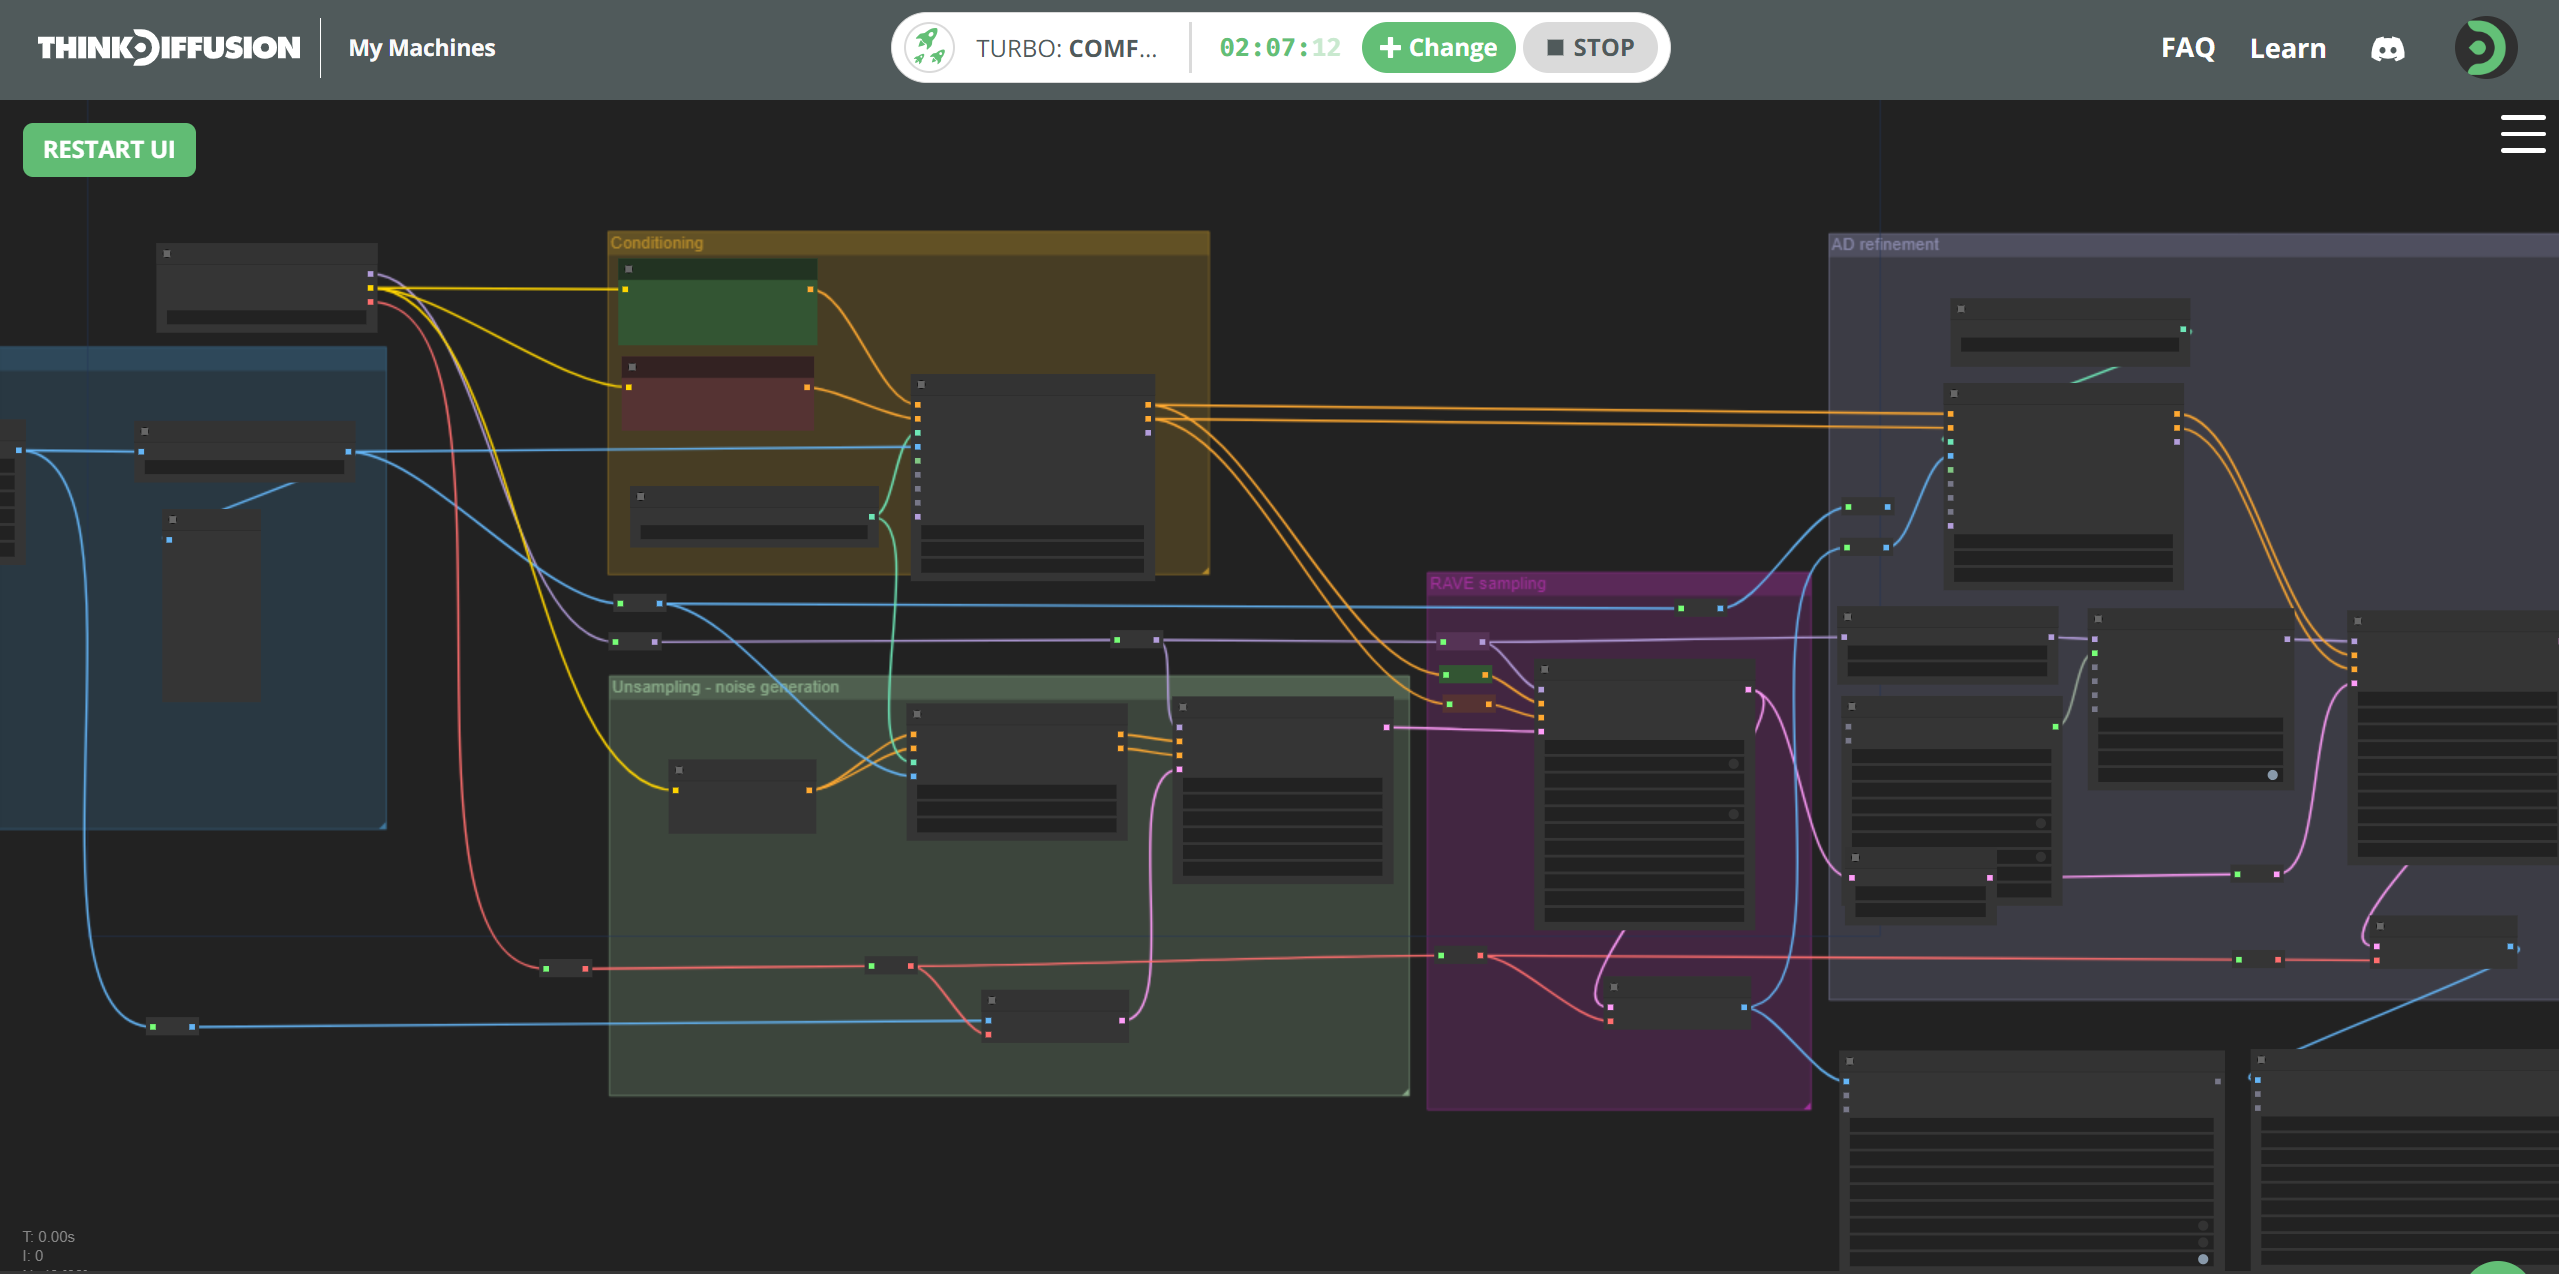
Phew! Now that the setup is complete, let's get creating with the ComfyUI RAVE workflow.
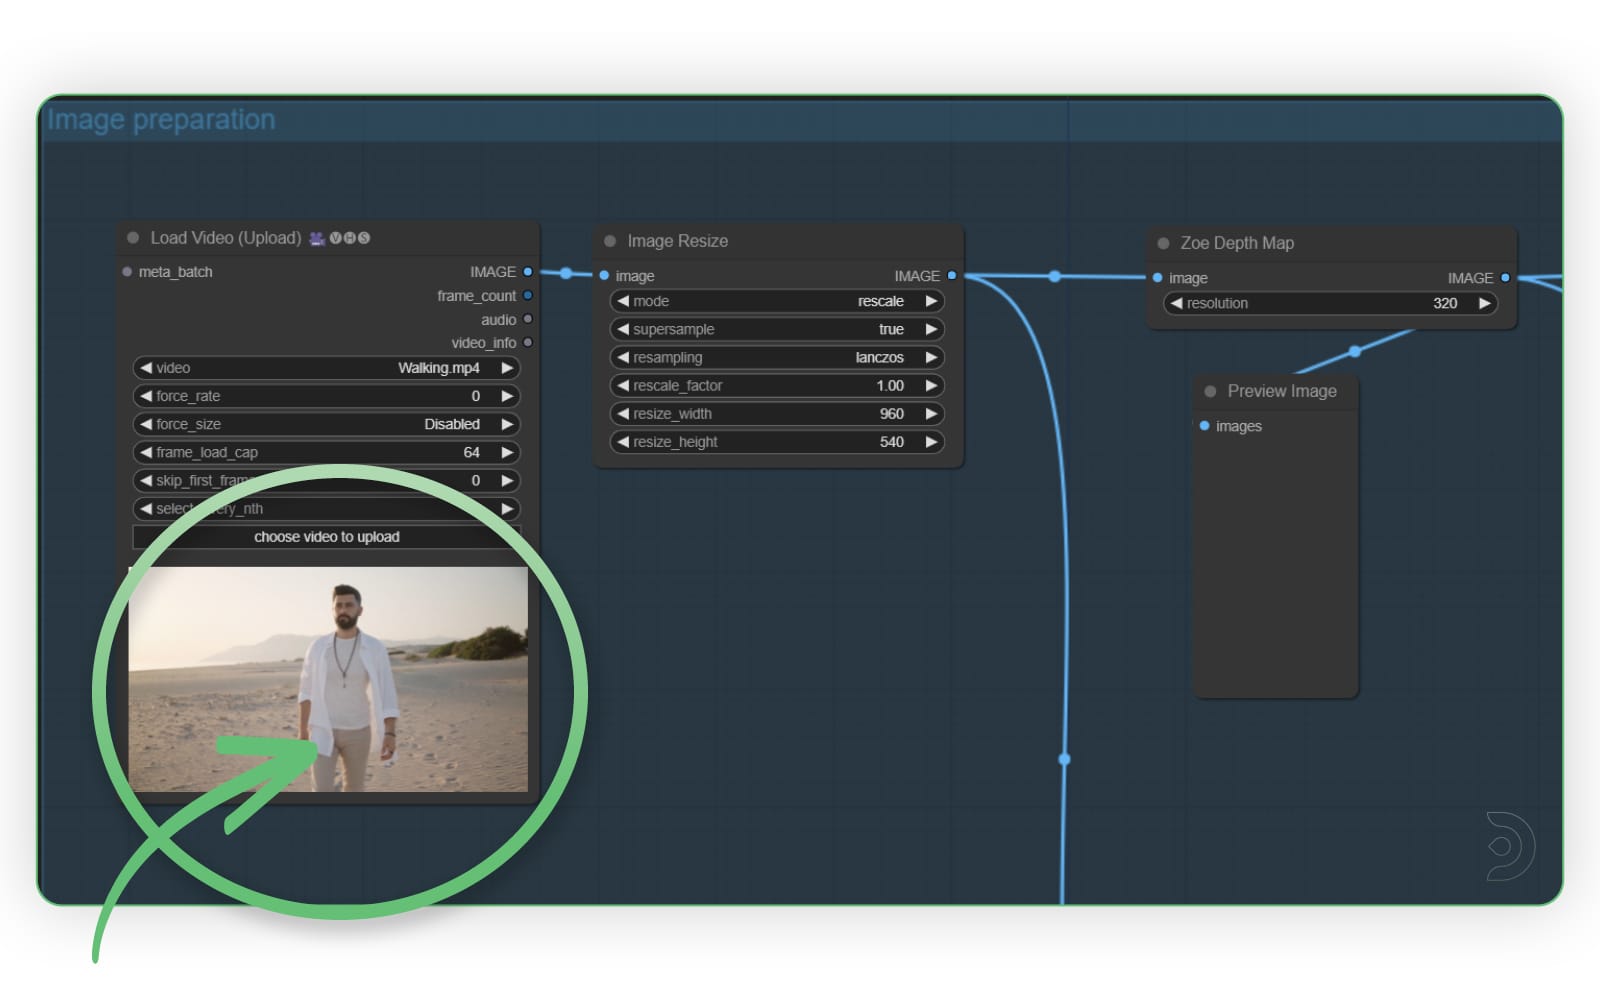
Image preparation section
Let's start with the Image preperation section. Here, you will need to upload your video into the Load Video (Upload) node. You can leave the other settings as the default.
I am using the following video as my input video (download here, also provided in the zip file above). To upload, simply click the choose video to upload button in the node.
TIP: When uploading via the node, your file will automatically be saved to your /comfyui/input folder. Next time you load the workflow, it will already find the file there. You can optionally upload there directly or organize into any subfolder under /comfyui/input. If you do upload it directly, remember to click ComfyUI's Refresh button so it shows up in the dropdown list.
Main Checkpoint Model
Let's set the main checkpoint/model. Above the Image Prepartion section is the Load Checkpoint node. I have selected realisticVision as my checkpoint model but feel free to choose any SD1.5 model you want to best achieve your desired style.

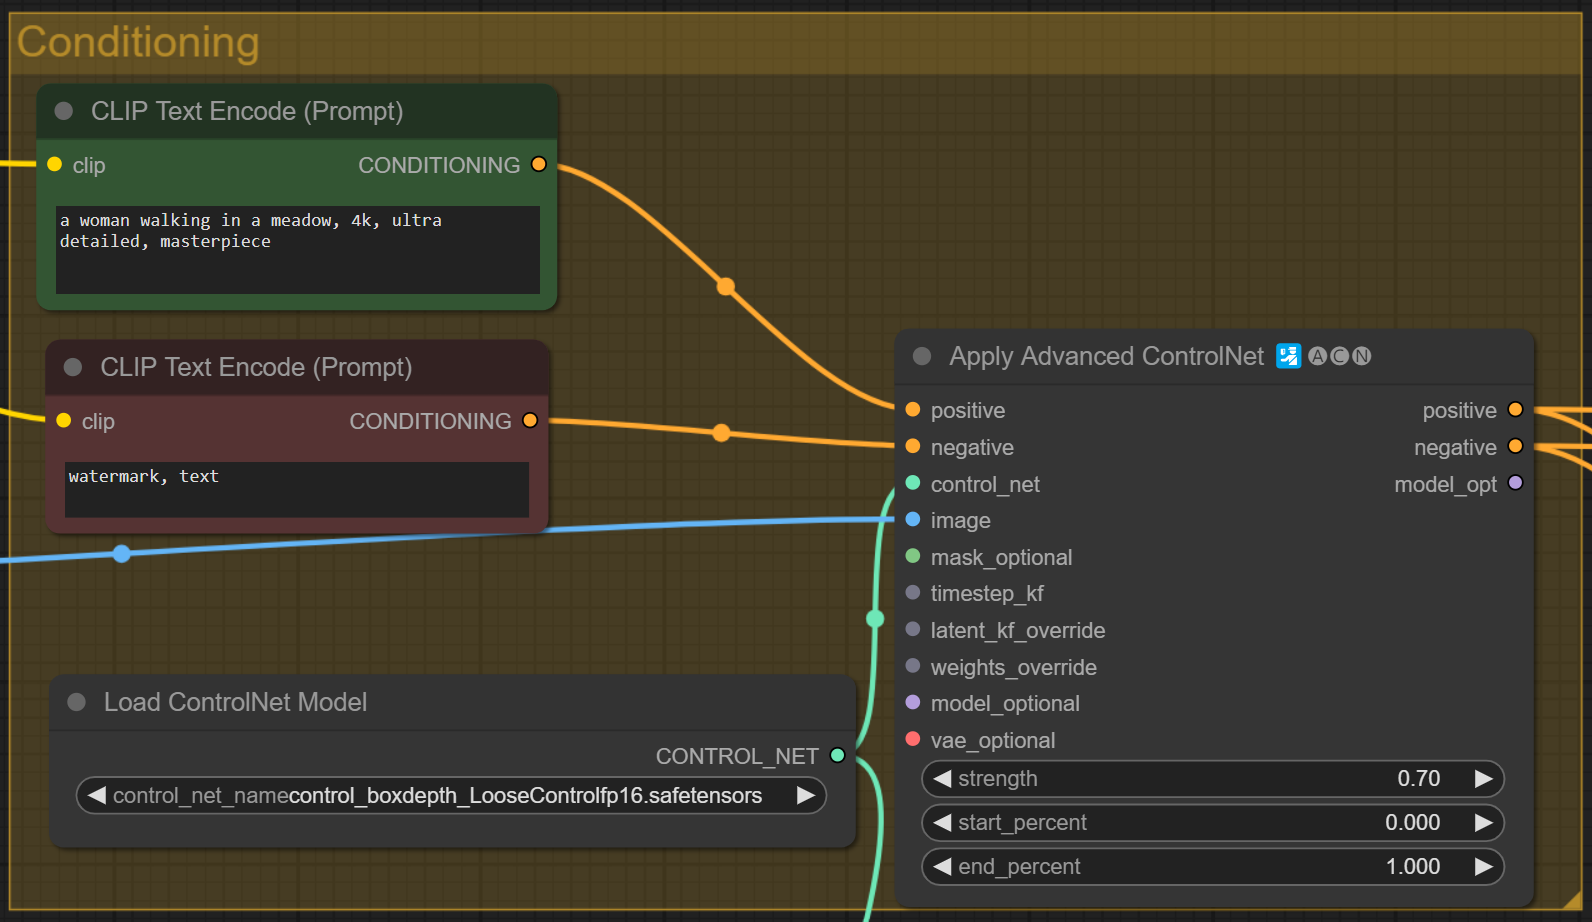
Conditioning Section
Within the Conditioning section
- Set your positive prompt in the green
CLIP Text Encode (Prompt)node. I have added the following positive prompt:
a woman walking in a meadow, 4k, ultra detailed, masterpiece - Set your negative prompt in the red
CLIP Text Encode (Prompt)node. I used:
watermark, text - In the
Load ControlNet Modelnode, select the Loose ControlNet model you installed above:control_boxdepth_LooseControlfp16.safetensors - You can leave
Apply Advanced ControlNetnode as is.
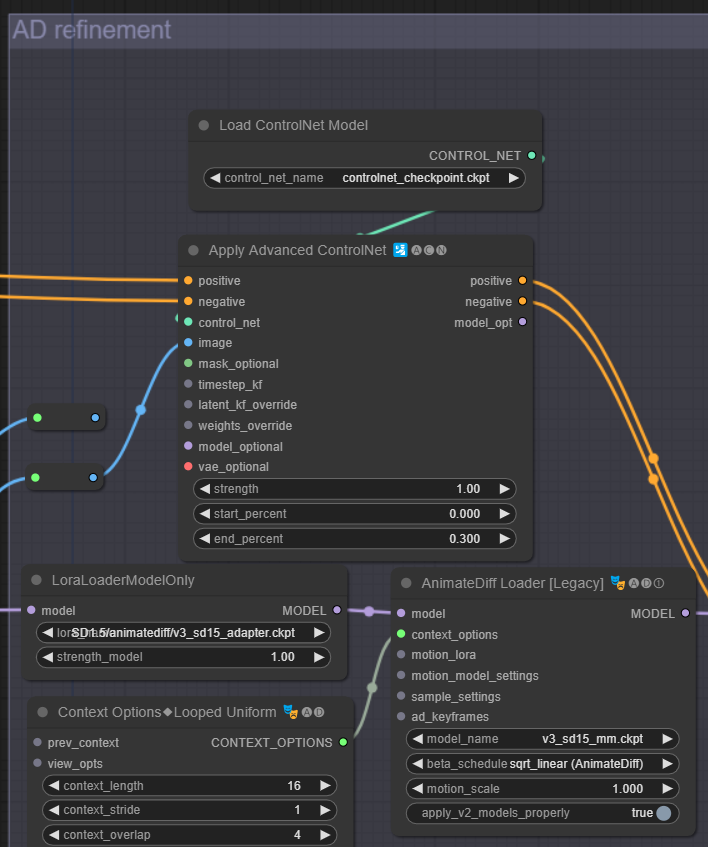
AD Refinement section
Within the AD Refinement section:
- In the
Load ControlNet Modelnode, select AnimateDiff ControlNet model uploaded above:controlnet_checkpoint.ckpt - In the
LoraLoaderModelOnlynode, select the AnimateDiff Adapter LoRA installed above:SD1.5/animatediff/v3_sd15_adapter.ckpt - In the
AnimateDiff Loader [Legacy]node, select the AnimateDiff Motion Model installed above:v3_sd15_mm.ckpt
The remaining values can be left as is but you can also adjust the number of steps and the cfg scale in the KSampler (Advanced) node to suit your workflow.
Let's Generate!
Now we can hit Queue Prompt to generate our video! Grab a coffee or your favorite drink as this workflow can take 10 minutes or so complete...
TIP: Is nothing happenning? Does the top progress bar shows (1) Running... in another tab? No worries. You might have previously installed an incorrect version of the rgthree custom node, which you need to remove. By the way, a working version of rgthree is already preinstalled on all ThinkDiffusion machines. To fix:
1. Remove your rgthree folder: /comfyui/custom_nodes/rgthree-comfy
2. RESTART Comfy UI and REFRESH your browser.
Transforming a subject character with the RAVE ComfyUI workflow
Let's run exactly the same settings as before but we will change our positive prompt to: gorilla walking on a road, 4k, ultra detailed, masterpiece
Transforming a subject character into a gorilla with the ComfyUI RAVE workflow
Pretty cool right?!
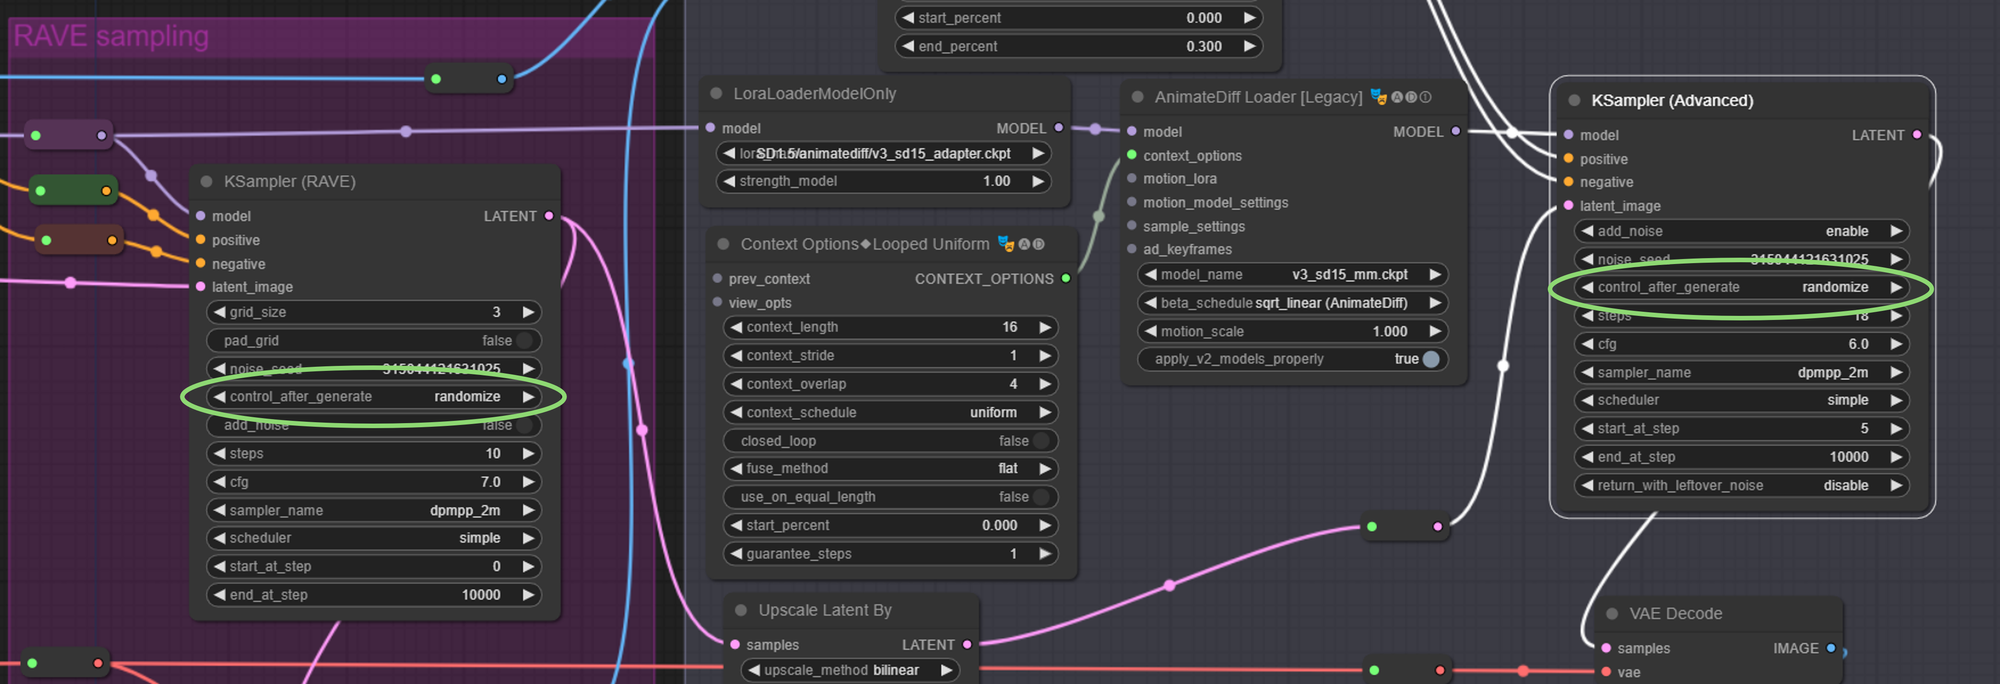
TIP: Get different results with the same prompt
If you want to have different results with the same prompt, then you will need to randomize your seed after each generation. Simply set control_after_generate=randomize in both your KSampler (Rave) and KSampler (Advanced) nodes.
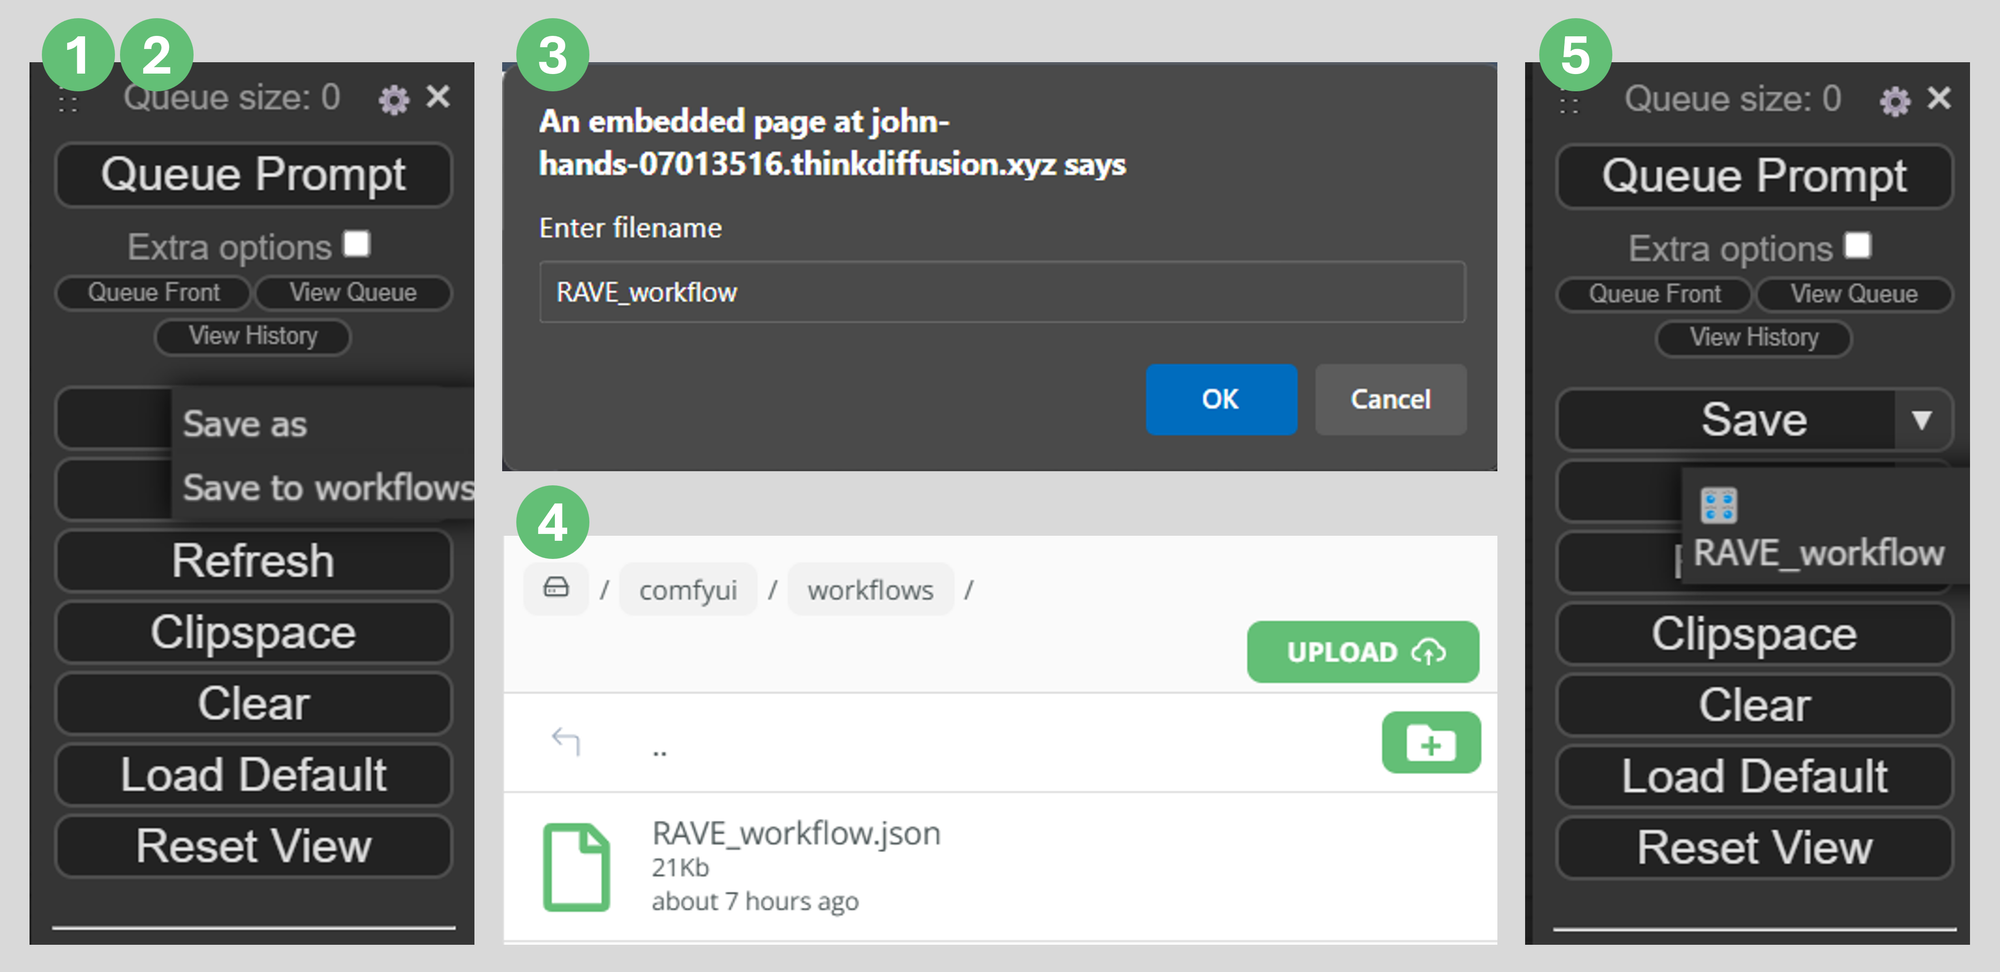
TIP: Save your workflow to your cloud storage
If you've made any changes, you can save your workflow to your cloud storage by using the dropdown option on ComfyUI's Save button:
- Click on ComfyUI's dropdown arrow on the
Savebutton - Click
Save to workflowsto save it to your cloud storage/comfyui/workflowsfolder. - Enter a file name. No need to include an extension, ComfyUi will save it as a
.jsonfile. - You can confirm your file is in your
/comfyui/workflowsfolder. - Now you can load your workflow using the dropdown arrow on ComfyUI's
Loadbutton.
More Examples
Transforming a subject character into an alien with the ComfyUI RAVE workflow
Transforming a subject character into a dinosaur with the ComfyUI RAVE workflow
Frequently asked questions
What is ComfyUI?
ComfyUI is a node based web application featuring a robust visual editor enabling users to configure Stable Diffusion pipelines effortlessly, without the need for coding.
What is AnimateDiff?
AnimateDiff operates in conjunction with a MotionAdapter checkpoint and a Stable Diffusion model checkpoint. The MotionAdapter comprises Motion Modules, which are tasked with integrating consistent motion throughout image frames. These modules come into play following the Resnet and Attention blocks within the Stable Diffusion UNet architecture.
What is ControlNet?
ControlNet encompasses a cluster of neural networks fine-tuned via Stable Diffusion, granting nuanced artistic and structural control in image generation. It enhances standard Stable Diffusion models by integrating task-specific conditions.
Can I use AnimateDiff with SDXL?
YES! AnimateDiff for SDXL is a motion module which is used with SDXL to create animations. It is made by the same people who made the SD 1.5 models
ComfyUI in the cloud
Any of our workflows including the above can run on a local version of SD but if you’re having issues with installation or slow hardware, you can try any of these workflows on a more powerful GPU in your browser with ThinkDiffusion.
If you’d like a way to enhance facial details, then check out my post on ComfyUI-FaceDetailer. And as always, have fun RAVING out there!

Member discussion